Preference (advanced), Volume setup sub-menu, Press the setup button to return to the main menu – Integra DTR-7.4 User Manual
Page 62
62
Preference (Advanced)
The “Preference” menu allows you to perform
miscellaneous settings for the DTR-7.4.
The illustrations used here represent the remote controller.
When you perform the procedures on the DTR-7.4, use
the corresponding buttons on the front panel.
This sub-menu allows you to make various settings con-
cerning the volume control of the DTR-7.4.
a. Volume Display
You can choose from two ways of displaying the volume
setting on the screen.
Absolute: This displays the volume with a minimum
of 0 for no sound and a maximum of 100. As a refer-
ence, the volume setting of Ref (82) is equivalent to
0 decibels for the relative display method.
Relative: This displays the volume as a decibel
value on a scale with a designated reference point
that is displayed as 0, which equals the volume set-
ting of 82 of the absolute display method. With this
display method, the minimum value is –
∞, the next
highest is –81, and the maximum value is +18.
b. Muting Level
This sets the attenuation level during playback when the
MUTING button is pressed on the remote controller.
This can be set to –
∞, or between –50 and –10 decibels
in 10 decibel increments.
c. Maximum Volume
This setting allows you to set the maximum volume that
can be output with the Master Volume dial. Setting a
maximum volume allows you to prevent components
from being damaged by excessively loud volumes. For
the absolute volume display method, this can be set
between 50 and 99. For the relative volume display
method, this can be set between –32 and +17 decibels.
To not set a maximum volume, select “Off.”
d. Power On Volume
This sets a designated volume to which the DTR-7.4 will
be set every time that the power is turned on. This pre-
vents the DTR-7.4 from suddenly outputting very loud
sounds if it is turned on while it is set to an extremely
high volume. For the absolute volume display method,
this can be set between 0 and 100. For the relative vol-
ume display method, this can be set to –
∞, or between
–81 and +18 decibels. To have the DTR-7.4 turned on
with its current volume setting, set this to “Last.”
1
Press the scroll wheel, and then press the
Setup button to display the main menu on
the monitor and front display.
When the “Basic Menu” is displayed, select
“
→Advanced Menu” using the and cursor
buttons and press the Enter button to display the
“Advanced Menu.”
2
Use the
and
cursor buttons to select
“4. Preference” and then press the Enter
button.
The “Preference” menu appears.
3
Use the
and
cursor buttons to select
an item and then press the Enter button.
4
Use the
and
cursor buttons to select
an item and then use the
and
cursor
buttons to set the desired value.
5
Press the Setup button to return to the
main menu.
--/---
@. - ' /
ABC
DEF
PQRS
TUV
WXYZ
GHI
JKL
MNO
TV CH
TV VOL
+10
0
1
2
3
4
5
6
7
8
9
+
-
+
-
Direct Tuning
Custom
Display
Dimmer
T V
Input
Sleep
Muting
T V
On
Standby
Audio
AD
J
Exit
Gu
ide
Random
Step / Slow
Rec
Clear
Input
To
p M
enu
Men
u
Set
up
Retu
rn
Zone 2
Input
Mode
Macro
CH
VOL
Disc
Enter
Master Volume
Tape
Tuner
Phono
Net Audio
CD
Video 1
VCR 1
Video 3
Video 2
VCR 2
Video 4
Video 5
DVD
)
N
)
D
A-FO RM Listening Mode Memory
Video 5 Input
Stereo
Direct / Pure Audio
DSP
Surround
THX
Clear
Rec Out
Zone 2
Of f
Setup
Tuning
Preset
Enter
Return
Dimmer
Display
S Video
Audio
Video
L
R
Memory
FM Mode
DTR-7.4
Digital
Setup
Enter
Setup
Enter
/
/
/
/
/
/
Scroll wheel
Advanced Menu
0.Hardware Setup
1.Speaker Setup
2.Input Setup
3.Audio Adjust
4.Preference
5.Network Setup
[ENTER]Quit:[SETUP]
→
Basic Menu
4.Preference
1.Volume Setup
2.Headphones Level
3.OSD Setup
4.OSD Position
[ENTER]Quit:[SETUP]
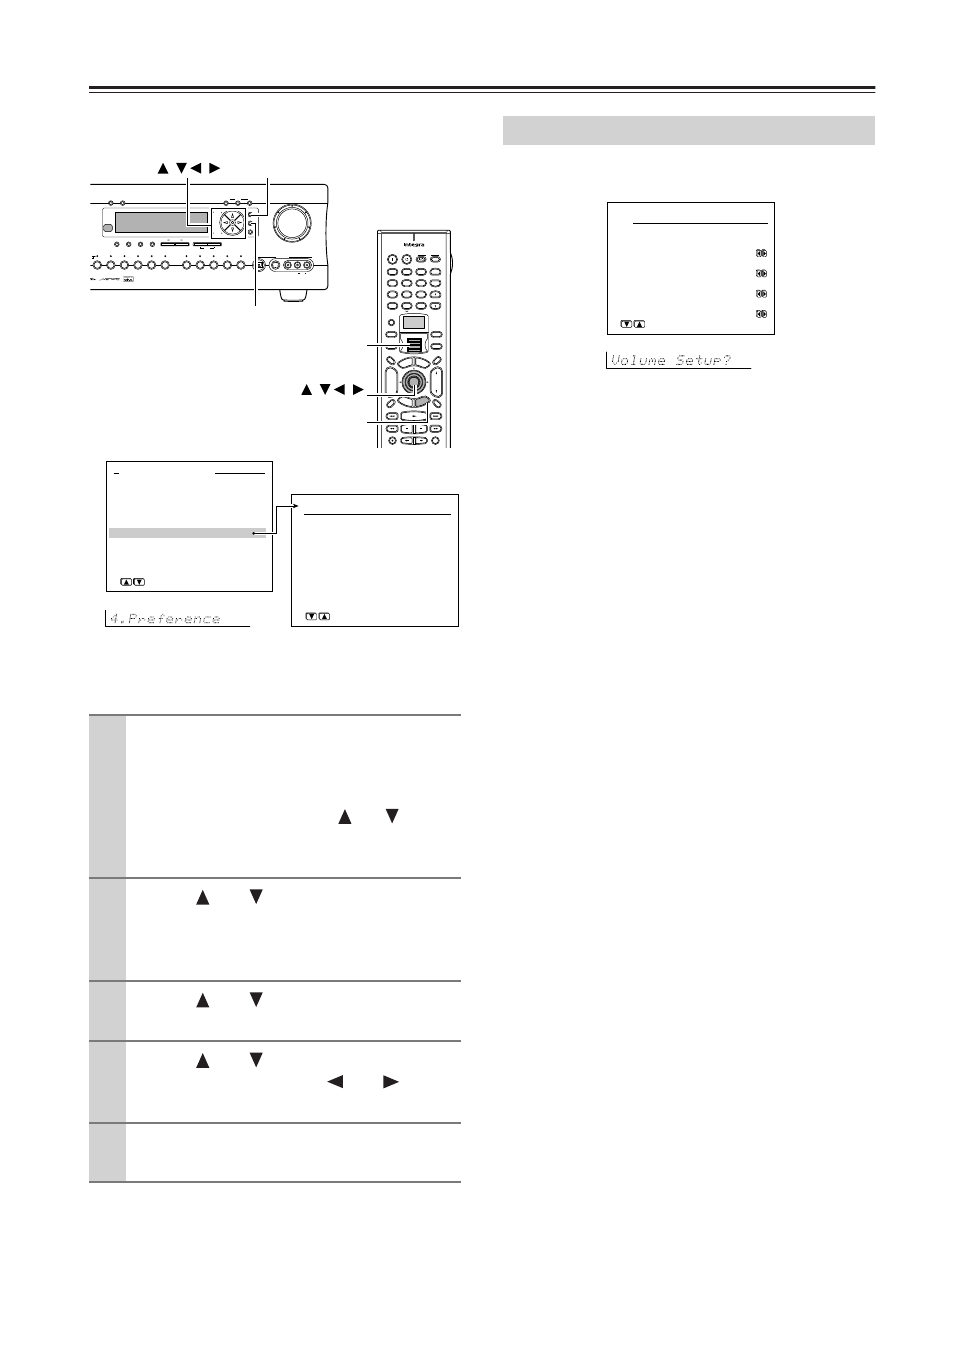
Volume Setup Sub-menu
4-1.Volume Setup
a.Volume Display
:Absolute
b.Muting Level
:-oodB
c.Maximum Volume
:Off
d.Power On Volume
:Last
Quit:[SETUP]