Input setup (advanced), Press the setup button to return to the main menu – Integra DTR-7.4 User Manual
Page 56
56
Input Setup (Advanced)
With the DTR-7.4, you can set a different listening mode
for each different signal type that comes from each input
source. For example, if your DVD player also plays com-
pact discs and the DVD video signal is Dolby Digital and
the compact disc signal is PCM, then you can set a differ-
ent listening mode for each.
This is especially convenient if you frequently play the
same types of movies or music.
Once the DTR-7.4 enters the standby state, the listening
mode returns to the mode set at “Listening Mode Preset,”
even after you changed the listening mode to a different
listening mode while playing.
The illustrations used here represent the remote control-
ler. When you perform the procedures on the DTR-7.4,
use the corresponding buttons on the front panel.
Configuring the Listening Modes You
Use Frequently
(Listening Mode Preset)
1
Press the Input button, and then roll the
scroll wheel to select the input source you
want to set.
--/---
@. - ' /
ABC
DEF
PQRS
TUV
WXYZ
GHI
JKL
MNO
TV CH
TV VOL
+10
0
1
2
3
4
5
6
7
8
9
+
-
+
-
Direct Tuning
Custom
Display
Dimmer
T V
Input
Sleep
Muting
T V
On
Standby
Audio
AD
J
Exit
Gu
ide
Random
Step / Slow
Rec
Clear
Input
To
p M
enu
Men
u
Set
up
Retu
rn
Zone 2
Input
Mode
Macro
CH
VOL
Disc
Enter
Master Volume
Tape
Tuner
Phono
Net Audio
CD
Video 1
VCR 1
Video 3
Video 2
VCR 2
Video 4
Video 5
DVD
)
N
)
D
A-FO RM Listening Mode Memory
Video 5 Input
Stereo
Direct / Pure Audio
DSP
Surround
THX
Clear
Rec Out
Zone 2
Of f
Setup
Tuning
Preset
Enter
Return
Dimmer
Display
S Video
Audio
Video
L
R
Memory
FM Mode
DTR-7.4
Digital
Setup
Enter
Input
Setup
Enter
/
/
/
/
/
/
Input source
buttons
Scroll wheel
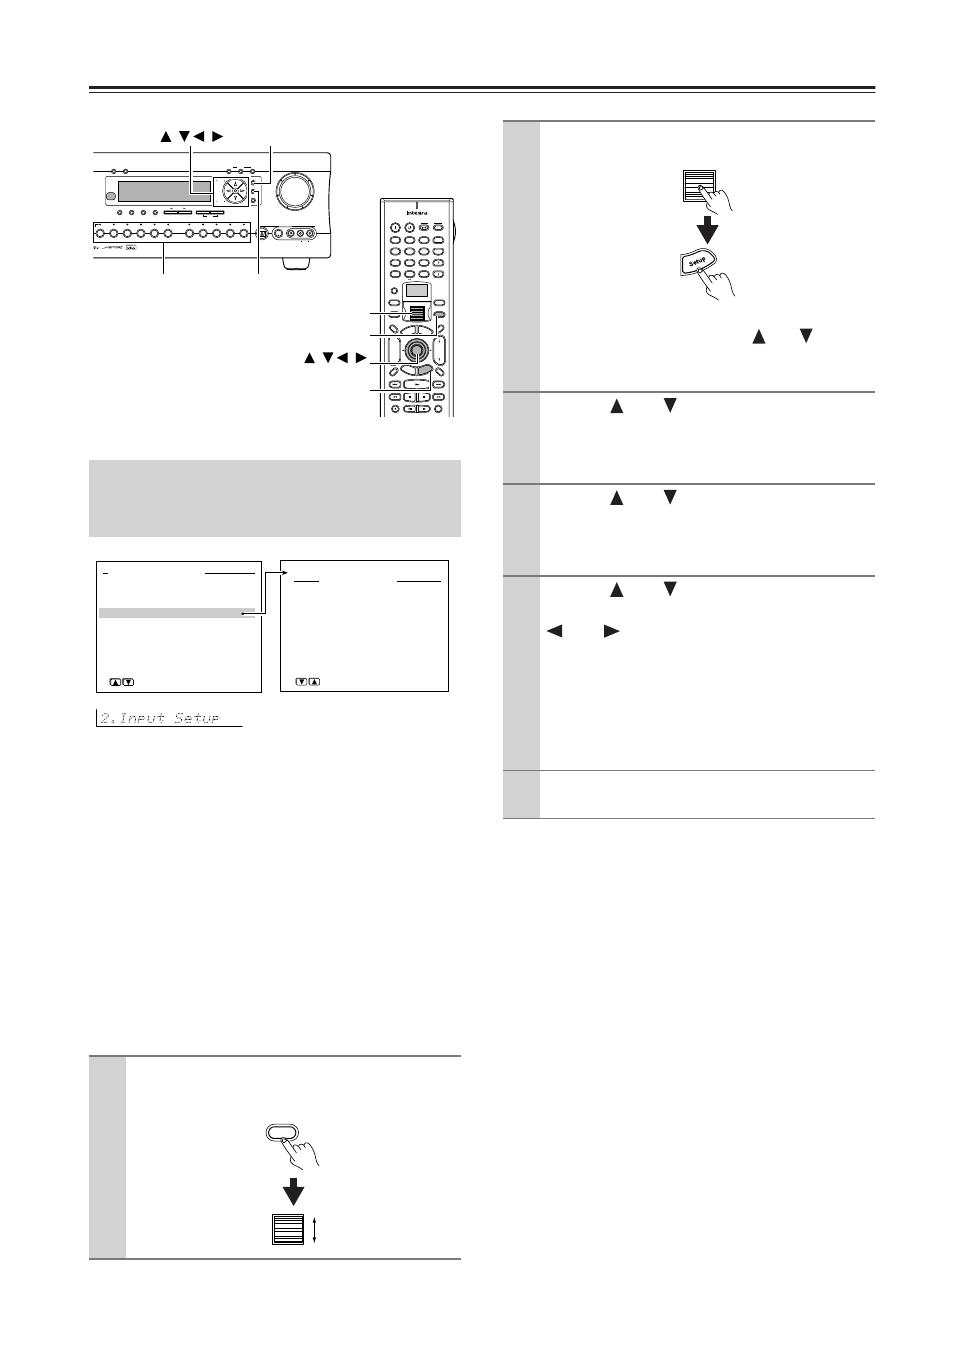
2.Input Setup
1.Digital Setup
2.Multichannel Setup
3.Video Setup
4.Character Input
5.IntelliVolume
6.Listening Mode Preset
7.12V Trigger
[ENTER]Quit:[SETUP]
Input:DVD
Advanced Menu
0.Hardware Setup
1.Speaker Setup
2.Input Setup
3.Audio Adjust
4.Preference
5.Network Setup
[ENTER]Quit:[SETUP]
→
Basic Menu
Input
2
Press the scroll wheel, and then press the
Setup button.
When the “Basic Menu” is displayed, select
“
→Advanced Menu” using the and cursor
buttons and press the Enter button to display the
“Advanced Menu.”
3
Use the
and
cursor buttons to select
“2. Input Setup” and then press the Enter
button.
The “Input Setup” menu appears.
4
Use the
and
cursor buttons to select
“Listening Mode Preset” and then press
the Enter button.
The “Listening Mode Preset” menu appears.
5
Use the
and
cursor buttons to select
an input source signals and then use the
and
cursor buttons to set the
desired listening modes.
• If you set “Last Valid” as the listening mode
preset, the last listening mode used for the cur-
rent input source type will be used automati-
cally when the same input source type is
selected to output next time.
6
Press the Setup button to return to the
main menu.