Donning – Millennium Enterprises GME-P100 User Manual
Page 14
2. Block off cartridge/canister inlet using
the palm of hand.
3. Inhale gently and hold breath for 10 sec-
onds. If the seal is good, the facepiece
will collapse and remain collapsed
against face. Remove hand and breathe
normally.
4. If the facepiece did not remain col-
lapsed during the test, or any leakage is
noticed, readjust straps and perform
Negative Pressure Seal Test again.
Note:
You may need to exhale sharply to
open the valve. If this does not release the
valve, do not use the facepiece.
This device may not seal properly with
your face if you have a beard, gross side-
burns or similar physical characteristics
(see ANSI Z88.2). An improper facial seal
may allow contaminants to leak into the
facepiece, reducing or eliminating respi-
ratory protection. Do not use this device
if such conditions exist. The negative
pressure seal test must be conducted
and passed before each use. Never
remove the facepiece except in a safe,
non-hazardous, non-toxic atmosphere.
Failure to follow this warning can result
in serious personal injury or death.
5. If this does not correct the leak, the
mask will not provide protection. If the
leakage is from the face seal, a different
size mask may provide a good seal. If
other than face seal leakage is detected,
the condition must be corrected before
performing another test.
DONNING THE BUTYL COATED NYLON
HOOD ACCESSORY
Ensure a complete Negative Pressure
Seal Test is conducted and passed.
Failure to follow this warning can result
in serious personal injury or death.
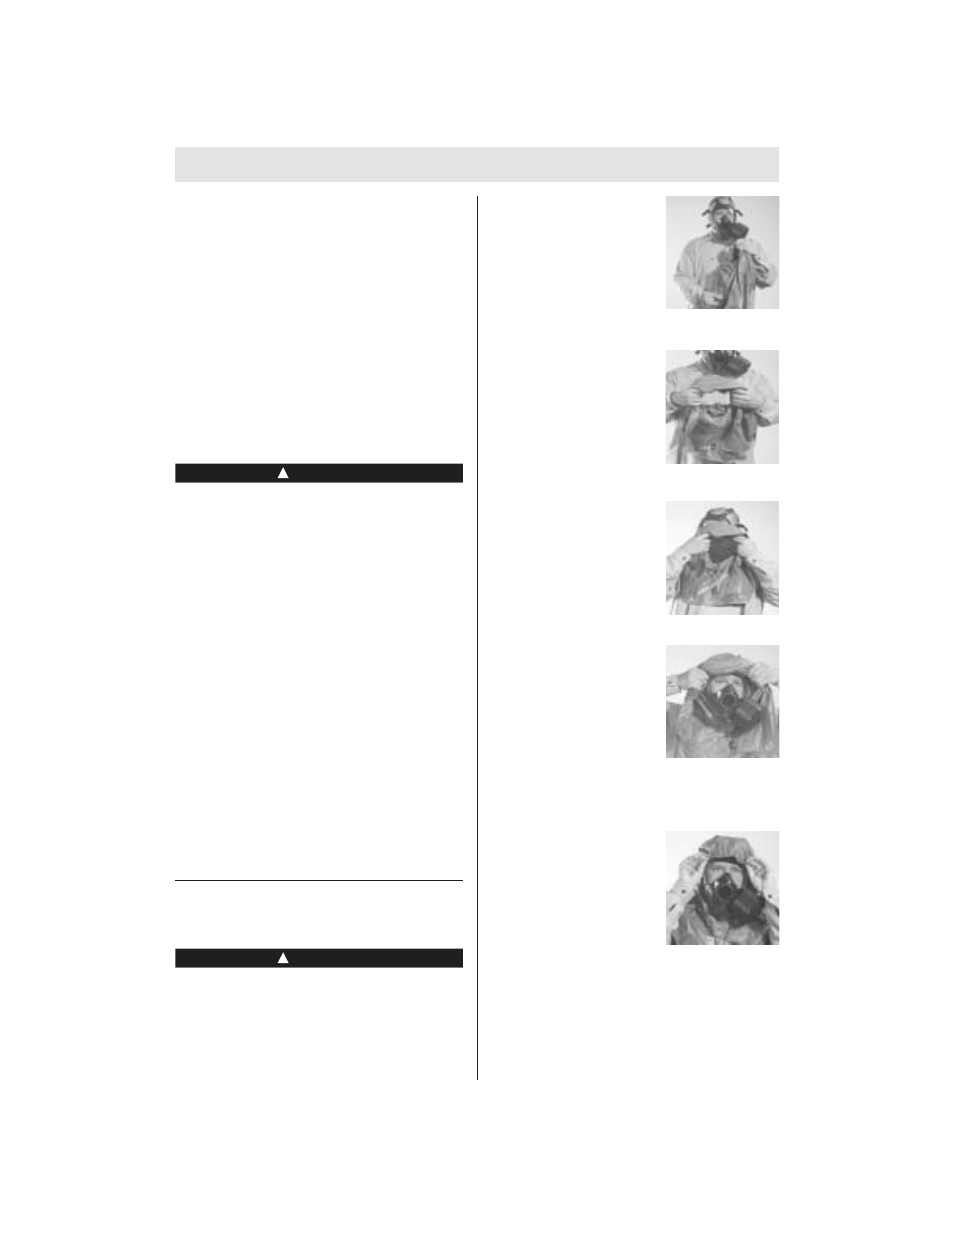
1. Position the hood so
that the lens opening
of the hood is facing
forward. Be sure that
the hood is right side
out with the draw-
string exposed on the
outside of the hood.
2. Fold the back panel of
the hood upward to
expose the inside of
the hood at the lens
opening. Next, in each
hand, grasp the sides
of the hood at the lens
opening.
3. Expand and slide the
lens opening of the
hood over the car-
tridge/canister com-
ponent. Ensure the
facepiece seal is
maintained.
4. Using both hands,
grasp the back panel
of the hood and pull it
over the facepiece
and head. The lens
opening of the hood
should coincide with
the lens opening of the facepiece. (Use
a buddy for assembly if situation
requires).
5. Carefully tuck the
elastic lens opening of
the hood around the
back of the facepiece
lens rings, component
housing assembly,
and applicable acces-
sory. The rain shield of the hood should
be uniformly over the upper lens ring of
the facepiece. The elastic lens opening
should be in contact with the rubber
surface of the facepiece. Be sure to
smooth out any wrinkles or folds that
might exist along the edge of the elastic.
TAL 403 (L) Rev. 4 - 430351
14
DONNING
WARNING
!
WARNING
!