Anode maintenance, Shut down for extended periods – GSW JWF307 User Manual
Page 15
– 15 –
• Black water can be an indication of organic contami-
nates in the water supply. This can be problematic in
areas where the water is obtained from surface or cont-
aminated sources. Organic particles can develop bacte-
rial growth, causing potential health hazards.
• Contact your water supplier for proper filtration or water
conditioning equipment.
• For bacterial problems contact your local health author-
ity. See also “Hot Water Odour”.
• A sudden appearance of rust-coloured water may indi-
cate that the anode(s) has been depleted. Once deplet-
ed, the anode’s inner steel core becomes exposed
causing it to corrode and release iron particles into the
water. See also “Anode Maintenance”.
Anode Maintenance
A new anode is about 20mm (13/16 in.) to 22mm (7/8 in.)
diameter and has a steel wire core approximately 3mm (1/8
in.) diameter in the center. If the anode is less than approx-
imately 10mm (3/8 in.) in diameter, or the inner steel core is
exposed, the anode(s) should be replaced. Operating a
water heater without an actively working anode(s) will void
the warranty.
To check/replace the anode:
1. Turn "OFF" the electrical supply to the water heater.
2. Close the cold water supply valve.
3. Open a nearby hot water faucet served by the system
to depressurize the system.
4. Connect a hose to the drain valve and drain 22 litres (6
USG.) as directed in “Draining, Flushing and Sediment
Removal”.
CAUTION!
The water being drained can be extremely
hot! The drain hose should be rated for at least 93
°
C
(200
°
F). If the drain hose does not have this rating, open the
cold water supply valve and a nearby hot water faucet
served by the system until the water flow is no longer hot.
Close the cold water supply valve and resume.
5. Remove the anode cover, or, on JWF657, Rear and
Combination flue models, remove top cover, insulation
and flue top cover.
NOTE: The anode(s) has been factory installed using a
power tool. It may be necessary for a second person to sta-
bilize the heater. A few sharp blows on the handle of the
socket wrench should loosen the anode nut. If an impact
wrench (power drive) is available, this is an easier way to
remove an anode.
6. Using a 1 1/16" socket (certain models require 1-5/16”)
, remove the anode(s) and inspect it. The surface may be
rough, full of pits and crevices, but this is normal. If it is
less than approximately 10mm (3/8 in.) in diameter, or
the inner steel core exposed, the anode(s) should be
replaced.
7. Apply Teflon® tape, or sealing compounds approved for
use with potable water, to the threads of the anode(s)
and install into the tank top.
8. Open the cold water supply valve and open a nearby hot
water faucet to purge air from the water tank as directed
in “Filling the Water Heater”.
9. Check for leaks. Repair as required, and re-test.
10.Replace the covers and insulation and turn the electrical
supply to the heater “ON”.
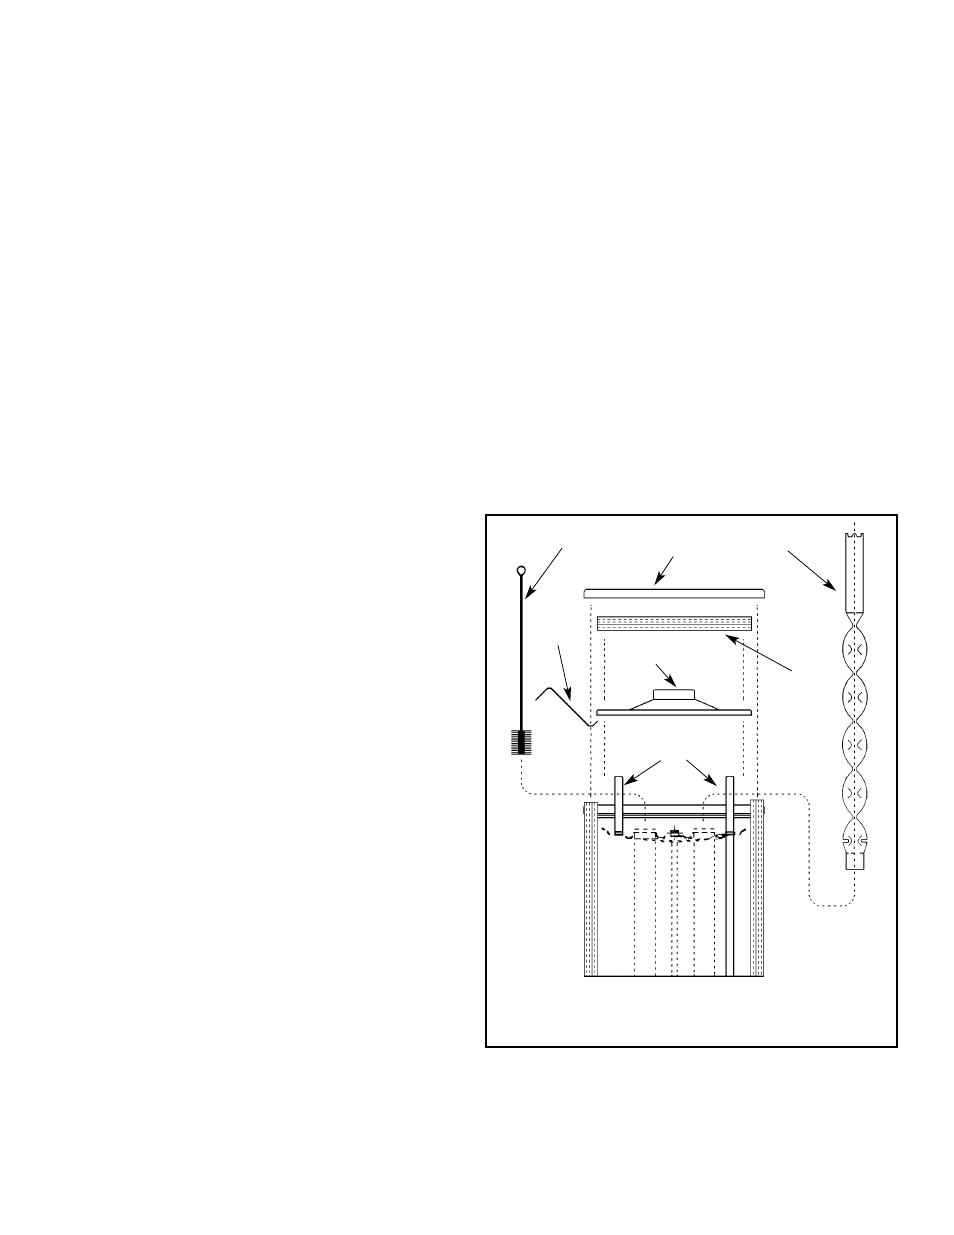
Cleaning Instructions, Flue Passages Of
The JWF657 Heater
Refer to Figure 13 for components of the heater.
1. Remove the casing top and lift if off completely. It is nec-
essary to disconnect the hot and cold water lines and
move them out of the way. Do not remove the nipples
from the tank.
2. Lift off the flue collector. The flue collector has a lip on
the outer edge which will allow a hook to grab the edge
to help lift it up.
3. Remove the flue baffles (4).
4. With a 76mm (3 in.) diameter wire brush, 1.2m (4 ft.)
long, remove any soot build-up which may be on the top
head or inside the flue collector.
5. Reassemble in reverse order. It may be necessary to
replace the gaskets around the nipples to seal them at
the flue collector. Replace the insulation and the casing
top.
6. Reconnect the plumbing lines.
Shut Down For Extended Periods
ALWAYS KEEP THE FUEL SUPPLY VALVE SHUT OFF IF
THE BURNER IS SHUT DOWN FOR AN EXTENDED
PERIOD OF TIME.
When away for extended periods of time such as vacation,
and no freezing temperatures are expected:
Figure 13 CLEANING FLUE PASSAGES OF THE
JWF657 HEATER
CASING TOP
FLUE
COLLECTOR
WIRE BRUSH
INSULATION
NIPPLES
HOOK
BAFFLE