Chapter1 preparing the scanner, 1 checking the contents of the scanner package, 2 names of parts – FUJITSU fi-5900C User Manual
Page 9: Chapter1, Preparing the scanner, Front side ■ rear side, Fi-5900c image scanner getting started
fi-5900C Image Scanner Getting Started
1
Chapter1
PREPARING THE SCANNER
1.1 Checking the Contents of
the Scanner Package
When you unpack the scanner package, make sure that
the package contains all the parts on the list included in
the package.
If any parts are missing or defective, contact your scan-
ner dealer or an authorized FUJITSU scanner service
provider. Handle the scanner and accessories with care.
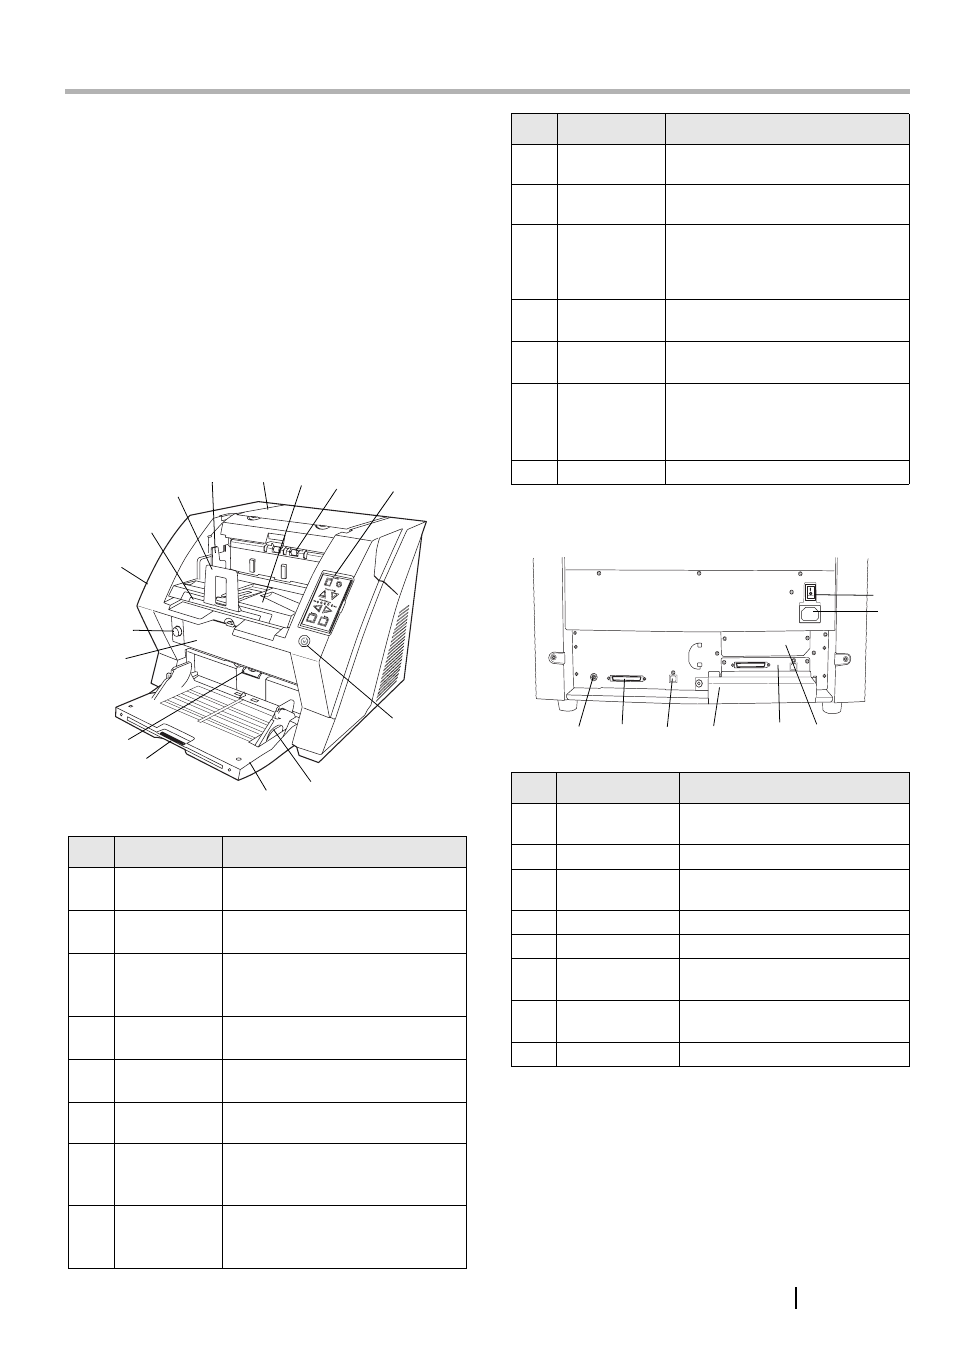
1.2 Names of Parts
This section describes the names of parts.
■ Front side
■ Rear side
No.
Name
Function
1
Stopper
Prevents ejected documents from
dropping off the scanner.
2
Stacker side
guide
For aligning ejected documents to
a certain width.
3
Top cover
Cover to access the consumables
storage box and Post Imprinter
option (sold separately).
4
Stacker
Area where ejected paper collects
after scanning.
5
Ejector
For ejecting the documents after
scanning.
6
Operator
panel
For operating the scanner.
7
Stacker
extension
For scanning long documents. Pull
the extension out according to the
document’s length.
8
ADF cover
Opens the cover for cleaning the
inner parts of the ADF or for
replacing consumables.
1
2
3
4
5
6
7
8
9
10
11
12
13
14
15
9
ADF cover
open button
Button used to open the ADF
10
Pre-imprinter
cover
For the Pre-Imprinter option
11
ADF
(Automatic
document
feeder)
The documents loaded onto the
Hopper will be fed sheet by sheet
for scanning.
12
Hopper
extension
Pulls the Hopper extension out for
loading long documents.
13
Hopper
Documents to be scanned are
loaded onto the Hopper.
14
Hopper side
guides
Sheet Guides used to make sure
that the paper to be scanned is fed
into the scanner straight, avoiding
skew.
15
Power button
Switches the scanner ON&OFF.
No.
Name
Function
1
Main power
switch
For switching the power support
ON/OFF.
2
Power inlet
For connecting the AC cable.
3
SCSI ID Switch
Sets the scanner’s SCSI ID with
this switch.
4
SCSI connector
For connecting the SCSI cable.
5
USB connector
For connecting the USB cable.
6
Extended mem-
ory slot
For connecting an extension
memory (sold separately).
7
VRS slot
The VRS board has been
installed
8
Extended slot
A spare slot for an option board
No.
Name
Function
1
2
3
4
5
6
7
8