Warning, Assembly 2 – Fisher-Price TRAIL RAIDER R1502 User Manual
Page 9
R1502b-0920
3
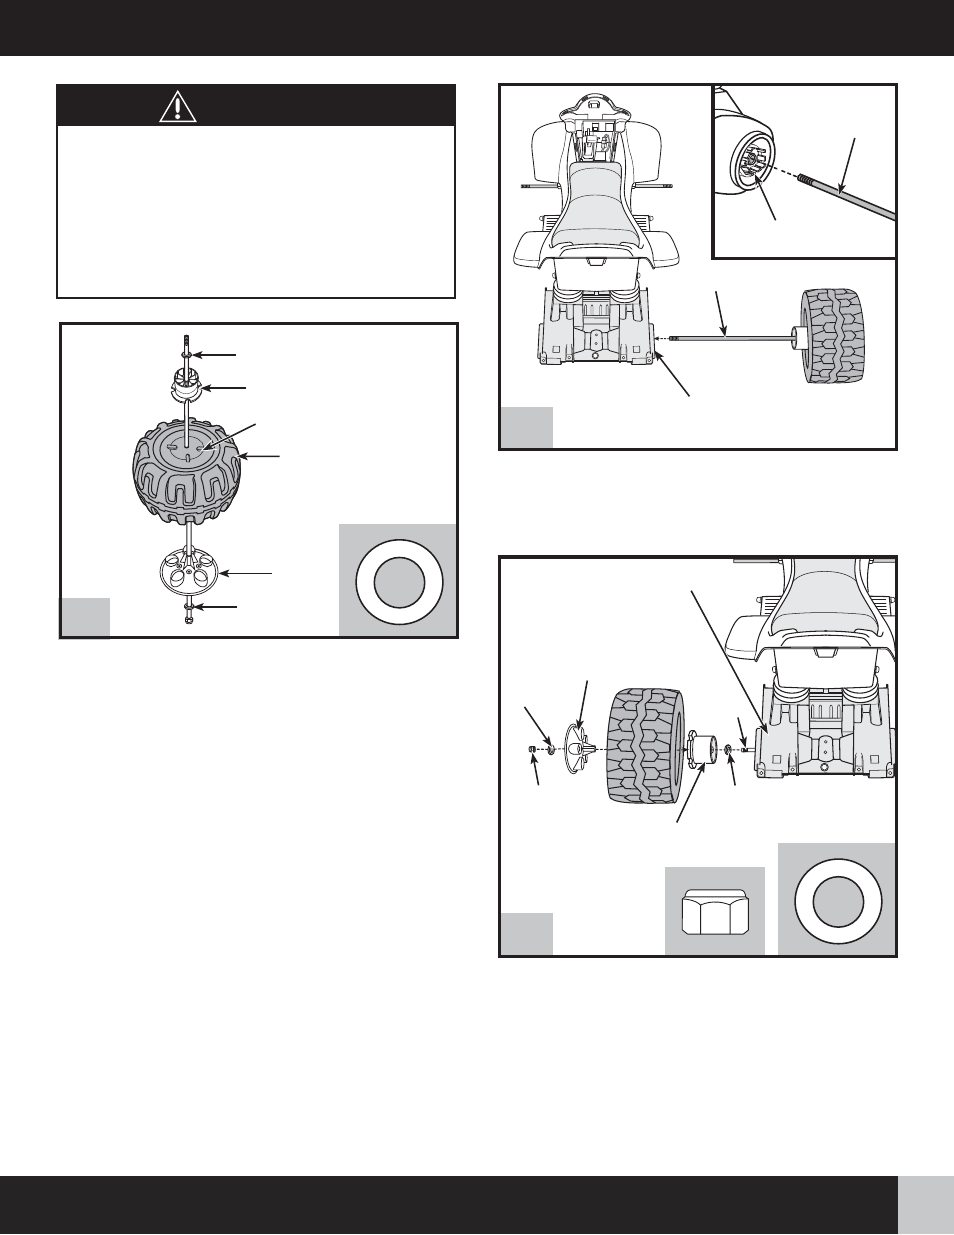
• Slide a
7
/
16
" washer onto the rear axle.
• Slide a hubcap, indented side down, onto the rear axle.
• Slide a wheel onto the rear axle. Make sure the ribs on the
wheel face up.
• Slide a rear wheel driver, ring side down, onto the rear axle.
Fit the grooves on the rear wheel driver onto the ribs on the wheel.
• Slide another
7
/
16
" washer onto the rear axle.
• Position the vehicle upright. Face the back end of the vehicle.
• Slide the rear axle assembly into the hole in the opposite side
of the motor assembly. Make sure the rear wheel driver on the
rear axle assembly fits onto the pins in the motor assembly.
Children can be harmed by small parts,
sharp edges and sharp points in the vehicle's
unassembled state, or by electrical items.
Care should be taken in unpacking and
assembly of the vehicle. Children should
not handle parts, including the battery,
or help in assembly of the vehicle.
WARNING
9
ASSEMBLY
2
R1502b-0920
1
• Slide a
7
/
16
" washer onto the rear axle.
• Slide the rear wheel driver onto the rear axle. Make sure the
rear wheel driver fits onto the pins in the motor assembly.
• Slide a wheel onto the rear axle. Make sure the ribs on the
wheel fit into the grooves on the rear wheel driver.
• Slide a hubcap, indented side out, onto the rear axle.
• Slide a
7
/
16
" washer onto the rear axle.
• Fit a
3
/
16
" -16 lock nut on the end of the rear axle and hand tighten.
Rear Axle Assembly
Rear Axle
Motor Assembly Pins
Motor Assembly
Hubcap
Rib
Wheel
Rear Wheel Driver
7
/
16
" Washer
7
/
16
" Washer
Rear Wheel
Driver
Motor Assembly
7
/
16
" Washer
Hubcap
Rear Axle
7
/
16
"
Washer
Lock Nut