Step #4 – Kenyon Mediterranean Series 24 Inch Electric Cooktop Owners Manual User Manual
Page 7
Allow a 2” minimum clearance between the bottom of the metal pan of the cooktop and any combustible surface located
below, ie: the upper edge of a drawer installed below the cooktop (see Fig. B on previous page). Failure to provide proper
clearances and ventilation may result in a fire hazard.
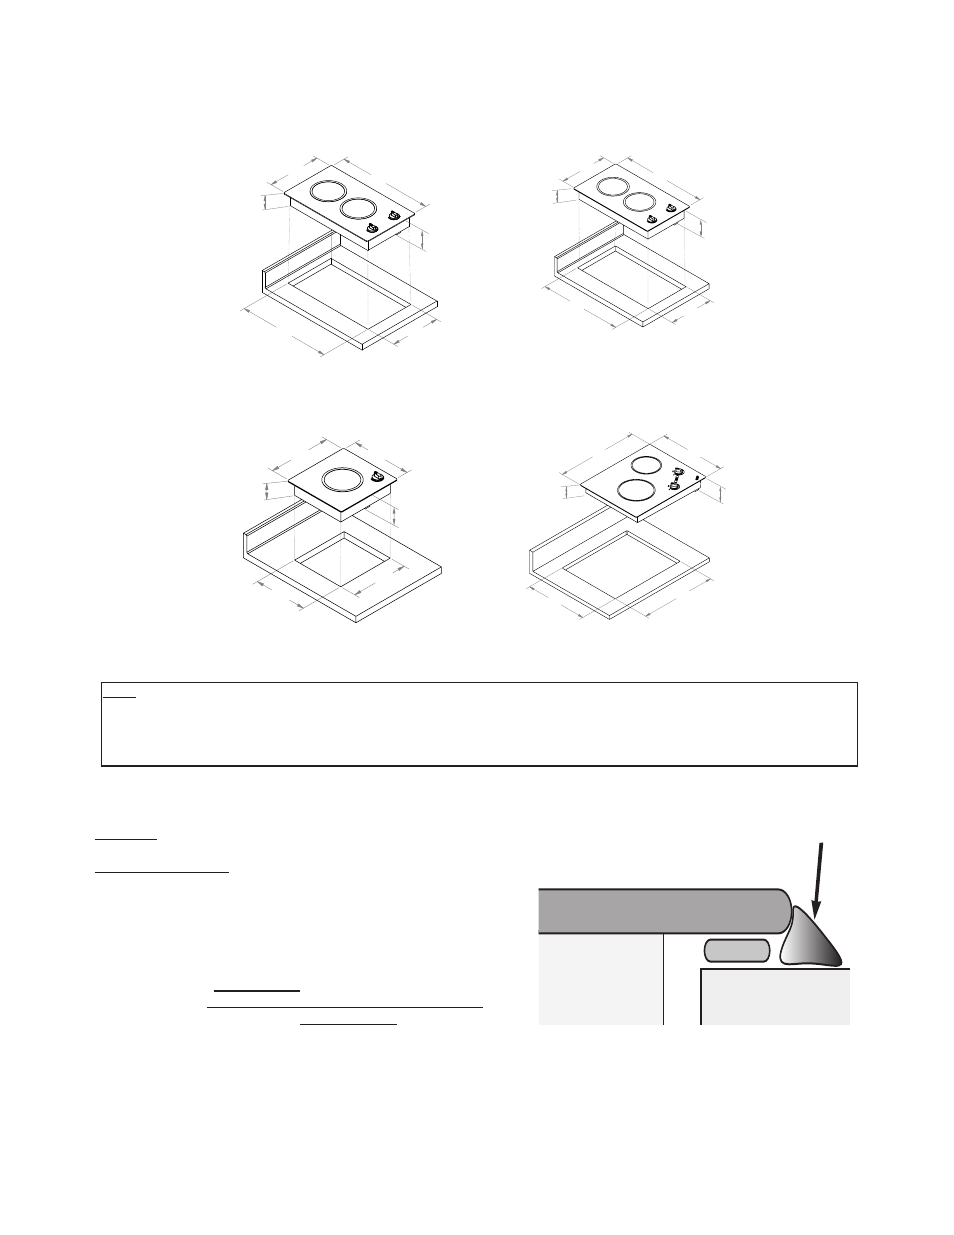
Cooktop dimensions and countertop cutout dimensions for each model are shown below:
Note:
When making countertop,
radius
the corner of the cutout (1/4” radius is typical). This will prevent cracking of
the countertop. Follow the countertop manufacturer’s instructions regarding the minimum corner radius and
reinforcement of corners.
12"
12 1/2"
10 3/4"
11 1/2"
2 5/8"
Models: MED1, CAR1, ALP1, CORT1
3 1/4"
23 1/4"
14 1/4"
21 3/4"
12 3/4"
Models: MED2, ALP2LG
3 1/4"
2 5/8"
12"
21"
10 3/4"
20"
Models: MED2TL, CAR2, ALP2SM, CORT2
3 1/4"
2 5/8"
4
19 1/2"
16"
17"
21"
2 3/4"
Models: ARCTIC2, ANTARCTIC2 & GLACIER2
2 3/4"
3 1/4"
STEP #4
Installing the Cooktop
The cooktop is supplied with two metal mounting brackets.
These brackets are designed to hold the cooktop firmly in place.
The cooktop does not have a metal frame and should be sealed
to the countertop.
Use a soft bedding compound that will
prevent damage if later removal for service is necessary.
We recommend a nonadhesive type of sealant, such as
plumber’s putty,
maximum compressed thickness of 1/16”.
Silicone may be used to seal the glass edge only, if desired.
silicone to seal the
glass edge if desired
counter top
glass panel
putty strip
- Cortez Series 12 Inch Electric Cooktop Owner's Manual Glacier Series 21 Inch Electric Cooktop Owner's Manual Polar Series 21 Inch Electric Cooktop Owners Manual Alpine Series 12 Inch Electric Cooktop Owners Manual Alpine Series 21 Inch Electric Cooktop Owners Manual Alpine Series 24 Inch Electric Cooktop Owners Manual Caribbean Series 12 Inch Electric Cooktop Owner's Manual