Press the
Optic S1 Secondary Unit Setting
In M manual flash mode, press the
Optic S2 Secondary Unit Setting
● S1 and S2 optic triggering is only available in M manual flash mode.
Display Flash Duration
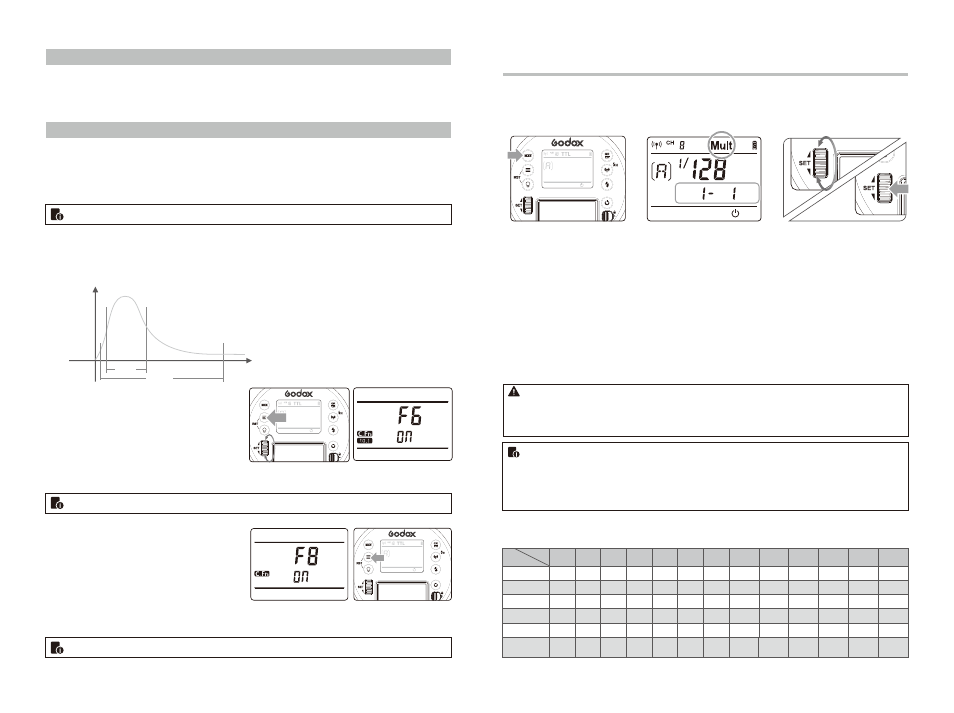
Flash duration refers to the length of time that from flash’s firing to reach the half peak at maximum. The half peak at maximum is usually expressed as t=0.5. In order to provide the photographer with more concrete data, this product adopts t=0.1. The difference between t=0.5 and t=0.1 is shown in the following picture.
With stroboscopic flash, a rapid series of flashes is fired. It can be used to capture a multiple images of a moving subject in a single photograph.You can set the firing frequency (number of flashes per sec. expressed as Hz), the number of flashes, and the flash output.
Press button so
1
that is displayed.
Calculating the Shutter Speed
During stroboscopic flash, the shutter remains open until the firing stops. Use the formula below to calculate the shutter speed and set it with the camera.
Number of Flashes / Flash Frequency = Shutter Speed
For example, if the number of flashes is 10 and the firing frequency is 5 Hz, the shutter speed should be at least 2 seconds.
To Avoid overheating and deteriorating the flash head, do not use stroboscopic flash more than 10 times in succession. After 10 times, allow the camera flash to rest for at least 15 minutes. If you try to use the stroboscopic flash more than 10 times in succession, the firing might stop automatically to protect the flash head. If this happens, allow at least 15 minutes' rest for the camera flash.
● Stroboscopic flash is most effective with a highly reflective subject against a dark background.● Using a tripod and a remote control is recommended.● A flash output of 1/1 and 1/2 cannot be set for stroboscopic flash.● Stroboscopic flash can be used with“buLb”.● If the number of flashes is displayed as “--”, the firing will continue until the shutter closes or the battery is exhausted. The number of flashes will be limited as shown by the following table.
Maximum Stroboscopic Flashes:
7
14
30
60
90
2
6
3
5
12
4
10
20
50
80
8
6-7
40
70
8-9
Flash Output
Hz
11
12-14
15-19
18
35
20-50
16
60-99
Flash Mode
— Multi: Stroboscopic Flash
Display Flash Duration Operation:
1. Press the
function.
2. Adjust the Select Dial to F6, the t0.1 icon
will be displayed on the VA panel.
3. Press button to enter the
adjustment condition.
4. Turn the Select Dial to choose the ON/OFF.
● The flash duration will only be displayed on the VA panel in M mode.
A
t
%
=
0
.
Turn the Select Dial to
choose a desired flash output.
Set the flash frequency and flash
times.
●
Press < SET > button to select
the flash frequency. Turn the Select Dial to set the number. ● Press < SET > button to select the flash times. Turn the Select Dial to set the number. ● After finish the setting, press button and all the settings will be displayed.
Stable Color Temperature Function
When use this function, the color temperature changes within ±100K over the entire power range: enter MENU C.Fn-08 and set it as ON, which means the color temperature function is turned on. When adjusting the power output from high to low in M mode, Flash Ready Indicator will blink (the beeper will alarm for 1 minute). Now press the Test Button to discharge, and the flash can be used as normal.
1/4
1/8
1/16
1/32
1/64
1/1281/256
● This function can only be supported in M non-high-speed mode.
0 1
©
- 33 -
- 34 -