Gardner Bender CP10K Cable Puller User Manual
Page 7
7
CAUTION: There are no set-up conditions that the rope
should pass through Boom-B.
FAILURE TO OBSERVE THESE CAUTIONS MAY RESULT IN
SEVERE INJURY OR DEATH
9.3 PULLING SIDEWAYS
1. Start by following steps 1 through 8 as described in PULLING
UPWARD.
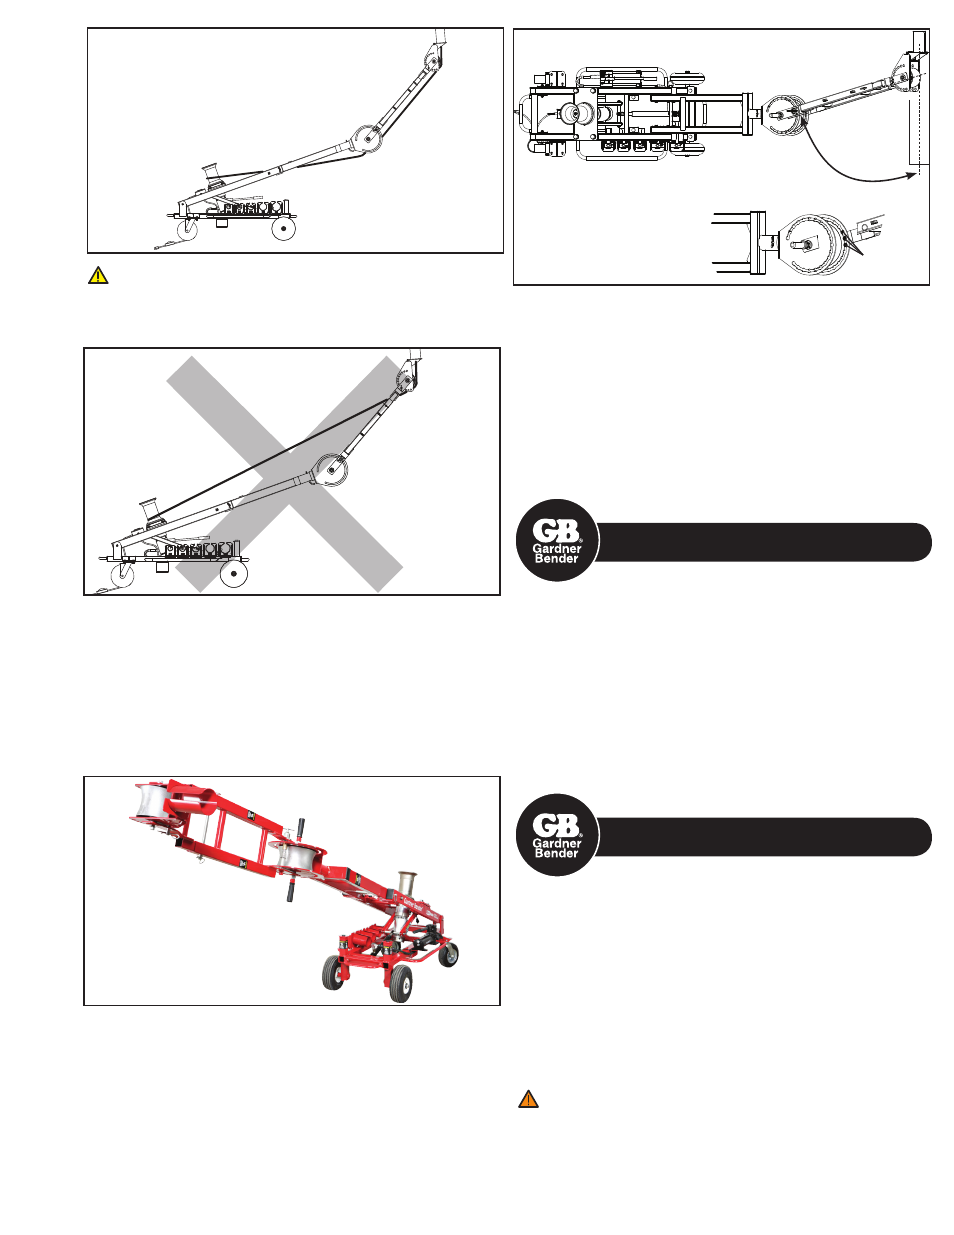
2. To set up the machine for sideways pulling, Boom-B has to be
rotated 90 degrees at the Pull Orientation Pivot (Part 14).
3. Remove the Pull Orientation Pin. (See Picture 6)
4. Rotate Pulley-A Housing and Boom-B together 90 degrees.
(See Picture 8)
5. Replace and secure the Pull Orientation Pin.
6. Remove Pulley-B Housing Lock Pin and temporarily store it in
the side clips of Boom-B. You will re-install it after engaging
the Conduit Adaptor with the conduit opening.
7. Make preliminary adjustments to position the Main Boom,
Boom-A and Boom-B for a sideways pull to assure that rope
will contact both pulleys.
8. Release the brakes on the casters and re-position the machine
perpendicular to the conduit wall.
9. Adjust Boom-B angle for sideways pulling. Use one of the 3 holes
on Pulley-A Housing shown above to minimize the load on the
boom structure.
10. Make final adjustments until the Conduit Adapter is properly
inserted inside of the conduit.
• The Main Boom angle can be increased by pumping
the Hydraulic Pump. The angle can be reduced by
slowly opening the pump valve.
!! Use Caution !!
• The angle of Boom-B, the length of Boom-B, and the
Pulley-B Housing angle can be adjusted as needed.
11. Install the Pulley-B Housing Lock Pin to secure the pulley housing.
1. A small pull angle is better than a large pull angle as it places less
stress on the cable being pulled.
2. If the rope is not contacting both rollers, then the set-up is wrong.
3. If the rope passes through Boom-B or Boom-B Extensions, then
the set-up is wrong.
4. If the rope is rubbing on the Boom-Structure or the Conduit
Adaptor, then the set-up is wrong.
5. The only time that the rope should rub a non-pulley surface is
in the set-up for a downward pull. In this case, the rope might
contact the Boom-A Lock Pin. This is okay as the lock pin has a
smooth, round outer surface.
1. Set-up the machine.
READ 9.0 SETTING UP THE MACHINE.
2. Route the rope from the conduit opening, across both pulleys, to
the Capstan.
READ 10.0 ROPE PATH GUIDELINES.
3. Wrap the rope around the Capstan counter-clockwise from the top.
Use 3 to 4 wraps minimum and additional wraps for heavy pulls.
Six to eight feet of rope should be free for the start of a pull.
4. Set-up the Footswitch. Plug the cord from the machine’s pull
Meter Box into the Footswitch cord receptacle. Make certain that
the switch on the meter box is set to OFF. Plug the Footswitch
plug into a 115V 3-prong grounded socket or extension cord
receptacle.
READ EXTENSION CORD WIRE GAUGE GUIDE.
WARNING: DO NOT CONNECT THE MACHINE'S CORD
DIRECTLY TO A POWER SOURCE. The machine must be
activated only with the Footswitch.
FAILURE TO OBSERVE THESE WARNINGS COULD RESULT IN
SEVERE INJURY OR DEATH
Picture 8
10.0 ROPE PATH GENERAL
GUIDELINES (All Set-ups)
11.0 OPERATING INSTRUCTIONS
PULL
ANGLE
Looking Down from Above
Use one of
3 holes
PULLING DOWNWARD
Ropes must contact both pulleys.
Rope should not pass through
Boom-B.