2 marks/waypoints list, Edit, Find – Standard Horizon CP500 User Manual
Page 43: Locate, Marks/waypoints list, Personal computer, Receive, Creating/modify a new mark in the user points list
CP500
Page 45
7.2
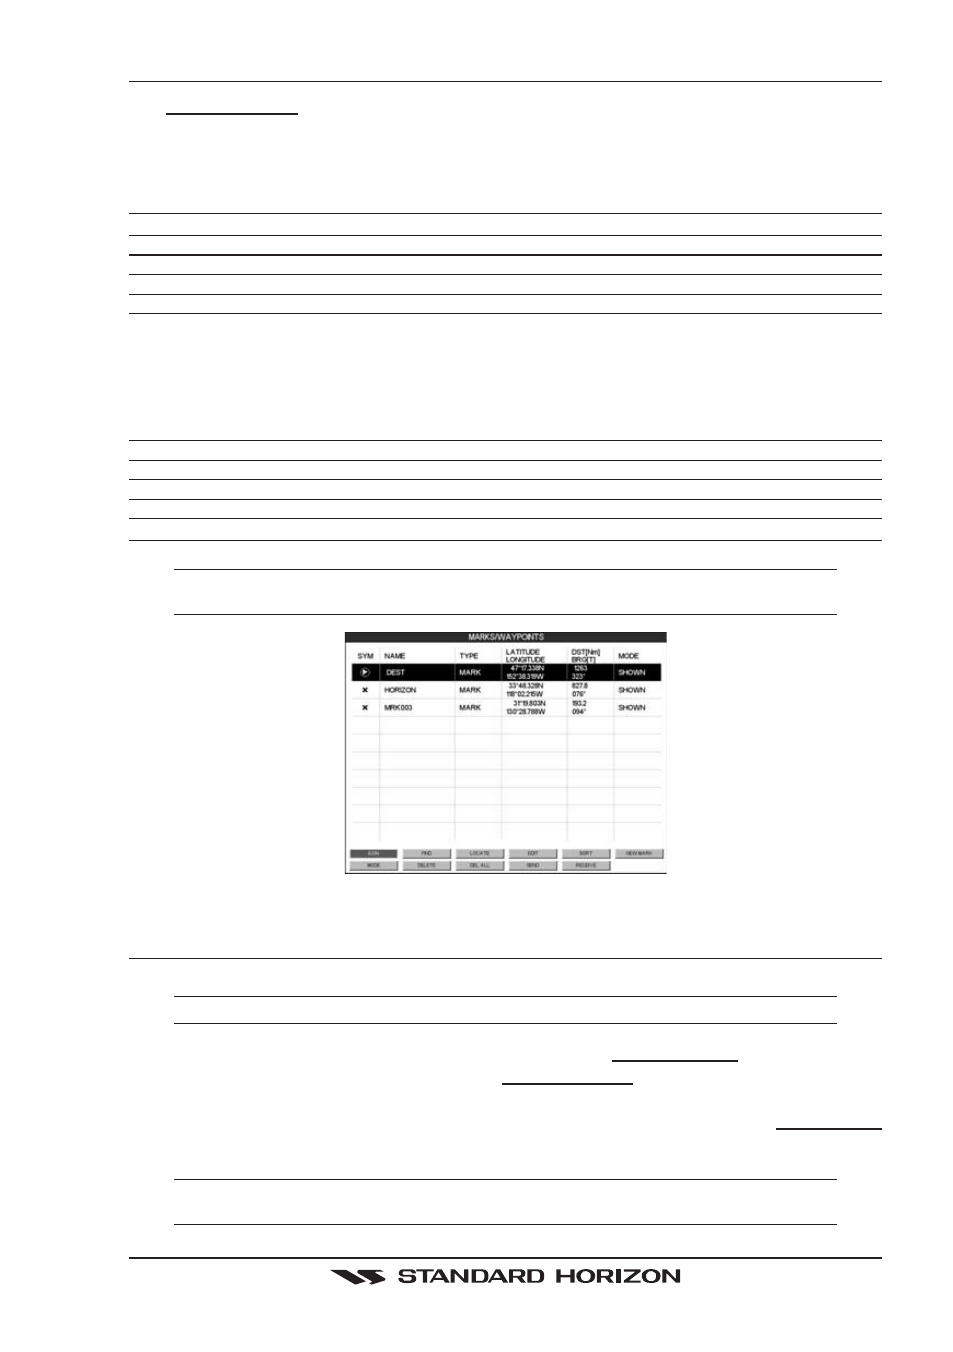
MARKS/WAYPOINTS LIST
The MARKS/WPTS List shows all the Marks and Waypoints that have been stored into the
CP500. To obtain the List page:
1. Created a Mark.
2. Place the cursor over the Mark, press [L
IST
].
This page also allows you to:
ICON
Allows sorting by icon type
FIND
Searches through the Marks or Waypoints to find a point by name using the ShuttlePoint knob
LOCATE
Shows the position of a Mark or Waypoint on the Chart page
EDIT
Allows you to edit a previous stored Mark or Waypoint
NEW MARK
Allows entering in Marks, editing icon type and position
MODE
This selection controls how the Marks or Waypoints are shown on the Chart page. Selections are:
a. SHOW - icon and name are shown
b. ICON - only icon (no name) is shown
c. HIDE - Mark or Waypoint is hidden
d. SHOW ALL - All Marks or Waypoints are shown
e. ICON ALL - All Icons are shown without name
f. HIDE ALL - All Marks or Waypoints are hidden
DELETE
Allows deleting the selected point.
DEL ALL
Allows deleting all stored points.
SORT
Sorts the name of the Mark or Waypoint in ascending or descending order
SEND
Sends the stored points to a external device (PC) capable of listening to NMEA WPL and RTE sentences.
RECEIVE
When selected, receives points from an external device (PC) that is capable of sending NMEA WPL sentence.
NOTE
The SEND and RECEIVE functions are usually used by navigation programs running on a Personal
Computer.
Figure 7.2 -Example of Marks/Waypoints List
7.3
CREATING/MODIFY A NEW MARK IN THE USER POINTS LIST
NOTE
This function is very useful if you have a list of Marks that you want to enter into the GPS Chart Plotter.
1. Press [MENU]. Move the ShuttlePoint knob to highlight USER POINTS and press [ENT].
2. Move the ShuttlePoint knob to highlight MARKS/WPTS and press [ENT].
3. The MARKS/WAYPOINTS List page will be shown (see previous Figure).
4. To create a New Mark, move the ShuttlePoint knob to the right to highlight NEW MARK
and press [ENT].
NOTE
In the User Point List page, you can also modify the Icon, Name, Lat/Lon and Mode to show the Mark
on the Chart page.