System configuration – Harman-Kardon AVR 5550 User Manual
Page 24
24 SYSTEM CONFIGURATION
System Configuration
When the Set button @
F has been pressed
and the system is ready for a change to the front
speaker setting, the on-screen display and Main
Information Display ˜ will read F R O N T
L A R G E
or F R O N T S M A L L depending
on the current setting. Press the
‹
/
›
buttons 7
$ on the front panel or the
⁄
/
¤
buttons
D
on the remote until the desired setting is shown,
using the instructions for “large” or “small”
shown earlier, then press the Set button @
F.
If another speaker position needs to be changed,
press the
‹
/
›
buttons 7 $ on the front panel
or the
⁄
/
¤
buttons
D on the remote to select
a different speaker position, press the Set button
@
F and then the
‹
/
›
buttons 7 $ on the
front panel or the
⁄
/
¤
buttons
D on the
remote until the correct speaker setting is shown
and press the Set button @
F again to con-
firm the selection.
To assist in making these settings, the icons in
the Speaker/Channel Input Indicators E
will change as the speaker type is selected at
each position. When only the inner icon box is lit,
the speaker is set for “small.” When the inner box
and the two outer boxes with circles inside them
are lit, the speaker is set for “large." When no
indicator appears at a speaker location, that posi-
tion is set for “none” or “no” speaker.
Note: These icons are available only when
making setup changes without the use of the full
OSD mode.
As an example, in the Figure below, all speakers
are set for “large,” and a subwoofer is set.
Surround Setup
Once the speaker setup has been completed, the
next step for that input is to set the surround
mode you wish to use with that input. Since sur-
round modes are a matter of personal taste, feel
free to select any mode you wish – you may
change it later. The Surround Mode chart on page
29 may help you select the mode best suited to
the input source selected. For example you may
select Dolby Pro Logic II or Logic 7 for most ana-
log inputs and Dolby Digital for inputs connected
to digital sources. In the case of inputs such as a
CD Player, Tape Deck or Tuner, you may wish to
set the mode to Stereo, if that is your preferred
listening mode for standard stereo sources, where
it is unlikely that surround encoded material will
be used. Alternatively, the 5 Channel Stereo or
Logic 7 Music mode may also be a good choice
for stereo-only source material.
It is easiest to complete the surround setup using
the full-OSD on-screen menus. From the MAS-
TER menu (Figure 1), press the
⁄
/
¤
buttons
D until the
›
cursor is next to the
SUR-
ROUND SELECT
menu. Press the Set
Button
F so that the
SURROUND
SELECT
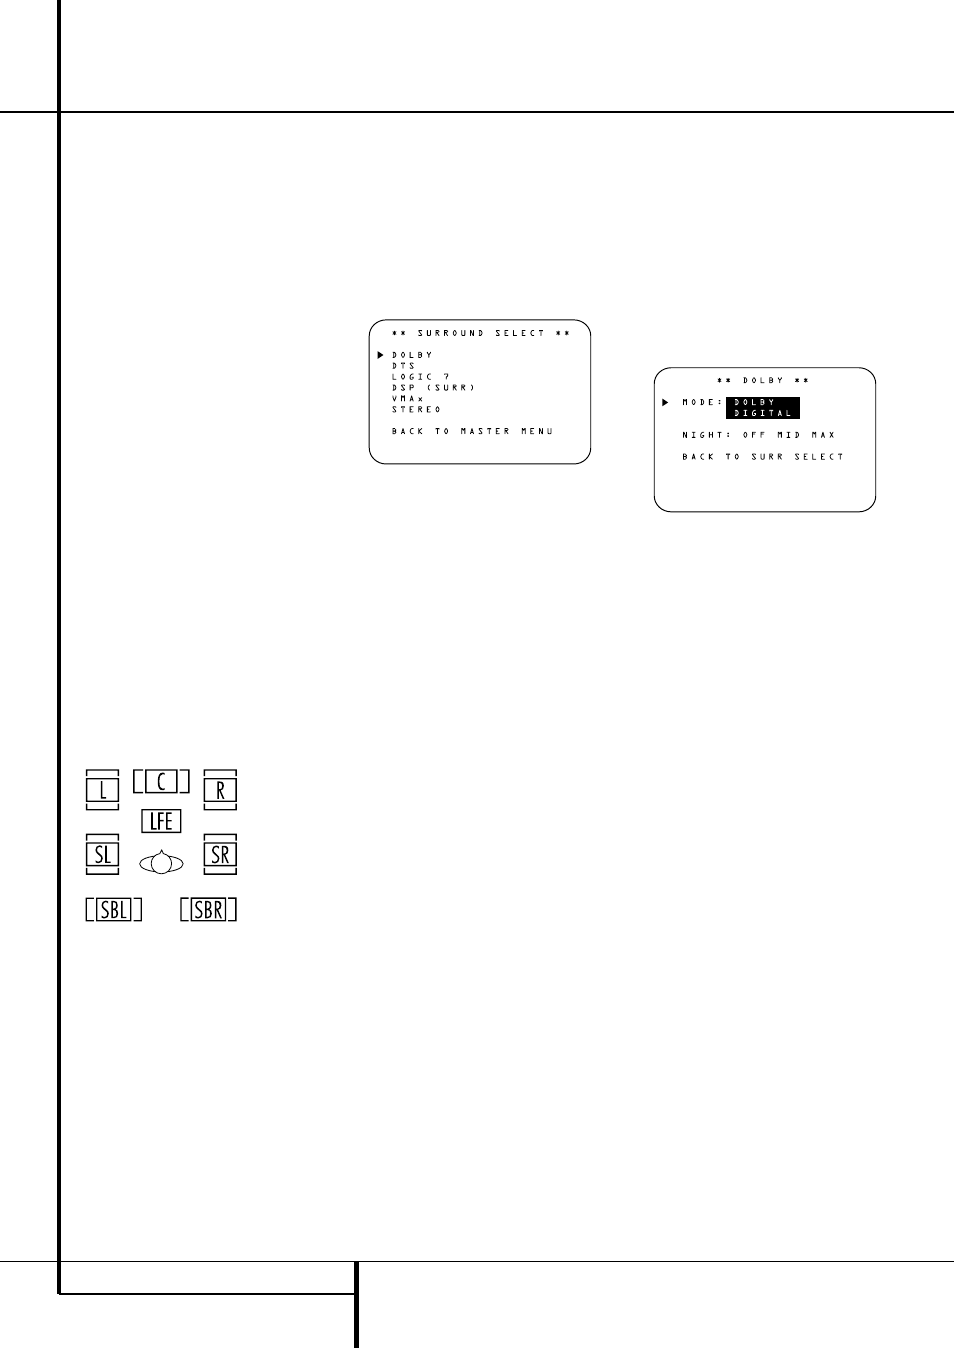
menu (Figure 5) is on the screen.
Figure 5
Each of the option lines on this menu (Figure 5)
selects the surround mode category, and within
each of those categories there will be a choice of
the specific mode options. The choice of modes
will vary according to the speaker configuration
in your system.
When the
SURR BACK
line of the
SPEAKER SETUP
menu (Figure 4) is set to
NONE
the AVR 5550 will be configured for 5.1-
channel operation, and only the modes
appropriate to a five-speaker system will appear.
When the
SURR BACK
line of the
SPEAKER SETUP
menu (Figure 4) is set to
SMALL
or
LARGE
the AVR 5550 will be
configured for 6.1/7.1-channel operation, and
additional modes such as Dolby Digital EX and
7 STEREO or Logic 7 7.1 will appear, as they are
only available when seven main speakers are
present. In addition, the modes DTS ES (Discrete)
and DTS+NEO:6 (DTS ES Matrix) available in the
AVR 5550 will not appear unless a digital source
is playing the correct bitstream.
Note: When a Dolby Digital or DTS source is
selected and playing, the AVR 5550 will select
the appropriate surround mode automatically, no
matter which surround mode was selected for
that input as default. Then no other surround
modes will be available, except VMAx with Dolby
Digital recordings and all Pro Logic II modes with
Dolby Digital 2 channel (2.0) recordings (see
page 34).
To select the mode that will be used as the initial
default for an input, first press the
⁄
/
¤
buttons
D until the on-screen cursor is next to the
desired mode’s master category name. Next,
press the Set Button
F to view the sub-
menu. Press the
‹
/
›
Buttons
Ea to scroll
through the available choices, and then press the
¤
Button
D so that the cursor is next to
BACK TO MASTER MENU
to continue the
setup process.
On the
Dolby
menu (Figure 6), the selection
choices include Dolby Digital, Dolby Pro Logic II
Music, Dolby Pro Logic II Cinema, Dolby Pro Logic
II Emulation and Dolby 3 Stereo. A complete
explanation of these modes is found on Page 29.
Note that when the Dolby Digital mode is select-
ed there are additional settings available for the
Night mode that are associated with the sur-
round mode only, not with the input. That´s why
these settings must be made only once, not with
each input in use. They are described later in the
next main chapter (see below).
Figure 6
On the
DTS
menu, the selection choices made
with the
‹
/
›
Buttons
Ea on the remote
are determined by a combination of the type of
DTS program material in use and whether the 5.1
or 6.1/7.1 speaker output configuration is in use.
When the 5.1 configuration is in use the AVR will
automatically select the 5.1 version of DTS
processing when a DTS data stream is received.
When the 6.1/7.1 mode is selected, the DTS-ES
Discrete mode will automatically be activated
when a DTS source with the ES Discrete “flag” is
in use and the DTS-ES Matrix mode will be acti-
vated when an ES-Matrix encoded audio track is
received. In both cases the appropriate surround
mode will be indicated in the Lower Display
Line B in the front panel display and on the
screen. When a non-ES DTS disc is in use, when
the 6.1/7.1 mode is chosen the unit automatical-
ly will select the DTS + NEO:6 mode to create a
full eight-speaker surround mode. See page 29,
33 for a complete explanation of the DTS modes.
On the Logic 7 menu, the selection choices
made with the
‹
/
›
Buttons
Ea on the
remote are determined by whether the 5.1 or
6.1/7.1 speaker output configuration is in use. In
either case, the selection of a Logic 7 mode
enables Harman Kardon’s exclusive Logic 7 pro-
cessing to create fully enveloping, multichannel
surround from either two-channel Stereo or
Matrix-encoded programming such as VHS
cassettes, laserdiscs or television broadcasts
produced with Dolby surround.
In the 5.1 configuration you may select the Logic
7/5.1 Music, Cinema or Enhanced modes. They
work best with two-channel music, surround-
encoded programs or standard two-channel pro-
gramming of any type, respectively. When the
6.1/7.1 mode is selected, the Logic 7/7.1 Music