How to use the remote to control your plasma tv, The remote control, Gu id e a/ v net – Hitachi 55HDX61A User Manual
Page 34: Press done, Press exit to quit
34
GU
ID
E
A/
V NET
THE REMOTE CONTROL
HOW TO USE THE REMOTE
TO CONTROL YOUR PLASMA TV
AV NET LEARNING WIZARD
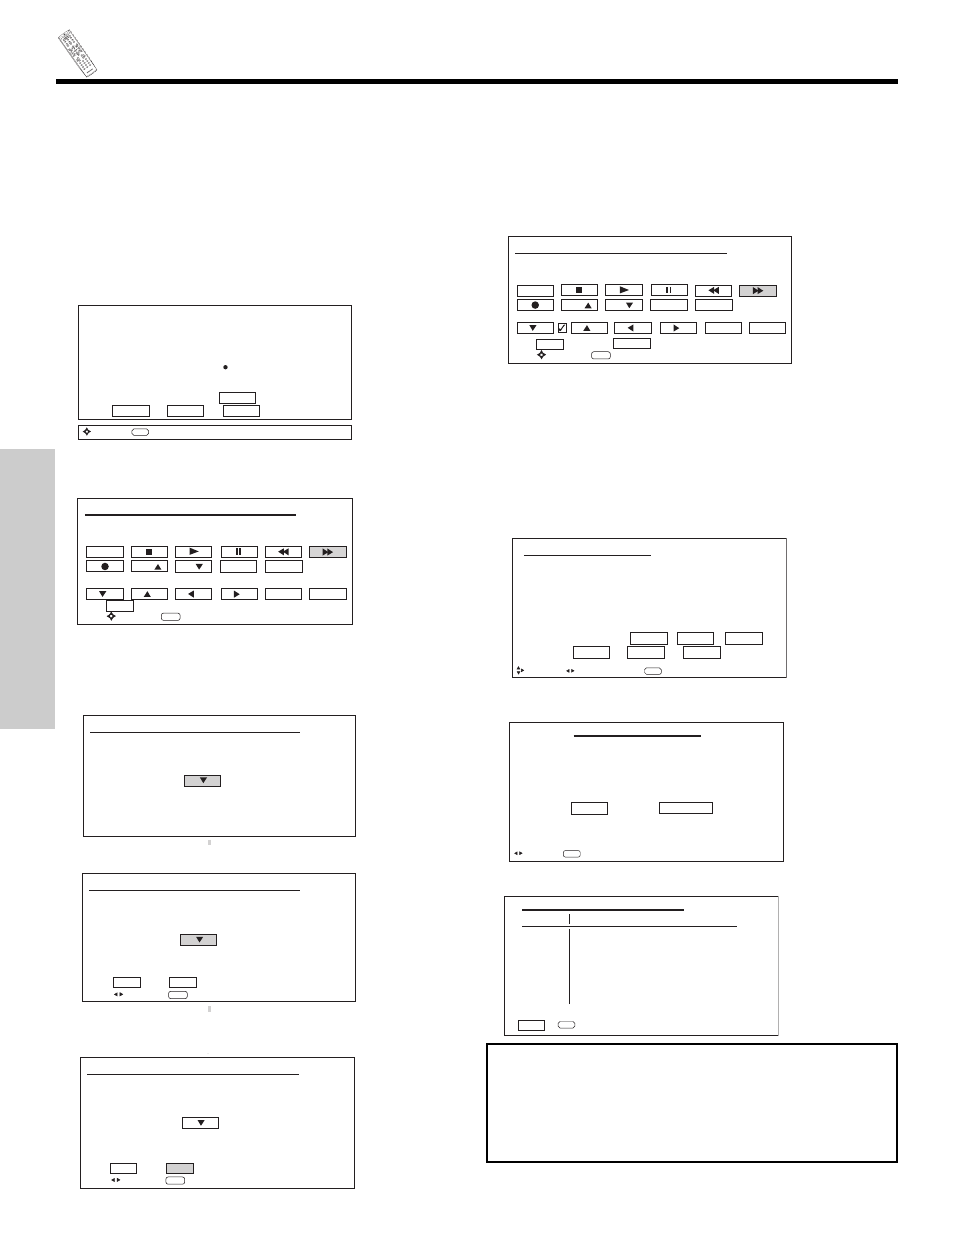
For example, after programming your AV Receiver to the AV NET and the soft keys do not work, the user has to use the AV NET
Learning Wizard. The AV NET Learning Wizard will transfer any remote button IR code of your AV Receiver to the soft keys of
your AV NET. Since an AVR2 (Custom) is not available in the device setup screen, the user can choose any custom device. For
this setup example, we have chosen the PVR2 (Custom) device.
5. Use the CURSOR PAD to select the prefered Softkeys (Ex.
̄
button) to learn, press the SELECT button.
1. Press A/V NET button on the remote control.
2. Use the CURSOR PAD
̆ or ̄ to select DEVICE SETUP,
press the SELECT button CURSOR PAD
̈.
3. Use the CURSOR PAD (
̆ or ̄) and SELECT button to
choose one CUSTOM option (Ex. PVR2).
4. Press the SELECT button to access the Setup screen.
NOTES:
1. To access the Menu function of a specific equipment, select the
“MENU” soft key on OSD, then press the MENU button of the
Plasma TV remote control. In order to use CURSOR PAD and EXIT
button of the Plasma TV remote control, “arrows, select, and EXIT”
button must be learned. Then the menu of the programmed
equipment can be controlled with the Plasma TV remote control.
2. When using the Learned device with the Timer Recording function,
the Power, Stop and Record soft Keys should be learned first.
Please choose the device to set up.
( ) DVD
( ) Set Top Box
( ) DVD2
( ) DVD3 (Custom)
( ) VCR
( ) VCR3 (Custom)
( ) VCR2
( ) PVR2 (Custom)
( ) AV Receiver
( ) CBL2 (Custom)
( ) PV Recorder
( ) STB2 (Custom)
( ) Cable Box
List
BACK
SETUP
MODIFY
Move
SEL
Next Step
HITACHI AV NET WIZARD (Learning)
Select the PVR2 softkey to learn?
TV Softkeys
BACK
POWER
CH
SELECT
EXIT
Move
SEL
Select
CH
TV/VCR
MENU
6. Press and hold the
̄ button of the AVR remote control while
pointing directly at the learning AV NET sensor of the AVC
(see pages 9-10) at a distance of 2 to 3 meters or 5 to 10 feet.
HITACHI AV NET WIZARD (Learning)
Press and hold desired button to
transfer the command to AV NET.
Please wait while AV NET
Learns the command...
8. If the code transfer was succesful, the screen below appears.
9. Select OK to continue.
HITACHI AV NET WIZARD (Learning)
Transfer was successfull
Press OK to continue.
BACK
OK
Move
SEL
Select
10. A check mark appears next to the programmed softkey.
Select DONE to EXIT or CONTINUE to learn another softkey.
HITACHI AV NET WIZARD (Learning)
Select the PVR2 softkey to learn?
TV Softkeys
Done
POWER
CH
SELECT
EXIT
Move
SEL
Select
CH
TV/VCR
MENU
Continue
7. If the code is not accepted, the screen below appears.
HITACHI AV NET WIZARD (Learning)
Transfer not completed!
Try again?
NO
YES
Move
SEL
Select
11. Use the CURSOR PAD
̄ to select Video Input. Press the
CURSOR PADS
̇,̈ to set the INPUT to which your
device is
connected.
12. Repeat step 11 for Audio Input. If the AVR is connected to
the TV, select “Using TV”. If the AVR is connected to an
external amplifier, select “no connection”.
13. Press CURSOR PAD
̄ to select Transmission Test. Perform
a Transmission Test by selecting Power, Play, or CH UP
softkeys. If the device responds, then it is properly set up.
Select OK.
PVR2 (Custom)
Video Input
No Connection
No Connection
Audio Input
Transmission Test
POWER
PLAY
CH UP
BACK
OK
EXIT
SEL
Select
Move
Set Input
HITACHI AV NET SET UP
14. Press Done.
Congratulations!
Your PVR2 is now connected
to your AV network.
Would you like to set up
another device?
Done
Continue
Move
SEL
Select
HITACHI AV NET SET UP
15. Press Exit to Quit.
DVD
----
Not Setup
Not Setup
DVD2
----
Not Setup
Not Setup
VCR
----
Not Setup
Not Setup
VCR2
----
Not Setup
Not Setup
AVR
----
Not Setup
Not Setup
PVR
----
Not Setup
Not Setup
CBL
----
Not Setup
Not Setup
STB
----
Not Setup
Not Setup
PVR2
0010
Not Setup
Not Setup
Device
Code
Video
Audio
EXIT
SEL
Select
HITACHI AV NET SETTING LIST