Av network setup wizard, First time use – Hitachi 55HDX61A User Manual
Page 24
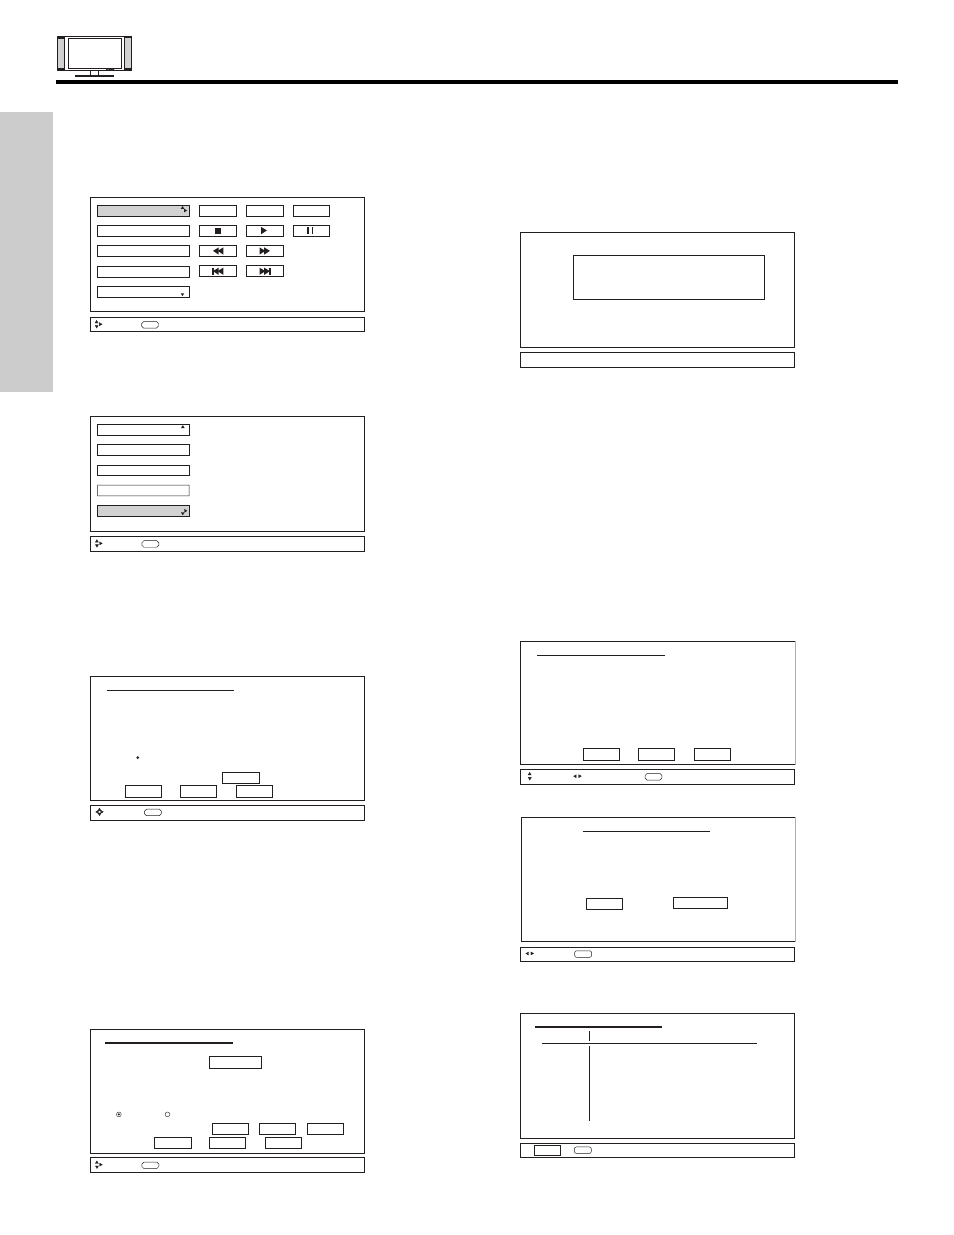
AV NETWORK SETUP WIZARD
FIRST TIME USE
SETUP PROCEDURE USING AV NETWORK DEVICE CODES:
An AV Receiver Setup example is shown below. If your device is not listed or the device codes not work after following the setup
procedure, please refer to the AV NET Learning wizard procedure on pages 33-34.
1.
Press the A/V Net button on the remote control.
2.
Use CURSOR PADS
̆ or ̄ to highlight Device Setup.
3.
Press the SELECT button or CURSOR PADS
̈ on the
remote control and the device selection screen appears.
4.
Use the CURSOR PADS
̆ or ̄ to choose AV Receiver
and press the SELECT button on the remote control.
5.
The Setup button on the bottom of the screen becomes
highlighted. Press the SELECT button on the remote control
to enter the setup screen.
VCR
DVD2
DVD
POWER
Move
SEL
Select
MENU
VCR2
AV Receiver
HOME
Set Top Box
Cable Box
PV Recorder
Move
SEL
Select
Custom
Device Setup
6.
Using the remote, enter the four digit Device Code for your
equipment, found on page 25.
7.
Use the CURSOR PAD
̄ to select AV Input. Press the
CURSOR PAD
̇ or ̈ to set the INPUT to which your
device is connected.
8.
Use the CURSOR PAD
̄ to select Internal Speakers.
Speakers to ON or OFF, then press SELECT to set the
option chosen.
9.
Press CURSOR PAD
̄ to select Transmission Test. Press
the CURSOR PADS
̇ or ̈ to select Power, Play, or CH UP
softkeys, before pressing the SELECT button to perform a
Transmission Test of the softkey selected. If the device
responds, then it is properly set up. Select OK. (If the
Transmission Test failed, try another code).
Please choose the device to set up.
( ) DVD
( ) Set Top Box
( ) DVD2
( ) DVD3 (Custom)
( ) VCR
( ) VCR3 (Custom)
( ) VCR2
( ) PVR2 (Custom)
( ) AV Receiver
( ) CBL2 (Custom)
( ) PV Recorder
( ) STB2 (Custom)
( ) Cable Box
List
BACK
SETUP
MODIFY
Move
SEL
Select
HITACHI AV NET SET UP
AV Receiver
Device Code
- - - -
(Enter Code “9999” to uninstall)
AV Input
Input4
Internal Speakers
On
Off
Transmission Test
POWER
PLAY
CH UP
BACK
OK
EXIT
Move
0-9
Input
HITACHI AV NET SET UP
10. If “OK” was selected, and the 4 digit code was invalid, the
screen below appears, then goes back to the Device
Code entry
screen.
11. Repeat Device Setup procedure until the Source (SRC)
Setting Screen appears.
This screen allows you to assign a label for each Source (SRC1
to SRC8) connection on the AV Receiver. Depending on the
number of source connections to the AV Receiver, some sources
may not be available.
12. To label your sources, use CURSOR PAD
̆ or ̄ to
highlight SRC1.
13. Use CURSOR PAD
̇ or ̈ to select the Source (DVD,
DVD2, VCR, VCR2, PVR, CBL, STB, TV or Custom). If
SRC1 is active, video and audio will be available depending
on the connections.
14. Repeat for SRC2 to SRC8 if applicable.
15. Select DONE to continue.
16. Select CONTINUE to setup another device.
Find your AVR
4-digit manufacturers code
and enter it here
ATTENTION
AV Receiver (SRC Setting)
SRC1
SRC2
SRC3
SRC4
SRC5
SRC6
SRC7
SRC8
SRC1
SRC2
SRC3
SRC4
SRC5
SRC6
SRC7
SRC8
Move
Set Input
SEL
IR Out
BACK
DONE
EXIT
HITACHI AV NET SET UP
Congratulations!
Your AVR is now connected
to your AV network.
Would you like to set up
another device?
Done
Continue
Move
SEL
Select
HITACHI AV NET SET UP
17. Select DONE to finish and the screen below appears to
show the device(s) which has been set-up.
18. Select EXIT to quit.
DVD
----
Not Setup
Not Setup
DVD2
----
Not Setup
Not Setup
VCR
----
Not Setup
Not Setup
VCR2
----
Not Setup
Not Setup
AVR
1360
Not Setup
Not Setup
PVR
----
Not Setup
Not Setup
CBL
----
Not Setup
Not Setup
STB
----
Not Setup
Not Setup
STB2
----
Not Setup
Not Setup
EXIT
SEL
Select
Device
Code
Video
Audio
HITACHI AV NET SET UP
24