Disassemble and install the battery compartment, Navigation, Charging guidance – CHASING M2 S Industrial Underwater ROV (328' Tether) User Manual
Page 7
1)Turn the knobs on both sides of the fuselage 90°
to the shallow card slot;
2)Turn the switch ① on the slider to the left, and
pull the lock assembly upwards while holding
the chute ②;;
3) Pull the lower sides of the pressure plat③, by
hand, pull down to deform the pressure plate ③,
and make the buckle come off the rear bracket.
4)Pull the Battery compartment slowly to pull it out.
a
Disassemble:
Disassemble and Install the
Battery compartment
3
4
1
2
1)Rotate the knobs on the both sides of the fuselage
90 ° to the deep card slot;
2)Slowly install the Battery compartment along the
chute under the fuselage. Press down hard until
you hear a "click" sound, and the knobs close in
place.
3)Pull the lower sides of the Pressure Plate by hand,
pull down to deform the Pressure Plate ③, make
the buckle fasten on the rear bracket;
b
Install:
4)Press down firmly on the chute of the locking assembly. When you hear a
“click” sound, the buckle is snapped into place properly, then the
installation is complete.
* Warning:1. Before removing or installing the Micro SD card, please switch remote
controller power button to off, and wipe off the water on the ROV;
2. Check the O-ring on the tether connector, please be sure the O-ring
cannot be squeezed out when tightening the cover. If it is missed or
damaged, please replace it in time.
EN
11
12
EN
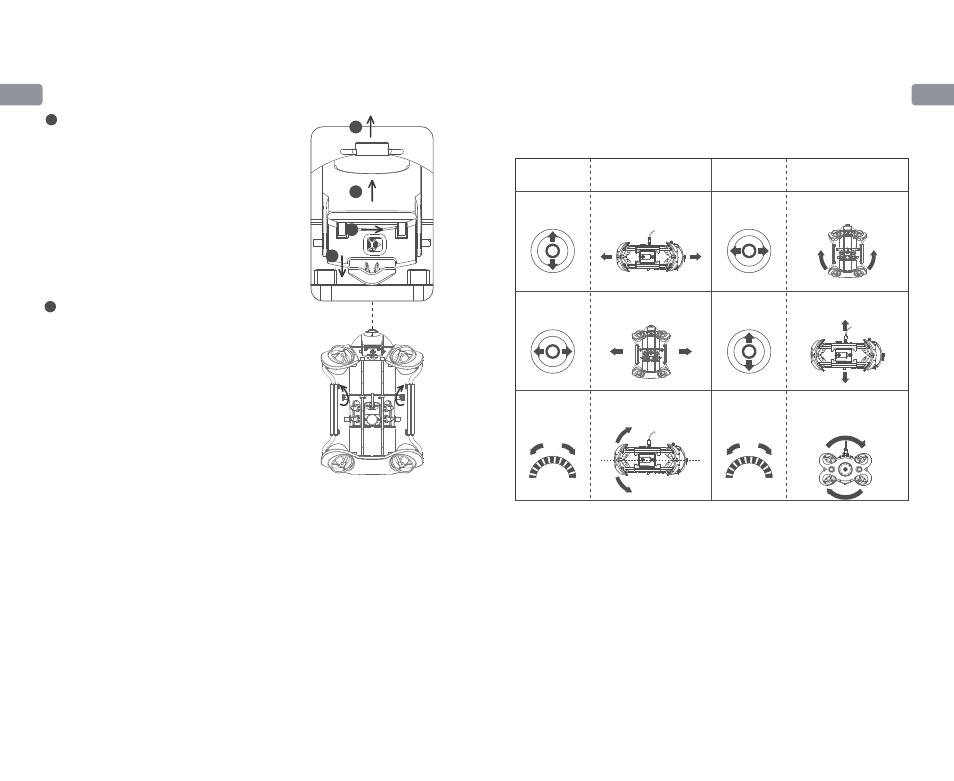
Navigation
Rov
(Flight Direction)
Forward/backward
Remote
Controller
Left Joystick
Rov
(Flight Direction)
Turn Left / Right
Remote
Controller
Left Joystick
Pan Left and Right
Right Rocker
Up / Down
Right Rocker
Turn the Dial To Adjust
the Pitch Attitude
Scroll the
Left Wheel
Scroll the
Right Wheel
Turn the Dial to Adjust The
Roll
Attitude, Release to Fix Status
M2 has 8 Vectored Thrusters layout which allows OMNI movement (up, down, left
and right, back and forth, pitch, roll, and pan) in all directions. The default is basic
control mode, suitable for beginners. Navigation attitude and remote control are as
follows:
If necessary, users can switch modes by long pressing the "One-key reset " button of
the remote controller. When switching to the advanced mode, the ROV can achieve
all-round full-freedom movement. The advanced mode is based on the first-person
perspective.
Charging Guidance
ROV & Remote Controller
Adapter(25.2V 2.9A) : It is a 3 in 1 charger that could charge the ROV, Remote
Controller, Battery Cabin & E-reel,
Red light indicates Charging, green light indicates fully charged.
* Note: in the basic mode, the maximum Angle of pitch and roll is about 80
degrees.