Remote controller, Handle indicators introduction – CHASING M2 S Industrial Underwater ROV (328' Tether) User Manual
Page 4
EN
05
06
EN
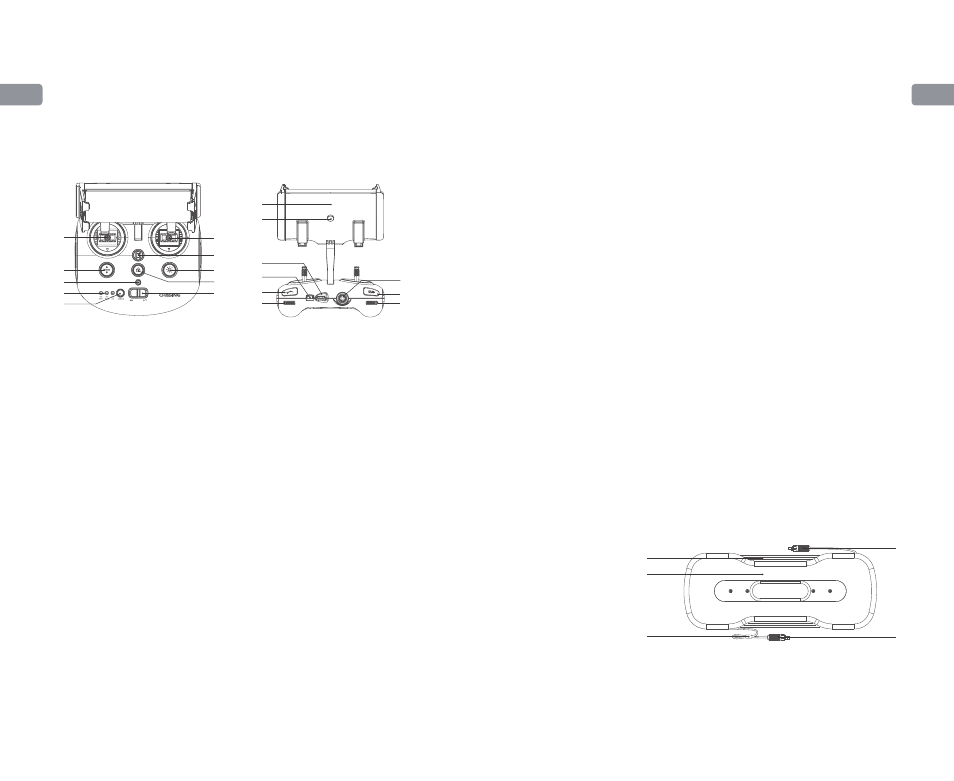
Remote controller
The Chasing M2 remote controller had integrated communication and control. It
connects directly to the drone via the included tether and connects wirelessly to
your mobile phone/tablet via Wi-Fi. It allows the drone to display a live video feed on
your phone/tablet, which enables users to control the drone in real-time. The base
station's HDMI output can also be used to display a live video feed to a larger screen.
* Note: Do not put the controller in the water to avoid damaging the device, damages
caused by water ing-ress are not covered by the warranty.
17
18
10
15
14
12
11
16
13
9
8
7
1
3
2
5
4
9
6
1. Power switch: Turns controller on/off
2. Power Indicator: Green (High power), Blue
(Medium power), Red (Low power)
3. Wi-Fi switch button: Short press to switch
5Ghz/2.4Ghz Wi-Fi
4. Signal Indicator:
2.4G : 2.4Ghz Wi-Fi indicator, always on
when working
5G: 5Ghz Wi-Fi indicator, always on when
working
ROV(drone): Indicates the communication
status between the controller and the
drone (Steady light indicates successful
connection; Blinking light indicates
disconnection.)
5. One-key reset: Short press to reposition
the ROV return to a horizontal state/
Long press to switch control mode
6. Unlock: Unlock/Lock,current state of
the Thruster will show on the App
7. Led Control: On/off led light (0%50%100%)
8. Safety Buckle: Can be used with a safety rope
9. Control Sticks: Used to control the
naviga-tion of the ROV
10.Robotic Arm Control: Press and hold to
enable/disable the grabber claw function;
press to change the floodlight brightness
level
11. Photo/Video: Short press to take
photos, long press to start / end
recording video
12.
Right Angel Adjustment:
Adjust the roll
angle or control the opening and
closing of the grabber claw
13. Left Angel Adjustment: Adjust the pitch
angle
14. Type-c Port: Direct connection with
mobile phone/tablet device
15. HDMI Socket: 1080P HD image
real-time output
16. Tether Connection Socket/Charging
socket
17. Phone/Tablet Clamp: Used to attach
phone/tablet mount to mounting
bracket
18. Clamp Button: Pull apart the two ends
and put in the phone/tablet, then
press this button to tighten
Handle indicators introduction
Battery:
Red:10%↓ Red light flashes quickly;10-29% Red light always on.
Blue:30-69% Blue light always on.
Green:70-100% Green light always on.
Signal Indicator:
2.4G: 2.4Ghz Wi-Fi indicator,always on when working.
5G: 5Ghz Wi-Fi indicator,always on when working.
ROV: Indicates the communication status between the controller and the
ROV (Steady light indicates successful connection, Blinking light
indicates disconnection.)
Gesture back Button:
The blue light is always on when the ROV is in a non-horizontal position.
Unlock Button:
Locking: No lights ; Unlocking: Blue light on.
Led Control Button:
Bright light:Blue light always on; Low light: Blue light flash; No light:
Blue light off.
1. Tether connectors
2. Tether
3. Winder
4. Fastener
100/200 meters Tether & Winder
The tether is used to connect the drone and the remote controller The winder is
used to store the tether.
2
4
3
1
1
* Warning:
·
Do not put exposed (unconnected) tether into the water or plashing
liquid to the tether.
·
Check whether the O-ring on the tether connector pre-dive, make a
replacement when it is missed or damaged.