PLANET WDRT-731U User Manual
Package contents 2. hardware installation
Note
– 1 –
– 2 –
– 3 –
– 4 –
1. Package Contents
2. Hardware Installation
– 7 –
– 8 –
3. Network Configuration (Windows 7)
4. Enter into the Web Management
5. Wireless Network Connection
– 5 –
– 6 –
Wireless Router
Quick Guide
CD-ROM
12V/1A Power Adapter
Ethernet Cable
STEP 1: Right-Click on the
network icon displayed
in the system tray.
STEP 2: Highlight the wireless network (SSID) you want to
connect and click Connect button.
STEP 3: Enter the encryption
key of WDRT-731U if
necessary.
You have already finished the
configuration of the WDRT-731U.
Now you can use your iPhone,
iPad, laptop, and any other Wi-Fi
devices to connect with it
wirelessly and start surfing the
Internet.
FURTHER INFORMATION:
The above steps introduce simple installations and configura-
tions for WDRT-731U. For further configurations of Wireless
Dual Band, WAN, LAN, Firewall, Virtual Server, DMZ, and
DDNS etc, please refer to the user manual in the CD-ROM. If
you have further questions, please contact the local dealer or
distributor where you purchased this product.
2011-E50280-001
Thank you for choosing PLANET WDRT-731U. Before
installing the router, please verify the contents inside the
package box.
If there is any item missed or damaged, please
contact the seller immediately.
STEP 1: Connect the Power Adapter provided in the
package to the WDRT-731U. The Power LED on
the front panel shall turn on accordingly.
STEP 2: Follow the figure below to connect the network
devices. It depends on your network environment
to connect the WAN port to a Cable/xDSL modem,
or the Ethernet directly in your place.
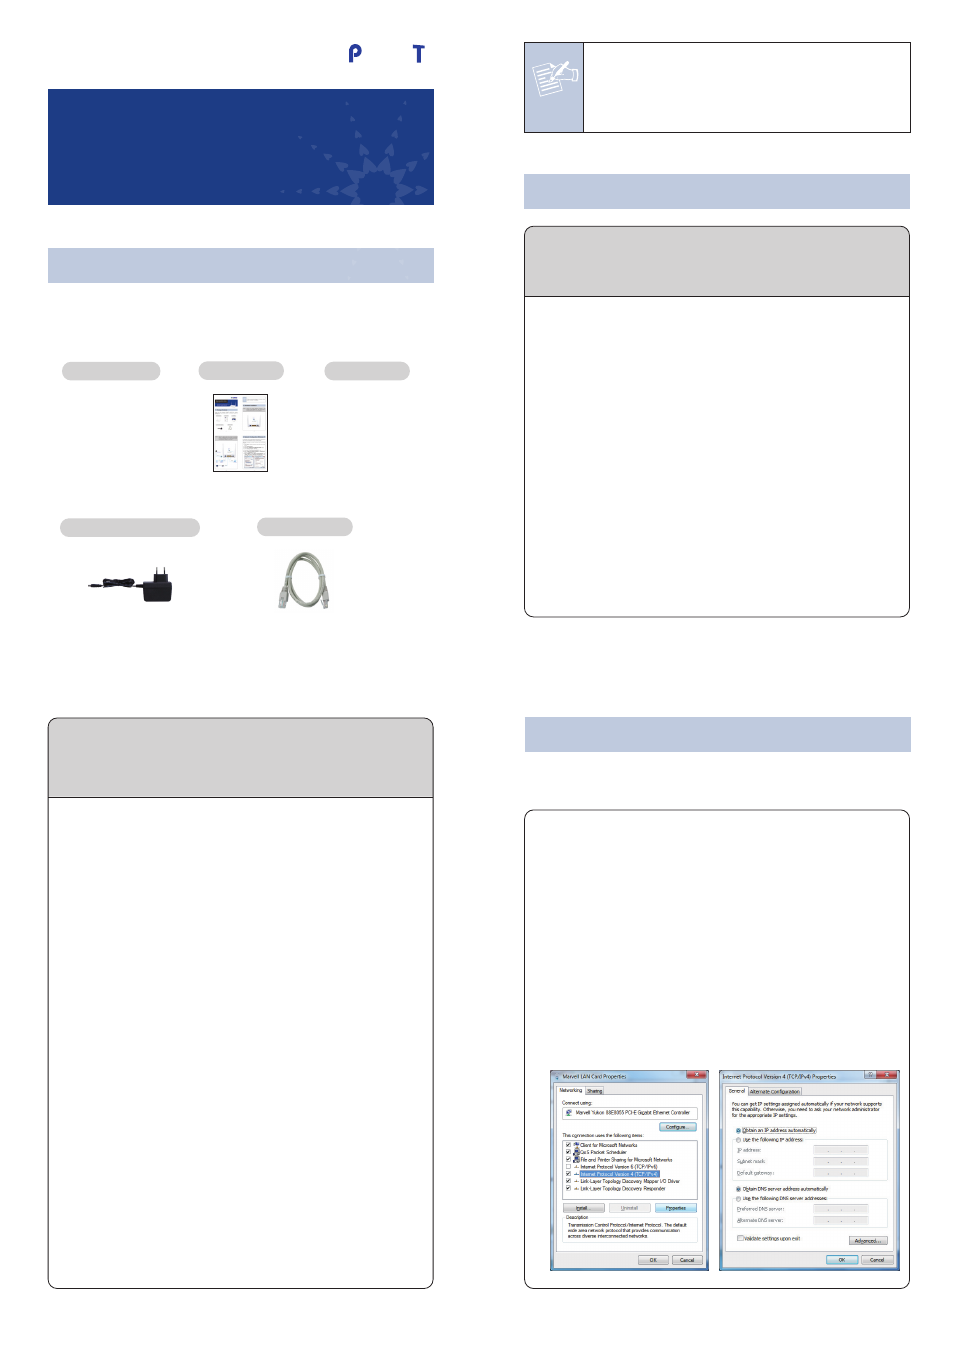
A computer with a wired Ethernet connection is required for
the first-time configuration of the Wireless Router.
Set your computer to get an IP address from the Wireless
Router:
1. Click “Start” button located at lower-left corner of the
screen.
2. Click “Control Panel”.
3. Double click “Network and Sharing Center” icon.
4. Click “Change adapter settings”.
5. Double click “Local Area Connection” icon.
6. Select “Internal Protocol Version 4 (TCP/IPv4)”
and click “Properties” button.
7. Select “Obtain an IP address automatically” and
“Obtain DNS server address automatically”, then
click “OK” button twice to save the configuration.
Default IP Address: 192.168.1.1
Default User name: admin
Default Password: admin
Default SSID of 2.4G: default_2.4G
Default SSID of 5G: default_5G
Default Wireless Encryption Type: None
STEP 2: When you enter into the Web User Interface,
please enter the User Name and Password in the
login window. The default User name and
Password are both “admin”.
Then click “Login” button to continue.
STEP 1: The Web management allows you to access
and manage the WDRT-731U easily. Launch
the Web browser and enter the default IP
address http://192.168.1.1
STEP 3: Once the corresponding Internet connection type
is chosen, click OK button to save and make the
changes take effect.
WDRT-731U
Quick Installation Guide
300Mbps Dual-Band 802.11n
Wireless Gigabit Router
Power Adapter
Power
PC/Laptop
RJ-45
Cable /xDSL
Modem
Phone
Jack
RJ-45
RJ-11
USB Line
RJ-45
A/V
001101010
STB
TV
USB Storage
Power Adapter
Power
FCC Statement
This device complies with Part 15 of the FCC Rules. Operation is subject to the following
two conditions: (1) This device may not cause harmful interference, and (2) this device
must accept any interference received, including interference that may cause undesired
operation.
This equipment has been tested and found to comply with the limits for a Class B digital
device, pursuant to Part 15 of the FCC Rules. These limits are designed to provide
reasonable protection against harmful interference in a residential installation. This
equipment generates, uses and can radiate radio frequency energy and, if not installed
and used in accordance with the instructions, may cause harmful interference to radio
communications. However, there is no guarantee that interference will not occur in a
particular installation. If this equipment does cause harmful interference to radio or
television reception, which can be determined by turning the equipment off and on, the
user is encouraged to try to correct the interference by one of the following measures:
- Reorient or relocate the receiving antenna.
- Increase the separation between the equipment and receiver.
- Connect the equipment into an outlet on a circuit different from that to which the
receiver is connected.
- Consult the dealer or an experienced radio/TV technician for help.
FCC Caution: Any changes or modifications not expressly approved by the party
responsible for compliance could void the user's authority to operate this equipment.
This transmitter must not be co-located or operating in conjunction with any other
antenna or transmitter.
Radiation Exposure Statement
This equipment complies with FCC radiation exposure limits set forth for an uncontrolled
environment. This equipment should be installed and operated with minimum distance
20cm between the radiator & your body.
CE Mark Warning
This is a Class B product in a domestic environment, this product may cause radio
interference, in which case the user may be required to take adequate measures.
"The product can be used without restrictions in the following countries: all EU member
states except France and Norway.
The product can be used with limitations in the following countries: France (for indoor use
only) and Norway (20 km in the center of Ny-Ĺlesund)."
1. The manufacturer is not responsible for any radio or TV interference
caused by unauthorized modifications to this equipment.
2. To avoid unnecessary radiation interference, it is recommended to
use a shielded RJ45 cable.
Note
Note
1. The manufacturer is not responsible for any radio or TV interference
caused by unauthorized modifications to this equipment.
2. To avoid unnecessary radiation interference, it is recommended to
use a shielded RJ45 cable.