Plug in, Push button, Linked – PLANET PL-502P User Manual
Page 2: Hardware installation, Utility installation for windows, Further information, Plc + poe
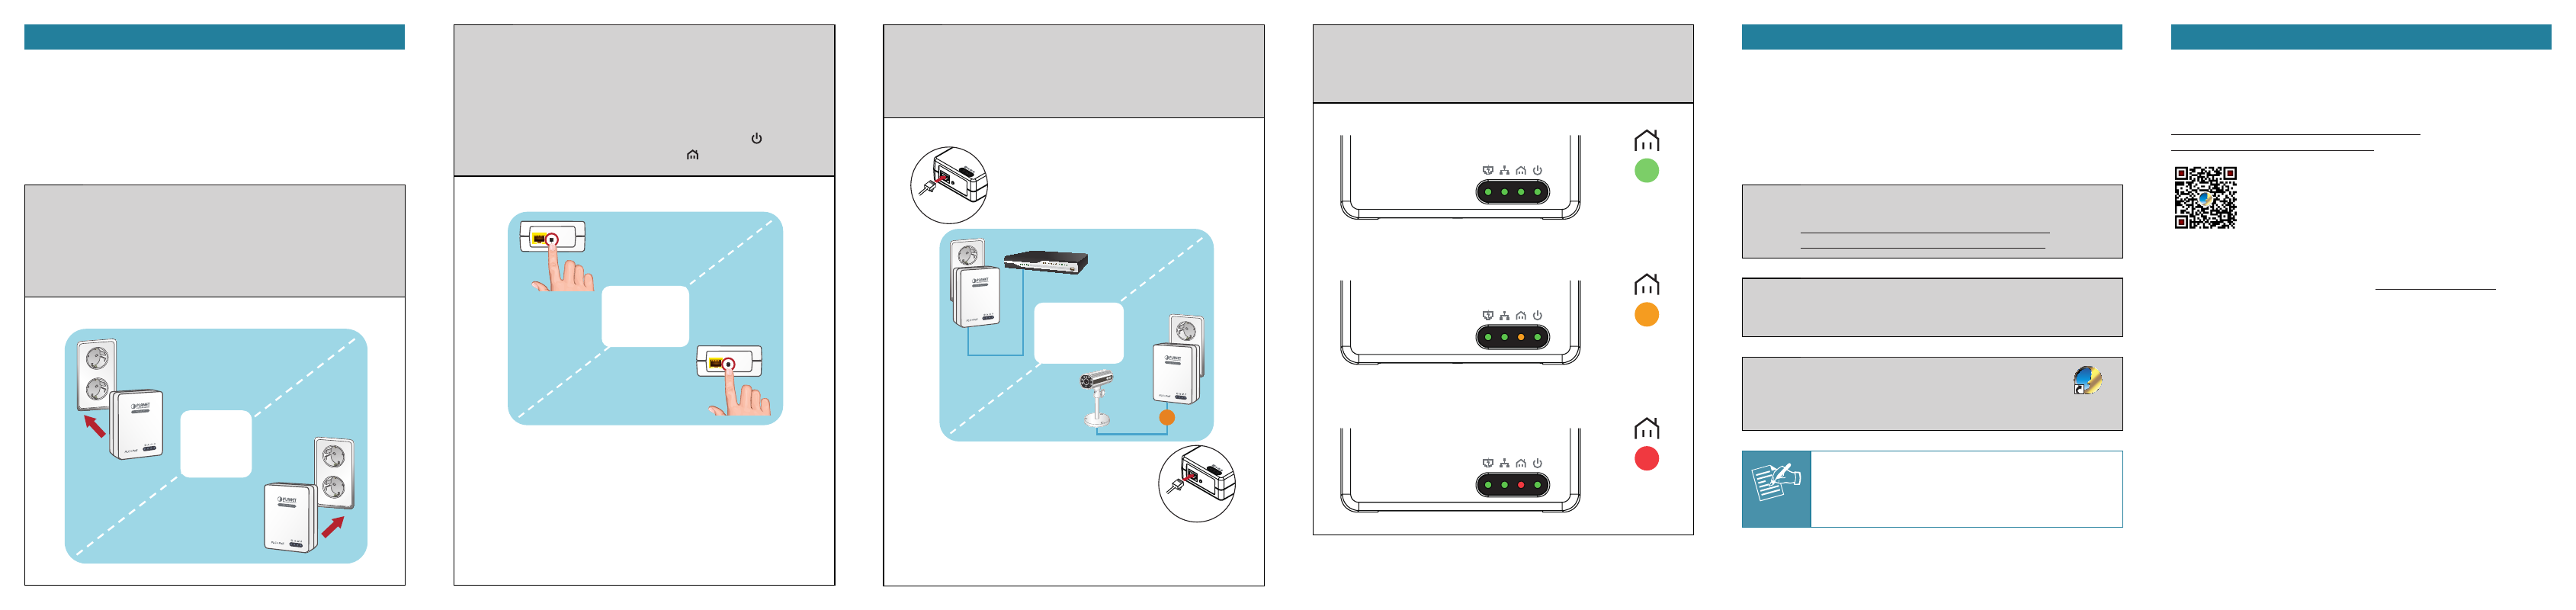
5. Hardware Installation
To create a powerline + PoE network, simply connect the PLC Adapter
and PLC+PoE Adapter, the PL-502P, to AC wall power outlets that
are on the same electrical system. No additional configuration in the
powerline network is necessary.
Follow the steps below to install the PL-502P in the house
Step 1: 1. Plug the PLC Adapter into AC wall power outlets near
the device you want to connect.
2. Plug the PL-502P into AC wall power outlet in your
room or office where you want to install the PoE PD,
such as IP camera or PoE wireless access point.
3. Ensure the Power LEDs are on.
Plug
in
Step 2: To secure your powerline network:
1. Hold down the PAIR/RST (or Security) button for 1~3
seconds on the first PLC Adapter.
2. Within 2 minutes, hold down the PAIR/RST button for
1~3 seconds on the PL-502P.
3. The Power LED starts to blink.
4. After successful setup, the Power LED will remain
solid and the Powerline LED will start blinking.
Push
Button
Within 2 minutes
Step 3: 1. Connect the Ethernet port of PLC Adapter to your home
router, NVR (Network Video Recorder) or PC’s Ethernet
port via the UTP cable.
2. Connect the PoE Ethernet port of the PL-502P to the
PoE PD via the UTP cable.
Linked
PoE
Mini Bullet
IP Camer
a
PL-502P
PLC
+ PoE
PL-502P
PLC
+ PoE
The PoE LED of the PL-502P should light up first and then the
Ethernet LED should start flashing in green.
Step 4: Verify the LEDs’ status of the PL-502P. If your PoE PD
is successfully powered up and can establish the Ethernet
data link with remote PC or NVR, then that means the
remote PLC Adapter and the PL-502P work fine.
PLC + PoE
> 100Mbps
PLC + PoE
50 ~ 99Mbps
PLC + PoE
< 50Mbps
Your PLC+PoE Adapters are now connected forming a powerline
(HomePlug AV) network.
6. Utility Installation for Windows
PLANET Power Packet Utility is a software utility used to search and
make connecting on a powerline network quick and simple.
The installation procedure for the Powe Packet Utility will vary
depending on which operating system you are using on your computer.
The following procedure is for installation under Windows 7. Installation
of other operating systems is similar.
Step 1: Download the Power Packet Utility from PLANET download
URL
Step 2: The file you have downloaded is a zip file. Unzip it and
double-click on the “Setup.exe” executable file to begin
installation.
Step 3: The utility will be installed on your computer and
a new icon “Power Packet Utility” will appear on
your desktop.
Power Packet
Utility
Note
This utility is only for Windows 2000, 2003, XP, Vista,
Windows 7 and Windows 8.
Further Information:
The above steps introduce the simple installations of the PL-502P. For
further details on the installation of the PLC+PoE Adapters, please refer
to the user manual which you can download from the PLANET website.
If you have further questions, please contact the local dealer or
distributor where you purchased this product or you can contact PLANET
directly at the following email address: [email protected]
2011-AE0520-000