Using postcards, Using micro adjust, Adjusting the loading position – Epson LQ-680Pro User Manual
Page 11: Epson lq-680pro
EPSON LQ-680Pro
11/00
EPSON LQ-680Pro
-
11
Using Postcards
You can print on a variety of postcards, loading them the same
way you load single sheets: from the paper guide or with the
optional cut-sheet feeder. (For instructions on loading single
sheets, see the User’s Guide.)
Before printing, make sure the paper thickness lever is set to
Auto
or
2
. Then select
Card
by pressing the
Tear Off/Special
Paper
button on the control panel.
Load postcards printable side up, top edge first.
Card mode is available only when the paper thickness
lever is set to Auto or 2 or higher on the scale.
When printing on postcards, make sure that your
software settings keep the printing entirely within the
printable area. Printing on the edge of a postcard can
damage the print head. For more information, see the
paper specifications on “Printable Area” on page 5.
Use postcards only under normal operating conditions.
Using Micro Adjust
The micro adjust feature allows you to move paper forward or
backward in 1/180-inch increments. You can use this feature to
adjust the loading, printing, and tear-off positions.
Adjusting the Loading Position
The loading position is the position of the paper after the
printer loads it. If your printing appears too high or low on the
page, you can change the loading position with the micro adjust
feature described below.
Top margin settings made in some application software
override adjustments you make to the loading position
with the micro adjust feature. If necessary, adjust the
loading position in your software.
1. Make sure the printer is turned on. If necessary, lift up the
printer cover so you can see the paper position.
2. Load either continuous or single-sheet paper. (Press the
Load/Eject
button to load continuous paper from the
tractor or a single sheet from the optional cut-sheet feeder.)
3. Hold down the
Pause
button for about three seconds. The
Pause
light starts flashing and the printer enters the micro
adjust mode.
4. Press the
LF/FF
D
button to move the paper toward the
front of the printer, or press the
Load/Eject
U
button to
move the paper toward the rear. The new loading position is
set to the position where you release the buttons.
When loading a sheet from the front (from the paper
guide), pressing the LF/FF
D
button moves the loading
position toward the top of the page. When loading a
sheet from the rear (from the cut-sheet feeders or the
tractor), pressing the LF/FF
D
button moves the
loading position toward the bottom of the page.
The printer has a minimum and a maximum loading
position. If you try to adjust the loading position beyond
these limits, the printer beeps and stops moving the
paper.
When the paper reaches the factory-set loading
position, the printer beeps and paper feeding pauses
briefly. Use the factory setting as a reference point
when adjusting the loading position.
If you want to eliminate the top margin and print at the
very top of the page, adjust the loading position so that the
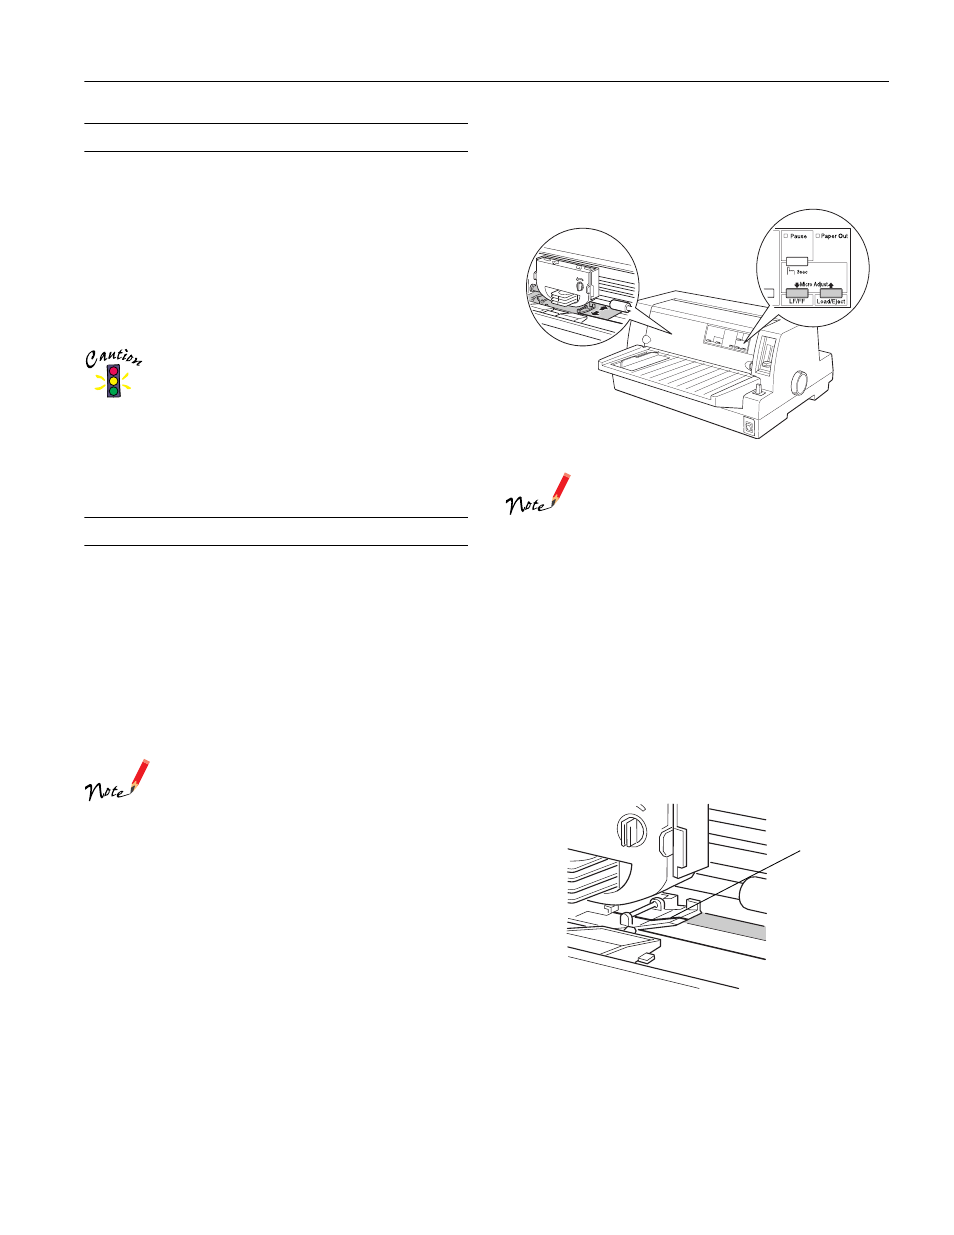
top of the paper lines up with the raised line on the ribbon
mask, as shown below.
5. After you set the loading position, press the
Pause
button
to turn off micro adjust mode.
For both single-sheet and continuous paper, your loading
position setting remains in effect until you change it, even if you
turn off the printer.
raised line