Sealey GSS1515G User Manual
Page 12
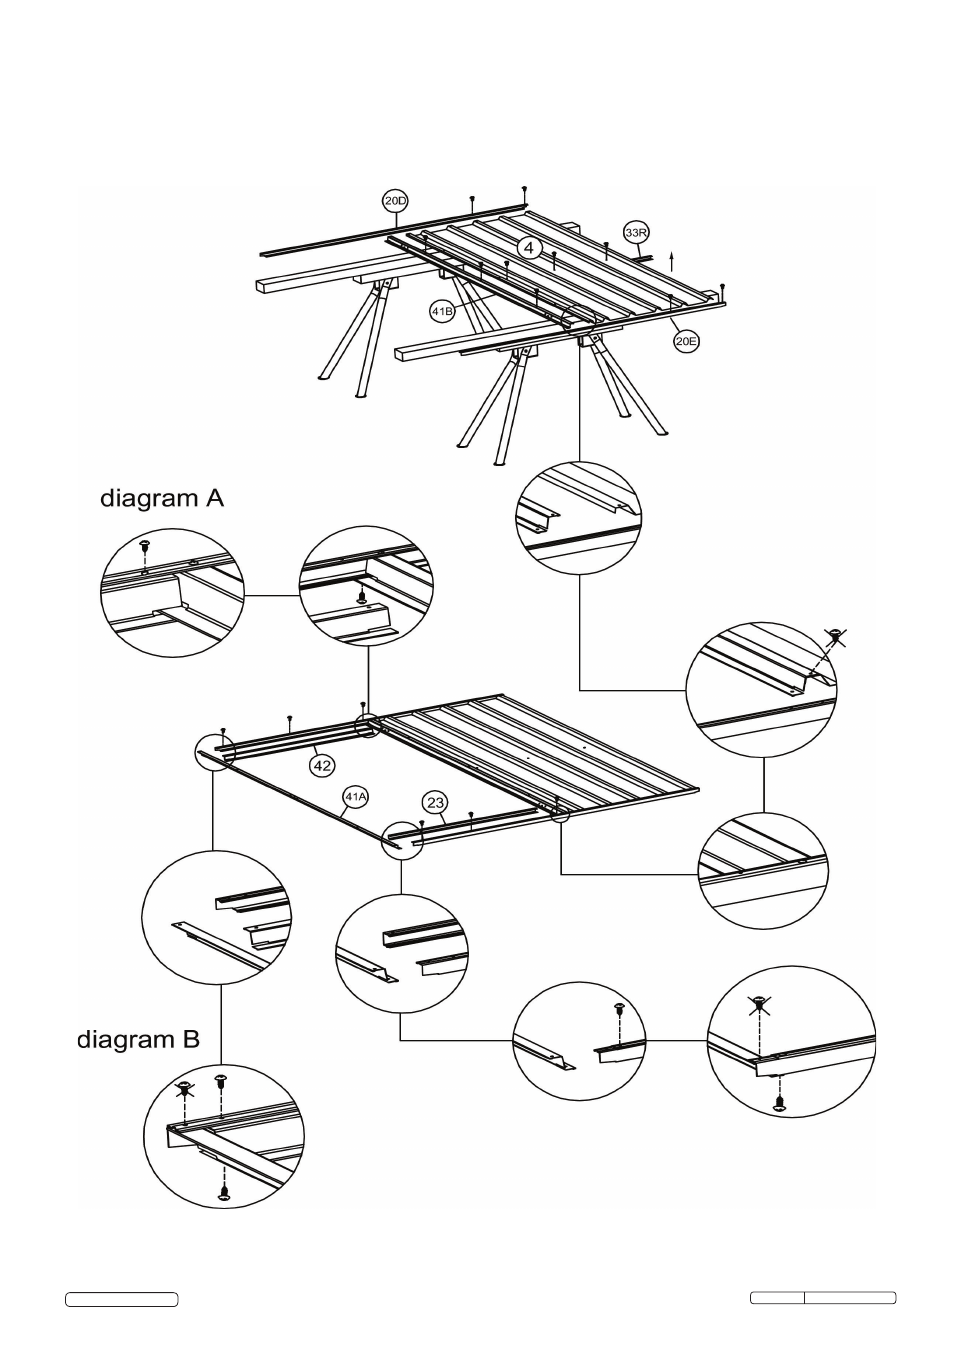
8.4. Assemble the front wall panel and front door.
8.4.1. Place 4 sheeting on the work table. Fit 20D the top channel, 20E the bottom channel
41B the jamb (there are pre-drilled holes for the next step on both 4 and 41B and these
must be aligned) and 33R the mid wall channel to the sheeting and fix them using the
self tapping screws (not those with cross mark at this stage).
8.4.2. Fit the 41A jamb, 42 jamb and 23 bottom channel in and fix them using the self tapping
screws
(not those with cross mark at this stage). Be aware of the joint details as per the
diagrams). Diagram B is the same as diagram A.
Original Language Version
GSS1515G Issue: 1 - 26/09/14
© Jack Sealey Limited
See also other documents in the category Sealey Equipment:
- SA0615 (7 pages)
- SAC2203B (6 pages)
- SAC2203B (8 pages)
- SAC2203B (6 pages)
- SSC12710D (14 pages)
- SAC0610E (4 pages)
- SAC10030 (4 pages)
- SSC11003 (9 pages)
- SAc3503B (6 pages)
- SSQC2409 (4 pages)
- SSQC2409 (4 pages)
- SSQC2409 (5 pages)
- SA1565 (5 pages)
- SA5055 (4 pages)
- SAC3203B3PH (6 pages)
- SAC72775BLN (6 pages)
- SAC55075B (5 pages)
- SAC03290 (3 pages)
- SAC05020 (4 pages)
- SAC106B (3 pages)
- SAC2203BLN (6 pages)
- ADB3000 (2 pages)
- SAC89025VLN (6 pages)
- CBOX2212V (1 page)
- PW2000 (5 pages)
- PW1712 (3 pages)
- PW4000 (4 pages)
- PW2500 (5 pages)
- PW5000 (5 pages)
- PWM1300 (7 pages)
- PWM2500SP (6 pages)
- LC300ST (2 pages)
- LC800ST (2 pages)
- LS1050V (4 pages)
- LS575VH (3 pages)
- LS520H (3 pages)
- LS450H (2 pages)
- LSH180V (2 pages)
- TP16 (1 page)
- TR3000 (2 pages)
- TP17 (2 pages)
- AK460DX (3 pages)
- AK466D (2 pages)
- TP69 (2 pages)
- TP6906 (3 pages)