Operation – Sealey SSQC0903P User Manual
Page 3
WARNING! ENSURE THAT YOU HAVE READ, UNDERSTOOD AND APPLIED
SECTION 1 SAFETY INSTRUCTIONS.
5.1.
DUTY CYCLE: at maximum pressure these compressors have a 50% duty cycle.
Do not run the air compressor for more than 30 minutes in any one hour. Doing so could
damage the air compressor.
5.2
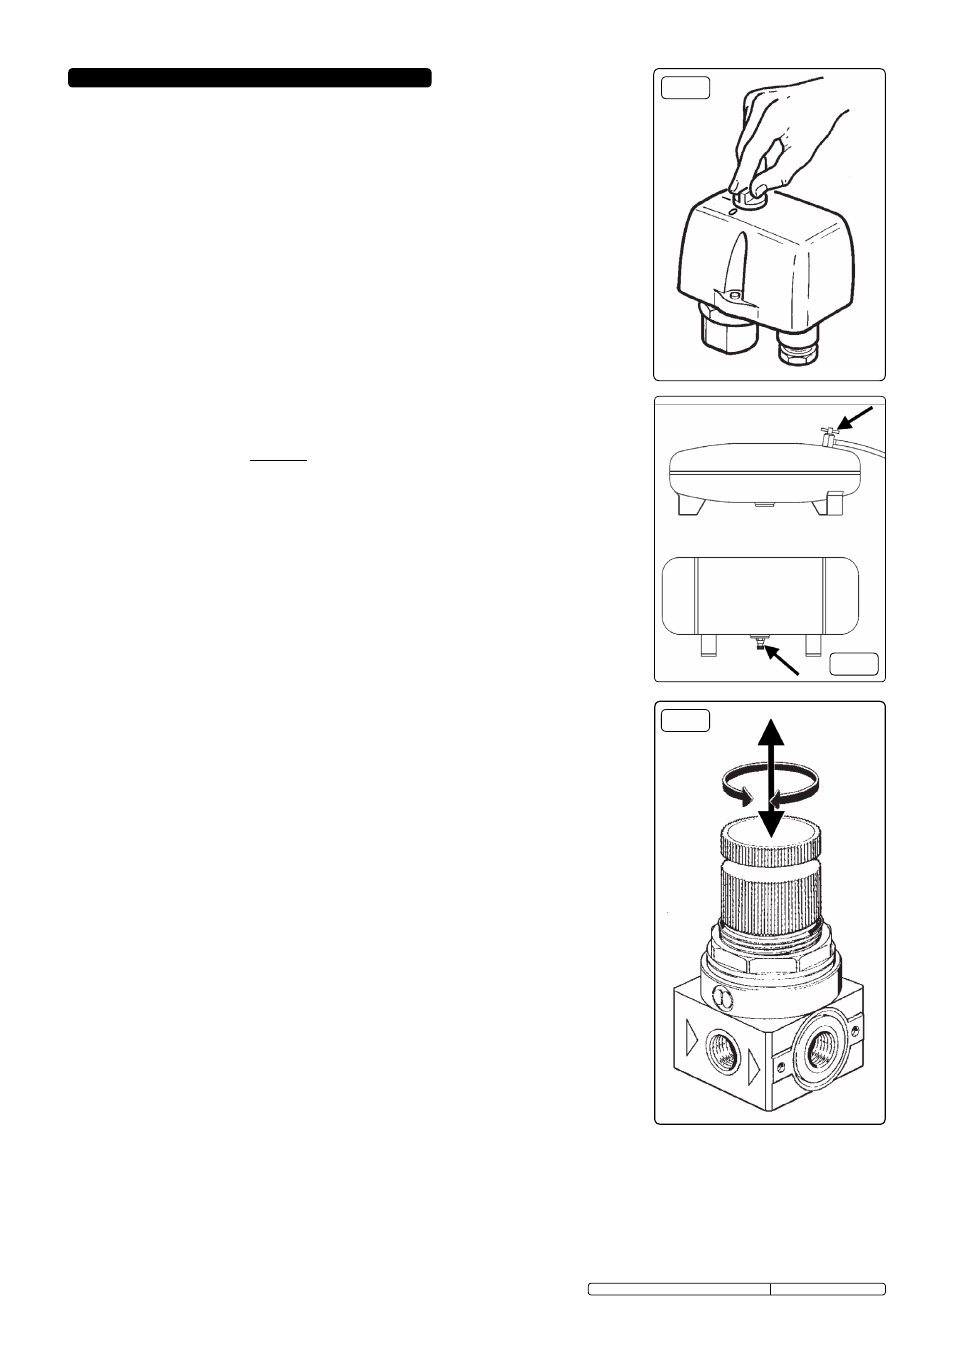
make sure that the main switch (fig.3) is ‘off’ (0).
5.3
check the oil level by looking through the sight glass, the level should be up to the centre of
the sight glass (fig.1B). fill with synthetic compressor oil only.
5.4
Ensure that the tank drain valve is closed (see fig.4).
5.5
close the air outlet valve so that lever is in line with the valve.
5.6
close the outlet pressure regulator by lifting then turning the knob clockwise, push down to
lock (fig.5).
5.7
connect the air tool required to the compressor via an air line connected to the air outlet
on the right-hand side of the regulator.
5.8
Plug the mains cable into the mains supply and start the compressor turning the switch to
the 'on' position (I).
5.9
allow the pressure in the tank to rise to the maximum at which point the compressor
will automatically cut out. tank pressure is shown on the gauge attached to the switch box.
5.10
fully open the air outlet valve by turning it through 90
°.
5.11 lift up the locking knob then begin to gradually open the regulator by turning the knob
clockwise until the gauge registers the required operating pressure specified for the
tool to be used. always
adjust up to the required pressure rather than down from a higher
pressure.
the required setting, once achieved, can be locked by pushing down the adjusting
knob (fig.5).
5.12 You can now begin to use the tool. the compressor will operate automatically cutting in and
out as required to restore the air pressure in the tank. the pressure switch (fig.3) stops the
motor when the maximum tank pressure is reached and restarts it when pressure falls
below the minimum threshold - approx. 2 bar (29psi) less than the maximum pressure.
Note: a) If the motor does not cut in and out, but runs continuously when using an air appliance,
the capacity of the compressor may be too small for the appliance.
b) the main gauge (attached to the switch box) indicates the pressure inside the main tank,
NOT the pressure supplied to the air equipment, which is shown on the gauge attached to
the regulator. should the pressure in the main tank exceed the pre-set maximum pressure,
the safety valve will activate (the safety valve is adjacent to the regulator).
WARNING! For this reason DO NOT tamper with, or adjust, the switch or the safety
valve.
NOTE: When the compressor is not being used set the regulated pressure to zero so as to avoid
damaging the pressure regulator).
5.13 to stop the compressor turn the main switch (fig.3) to the 'off' position (0). When the
compressor stops there will be a whistling sound as compressed air is vented from the
compressor head.
DO NOT, other than in an emergency, stop the compressor by switching
off the mains socket, or by pulling the plug out, as the pressure relief will not then occur and
motor damage may result upon restart.
5.14 When you have finished using the compressor unplug the unit from the mains power supply.
5.15 set the outlet pressure on the regulator to zero.
5.16
close the air outlet valve and remove the air line and air tool.
5.17 the tank must now be drained. this will release the air left in the tank and drain away
condensation that may have formed within the tank. choose a suitable location for this
operation and/or make provision to collect the condensation.
Wear ear and eye protection.
open the tank drain valve (see fig.4) slowly allowing air and moisture to bleed from the tank.
after bleeding close the drain valve to prevent debris building up in the valve.
WARNING! Water that is allowed to remain in the tank during storage will corrode and
weaken the air tank which could cause the tank to rupture. To avoid serious injury
drain the tank regularly.
5.18 SAFETY FEATURES
Thermal cut out: If the unit overheats the thermal cut out will operate and shut the unit
down. the thermal cut out will automatically reset when the unit has cooled down.
Current overload trip: If this trip operates, turn off and remove from the main supply.
Investigate and remedy the problem before connecting back to the main supply.
notE: When not in use drain the air form the tank and disconnect form the main supply.
5. OPERATION
Original Language Version
ssQc0903P, ssQc2405P, ssQc2409 Issue: 3 (sP) - 22/07/13
fig.3
ssQc0903P, ssQc2405P
ssQc2409
fig.4
fig.5