Fig.2 fig.3 fig.4, Fig.1, Tool selection – Sealey SAC2420E User Manual
Page 2: Operation
4. tOOL SELECtiON
iMPORtANt take care when selecting tools for use with
the compressor. Air tool manufacturers normally express
the volume of air required to operate a tool in cubic feet
per minute (cfm). this refers to free air delivered by the
compressor (‘air out’) which varies according to the
pressure setting. do not confuse this with the
compressor displacement which is the air taken in by
the compressor (‘air in’). ‘Air out’ is always less than ‘air
in’ - due to losses within the compressor - and so it is
important that, before choosing equipment, you study
the ‘Free Air delivery’ figures shown in the Specification
Chart.
5. OPERAtiON
WARNiNG! ENSURE tHAt YOU HAvE REAd,
UNdERStOOd ANd APPLiEd SECtiON 1 SAFEtY
iNStRUCtiONS.
5.1. make sure that the main switch (fig.5.1) is ‘off’ (down).
5.2. check the oil level by looking through the sight glass (fig.3).
5.3. ensure that the tank drain valve is closed (fig.1).
5.4. connect the air tool required to the compressor via an air line
connected to the air outlet.
5.5. Plug the mains plug into the mains supply and start the
compressor by pulling up the main switch (fig.5.1).
5.6. Allow the pressure in the tank to rise to the maximum at
which point the compressor will automatically cut out. tank
pressure is shown on the larger gauge (fig.5.6).
5.7. Begin to gradually open the regulator by turning the knob
clockwise (fig.5.2) until the small gauge registers the required
operating pressure specified for the tool to be used. Always
adjust up to the required pressure rather than down from a
higher pressure. the required setting, once achieved, can be
locked by screwing the locking ring (fig.5.3) up tight
underneath the adjusting knob.
5.8. You can now begin to use the tool. the compressor will
operate automatically cutting in and out as required to
restore the air pressure in the tank. the pressure switch
(fig.5.8) stops the motor when the maximum tank pressure is
reached and restarts it when pressure falls below the minimum
threshold - approx. 2 bar (29psi) less than the maximum
pressure.
Note: a) If the motor does not cut in and out, but runs continuously
when using an air appliance, the capacity of the compressor
may be too small for the appliance.
b) the main gauge (fig.5.6) indicates the pressure inside the
main tank,
NOt the pressure supplied to the air equipment,
which is shown on the smaller gauge (fig.5.5). should the
pressure in the main tank exceed the pre-set switch (fig.5.8)
maximum, the safety valve (fig.5.7) will activate.
WARNiNG! For this reason dO NOt tamper with, or adjust,
the switch or the safety valve.
2. iNtROdUCtiON & SPECiFiCAtiON
3. PREPARAtiON & ASSEMBLY
3.1. remove compressor from packaging and inspect for any
shortages or damage. If anything is found to be missing or
damaged, contact your supplier.
3.2. confirm that the mains voltage corresponds with the voltage
shown on the compressor data plate.
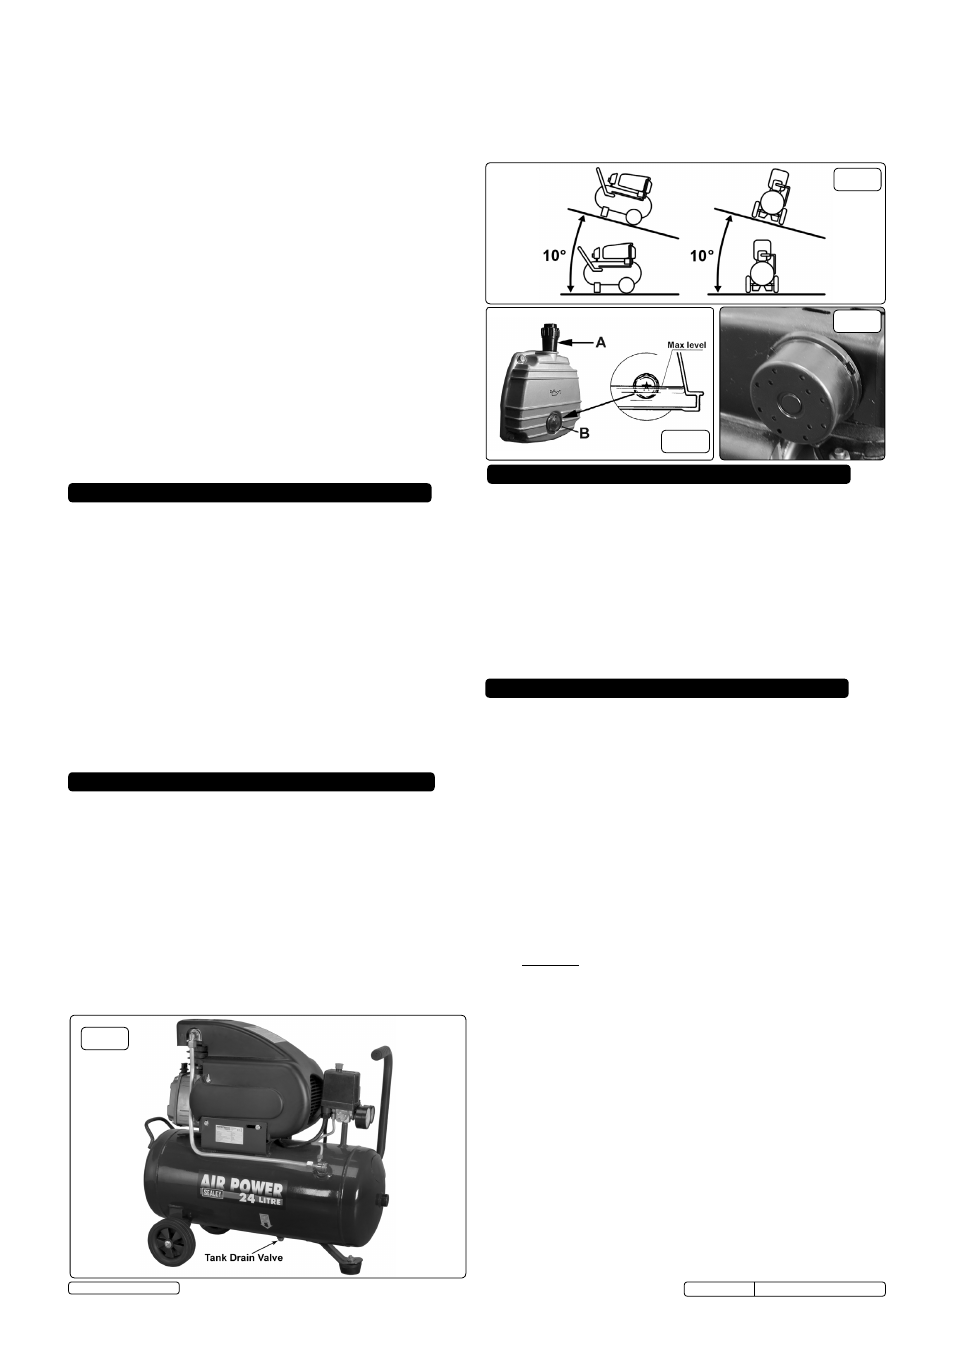
3.3. the compressor should be installed on a flat surface, or one
that does not exceed 10
° either transversely or longitudinally,
(see fig.2) and should be in a position that allows good air
circulation around the unit.
3.4. the compressor is supplied without oil in it. the oil is in a
separate container. remove the transit plug from the oil filler
aperture, pour oil into the aperture until it has reached the
correct level on the sight (fig.3). fit the oil filler/breather
supplied into the aperture.
MOdEL: .............................................................SAC2420E.v2
Motor output: ..................................................................... 2hp
voltage/Phase: ........................................................230V - 1ph
Rated supply: ..................................................................... 13A
Air displacement: ............................................ 6.8cfm(193l/m)
Maximum free air delivery: ............................. 4.6cfm(130l/m)
tank capacity: ................................................................... 24ltr
Maximum pressure: ..............................................116psi/8bar
Weight: ..............................................................................27kg
dimensions (W x d x H): ........................ 600 x 290 x 585mm
fig.2
fig.3
fig.4
7
dO NOt use the compressor outdoors, or in damp, or wet,
locations.
7
dO NOt operate within the vicinity of flammable liquids, gases or
solids.
7
dO NOt touch compressor cylinder, cylinder head or pipe from
head to tank as these may be hot.
7
dO NOt use this product to perform a task for which it has not
been designed.
7
dO NOt deface the certification plate attached to the compressor
tank.
7
dO NOt cover the compressor or restrict air flow around the unit
whilst operating.
q
dANGER! dO NOt direct the output jet of air towards people or
animals.
7
dO NOt operate the compressor without an air filter.
7
dO NOt allow anyone to operate the compressor unless they
have received full instructions.
WARNiNG! the air tank is a pressure vessel and the following
safety measures apply:
7
dO NOt tamper with the safety valve, dO NOt modify or alter the
tank in any way and
dO NOt strap anything to the tank.
7
dO NOt subject the tank to impact, vibration or to heat and
dO NOt allow contact with abrasives or corrosives.
WARNiNG! If an electrical fuse blows, ensure it is replaced with
an identical fuse type and rating.
3
When not in use, store the compressor carefully in a safe, dry,
childproof location.
Aluminium cylinder head with cast iron cylinder gives added resistance
to wear. suitable for general purpose workshop applications. Pump
head directly coupled to heavy-duty induction motor for reliable and
quiet operation. Welded tank complies with latest european standards.
fitted with fully automatic pressure cut-out switch with twin gauges
displaying tank and working pressures. fitted with AstA/Bs approved
non-rewireable plug.
fig.1
3.5. Ensure that the air vent in the oil filler/breather is free
from debris. if the air vent is blocked, pressure can build
up in the crankcase causing damage to the compressor
and possible personal injury.
3.6. If it is not already fitted, screw the air filter holder into the
inlet port (fig.4).
© Jack sealey limited
Original Language Version
sAc2420e.V2 Issue no: 3 (sP) - 25/06/14