Installation and use – Sealey LFT03 User Manual
Page 2
5. inSTallaTiOn and uSe
5.1 The following tools and equipment will be required.
5.1.1 suitable ladder to access the loft.
5.1.2 ruler and tape measure (3 metre).
5.1.3 Pencil and bradawl.
5.1.4 Drill & drill bits for wood, 2mm, 3mm and 13mm.
5.1.5 Medium Phillips screwdriver.
5.1.6 8mm spanner x2.
5.1.7 17mm spanner.
5.1.8 Wood glue (optional).
5.1.9 Lighting for the loft.
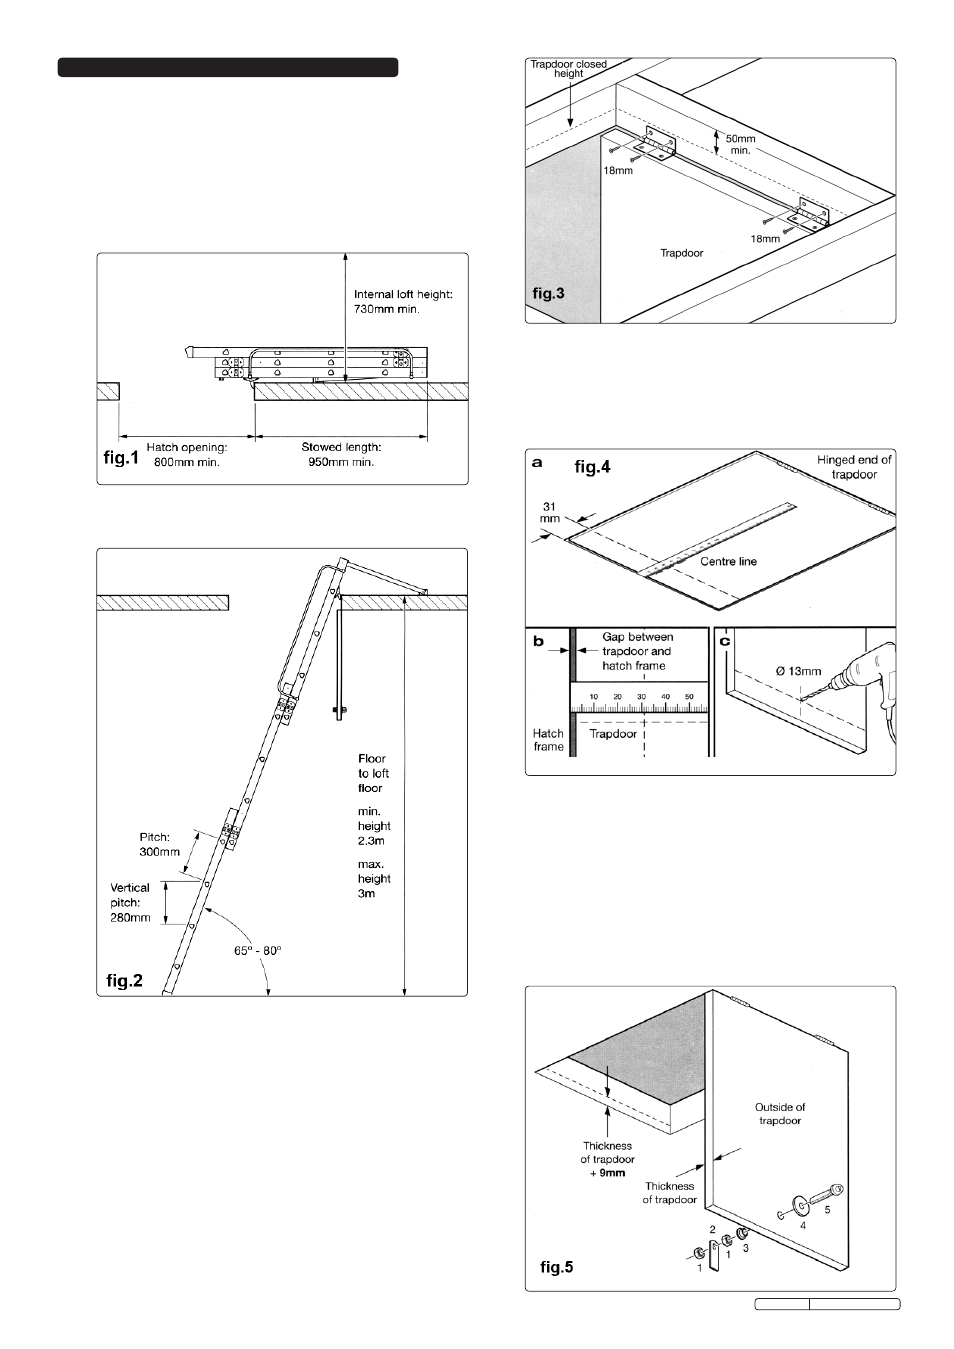
5.3 Hanging the trapdoor (see fig.3)
5.3.1 there should be no obstructions to the movement of the
trapdoor. Any old supports and hinges from previous trapdoors
should be removed. the new trapdoor should be a minimum of
20mm thick with a gap of 2mm all the way around when fitted in
the hatch.
note: the trapdoor will attach to the same side of the hatch frame as
the ladder.
5.3.2
attach the hinges to the trapdoor: Drill 2mm pilot holes and
screw the hinges (equally spaced) to one end of the trapdoor
using 4 x 18mm screws.
note: to increase the strength of the
fixings, fill the screw holes with wood glue before inserting the
screws. there must be a minimum of 50mm between the top of
the trapdoor (when closed) and the top edge of the frame.
5.3.3
install the trapdoor: Position the fitted hinges against the hatch
frame and mark the fixing hole positions. Drill 2mm pilot holes
and screw the hinges to the hatch surround using 4 x 18mm
screws as shown in fig.3.
5.3.6
Fitting the twist catch assembly: referring to fig.5, push the
twist catch collars (3 & 4) into either side of the hole in the trap
door with the large collar (4) on the outside.
5.3.7 from the outside, insert the pivot pin (5) through the hole and
secure with a nut (1). note: the pivot pin must still be able to
turn freely.
5.3.8 Place the catch lever onto the pivot pin as shown below and
secure with the second nut (1), again ensure that the pivot pin
still turns freely.
5.3.9 Measure the thickness of the trapdoor and add 9mm. Draw a
line this distance up from the bottom edge and parallel with the
hatch opening.
5.3.4
Preparing the trapdoor: close the trapdoor and hold in
position. referring to A & B in fig.4, measure and mark a line
onto the trapdoor, 31mm in from the edge of the hatch frame
and at the opposite end to the hinges.
5.3.5 Measure and mark a centre line. referring to c in fig.4, open the
trapdoor and drill a 13mm hole where the lines meet. sand off
any rough edges. Drilling a small pilot hole first may help.
5.2 See figs.1 & 2 for the necessary space requirements for
both the stowed and deployed positions.
Original Language Version
Lft03.V2 Issue: 1 - 04/08/11