Sealey LAD001 User Manual
Lad001, Ladder stabilizer model no, Instructions for
Thank you for purchasing a Sealey product. Manufactured to a high standard this product will, if used according to these instructions
and properly maintained, give you years of trouble free performance.
IMPORTANT: PLEASE READ THESE INSTRUCTIONS CAREFULLY. NOTE THE SAFE OPERATIONAL REQUIREMENTS, WARNINGS & CAUTIONS.
USE THE PRODUCT CORRECTLY AND WITH CARE FOR THE PURPOSE FOR WHICH IT IS INTENDED. FAILURE TO DO SO MAY CAUSE
DAMAGE OR PERSONAL INJURY AND WILL INVALIDATE THE WARRANTY. PLEASE KEEP INSTRUCTIONS SAFE FOR FUTURE USE.
INSTRUCTIONS FOR:
LADDER STABILIZER
Model No:
LAD001
1. SAFETY INSTRUCTIONS
2. INTRODUCTION AND CONTENTS
1.1
GENERAL SAFETY
WARNING! Ensure Health and Safety, local authority, and general workshop practice regulations are adhered to when using this
equipment.
Familiarise yourself with the application and limitations of the ladder Stabilizer, as well as the potential hazards.
Maintain the equipment in good condition.
Replace or repair damaged parts. Use genuine parts only. Unauthorised parts may be dangerous and will invalidate the warranty.
WARNING! When viewed from the front, the top of the ladder section(s) must always be directly above the base.
Place ladder at an angle of 65° to 70° - foot of ladder 1 metre from wall for each 3 metres up - for stability.
Where possible, lash top of ladder to a fixture to prevent slipping.
WARNING! Never over-reach when on the ladder.
Keep children and unauthorised persons away from the working area.
DO NOT use the ladder Stabilizer for any purpose other than that for which it is designed.
DO NOT use the equipment if any parts are damaged or missing as this may cause failure and/or personal injury.
DO NOT allow children to climb the ladder.
DO NOT use the equipment when you are tired or under the influence of alcohol, drugs or intoxicating medication.
When not in use store in a safe, dry, childproof area.
Ensure strap is securly tightened around the lower rung of the ladder.
4. MAINTENANCE
4.1
Periodically check that all nuts are tight and secure but
DO NOT overtighten.
4.2
Check that the rubber feet on the Stabilizer are in good condition and are
not worn, replace if necessary.
LAD001
Issue: 1 - 23/09/08
2.1
Introduction
Safe and easy way to stabilize your ladder on even or uneven surfaces. Yellow phosphate finish for added corrosion resistance.
Suitable for trades where ladders need to be used for on-site applications. Features heavy-duty metal feet fitted with non-slip rubber
pads for added grip and four eyelets for pegging to ground (pegs not included). Tray is adjustable for angle and includes an integral tie
down to secure ladder. Increases ladder footprint from 26cm² to 3097cm².
2.2
Contents
Main frame. . . . . . . . . . 1
Feet . . . . . . . . . . . . . . . 4
Nuts . . . . . . . . . . . . . . . 4
Fig.1
NOTE: It is our policy to continually improve products and as such we reserve the right to alter data, specifications and
component parts without prior notice.
IMPORTANT: No liability is accepted for incorrect use of this product.
WARRANTY: Guarantee is 12 months from purchase date, proof of which will be required for any claim.
INFORMATION: For a copy of our latest catalogue call us on 01284 757525 and leave your full name and address, including postcode.
01284 757500
01284 703534
Sole UK Distributor
Sealey Group,
Bury St. Edmunds, Suffolk.
www.sealey.co.uk
Web
3. ASSEMBLY & USE
3.1
Stabilizer Assembly.
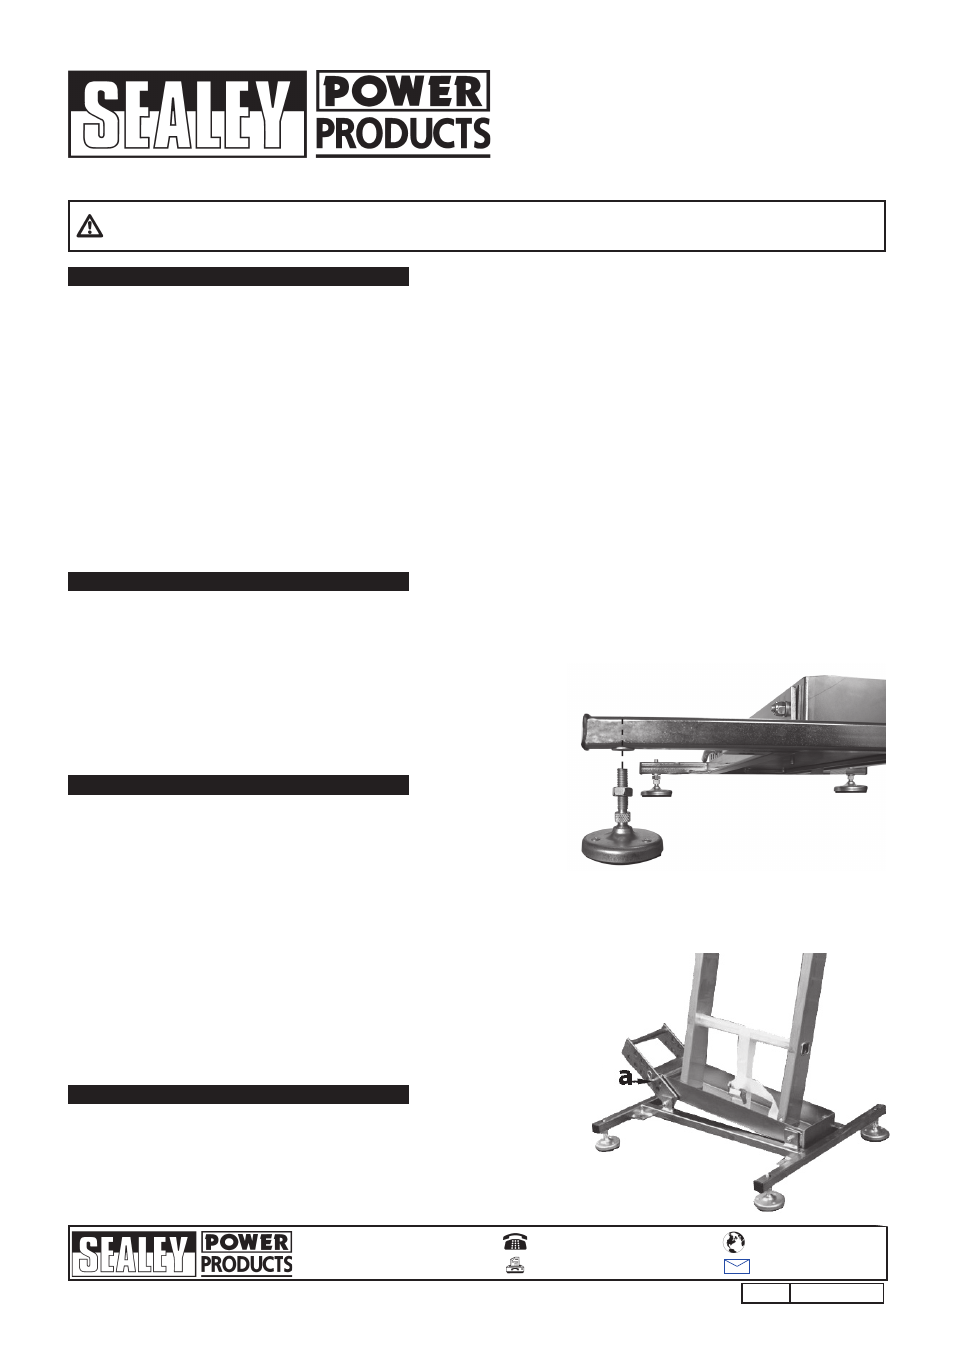
3.1.1 The stabilizer will come mostly assembled apart from the four feet. Screw the nuts
onto the feet then screw the feet into the threaded inserts on each corner (Fig.1).
3.2
Using the Stabilizer
3.2.1 Locate the stabilizer on solid even or uneven ground, the stabilizer uses a raising tray to counter uneven ground, Fig.2. Ensure that
the stabilizer is the correct way around to achieve this (the tray raises away from the slope).
The stabilizer has back to front adjustment within the feet, loosen the nut and screw in or out to the required height then tighten nut.
3.2.2 Remove the 'R' clip from the locking pin, withdraw the locking pin from the adjuster bracket (Fig.2a).
3.2.3 Lift the tray so that the ladder can be placed on a level surface (a spirit level can be used but by eye should be accurate enough),
move the adjuster bracket through its arc of movement to align the holes in
the tray with ones in the bracket, when the holes line up insert the pin and
secure with 'R' clip.
3.2.4 Place the ladder in the tray and secure the strap around the lower rung of the
ladder. Wrap the strap round the rung, pass it through the grip and pull tight,
as shown in Fig.2.
NOTE! You may also use pegs to secure the stabilizer to the ground to prevent
stippling (pegs not supplied).
Fig.2