Kichler 15215 User Manual
Kichler Hardware
THIS UNIT IS FOR USE WITH THE FOLLOWING KICHLER BOLLARD MOUNTING KITS ONLY:
15603, 15604, 15605, 15613, 15614, 15615
ALL INSTALLATIONS SHOULD COMPLY WITH LOCAL ELECTRICAL CODES AND THE NATIONAL ELECTRIC CODE FOR FIXTURE
MOUNTING AND WIRING METHODS. IF YOU HAVE ANY DOUBTS CONCERNING INSTALLATION, CONTACT A QUALIFIED LICENSED
ELECTRICIAN.
ESTA UNIDAD ES SOLAMENTE PARA USO CON LOS SIGUIENTES JUEGOS DE MONTAJE EN BOLARDO KICHLER: 15603, 15604,
15605, 15613, 15614, 15615.
TODAS LAS INSTALACIONES DEBEN CUMPLIR CON LOS CÓDIGOS ELÉCTRICOS LOCALES Y CON EL CÓDIGO ELÉCTRICO NA-
CIONAL PARA MONTAJE DE ARTEFACTOS Y MÉTODOS DE CABLEADO. SI USTED TUVIERA ALGUNA DUDA CONCERNIENTE A LA
INSTALACIÓN, COMUNÍQUESE CON UN ELECTRICISTA LICENCIADO CALIFICADO.
TURN OFF POWER.
1) Fixture can be mounted using one of 6 sizes of bollard mounting kits.
(sold separately).
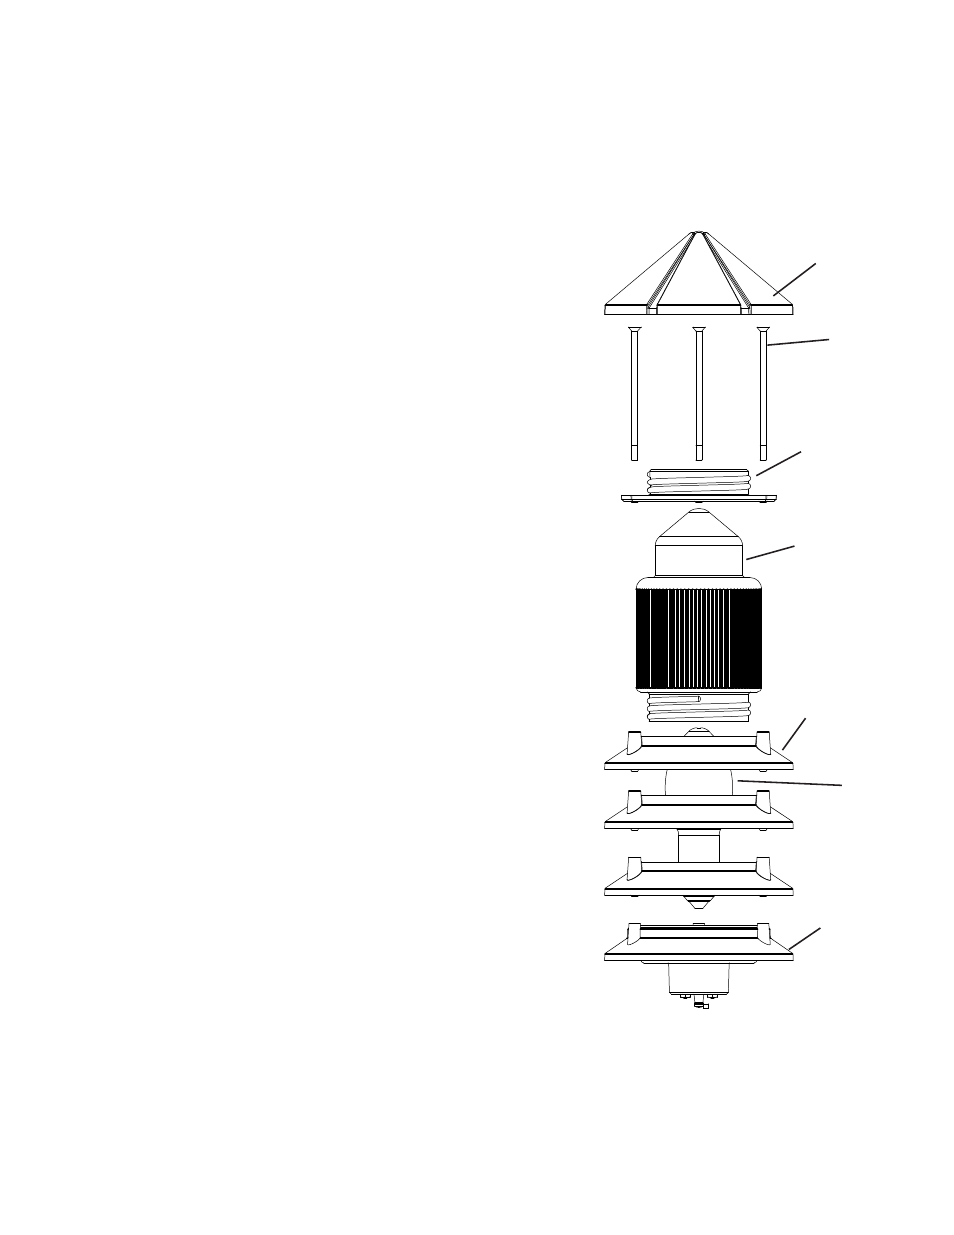
2) If fixture head is assembled, unscrew fixture roof. Remove the three
screws. Lift off the roof adapter and louvers. Unscrew the glass diffuser.
NOTE: fixture roof is offered in 3 styles.
3) Assemble fixture base to bollard tube. Secure in place using screws
and lock washers provided in bollard mounting kit.
4) Connect black socket wire to the ballast wire marked “LAMP”. Connect
white socket wire to ballast wire marked “COM”. Connect the green
fixture head wire to the green wire on the ballast assembly.
5) After wire connections are complete, mount bollard tube to casting
using provided hex-socket flat-head screws.
6) Lamp fixture, noting the lamp type and wattage indicated on the ballast.
Lamp type and wattage must match the ballast.
7) Re-install the diffuser, louvers, and fixture roof.
APAGUE LA ALIMENTACIÓN ELÉCTRICA
1) El artefacto se puede montar usando uno de los 6 tamaños de los
juegos de montaje de bolardo (se venden por separado).
2) Si la cabeza del artefacto está montada, destornille el techo del
artefacto. Quite los tres tornillos. Levante sacando el adaptador del
techo y las persianas. Destornille el difusor de vidrio.
NOTA: el techo del artefacto se ofrece en 3 estilos.
3) Monte la base del artefacto al tubo del bolardo. Sujete en el lugar
usando los tornillos y arandelas de seguridad que se proveen en el
juego de montaje del bolardo.
4) Conecte el alambre negro del casquillo al alambre del estabilizador
marcado “LAMP” (lámpara). Conecte el alambre blanco del casquillo al
alambre del estabilizador marcado “COM” (común). Conecte el
alambre verde de la cabeza del artefacto al alambre verde del conjunto
del estabilizador.
5) Después de terminar de hacer las conexiones de los alambres, monte
el tubo del bolardo a la fundición usando los tornillos de cabeza plana
de casquete hexagonal que se proveen.
6) El artefacto de la lámpara, notando el tipo de lámpara y vataje
indicados en el estabilizador. El tipo de lámpara y vataje deben
coincidir con el estabilizador.
7) Reinstale el difusor, las persianas y el techo del artefacto.
ROOF
TECHO DEL ARTEFACTO
DIFFUSER
DIFUSOR
LOUVER
PERSIANA
LAMP
LÁMPARA
FIXTURE BASE
BASE DEL
ARTEFACTO
For warranty information please visit: http://www.landscapelighting.com/portal/warranty_page
Para informacion de la garantia por favor visite: www.landscapelighting.com/portal/warranty_page
Date Issued: 12/2/11
IS-15215-US
SCREW
TORNILLO
ROOF ADAPTER
ADAPTADOR DEL TE-
CHO