Handling batteries, Using the display panel, Checking the battery – Epson 700 User Manual
Page 5: Flash, Epson photopc 700
EPSON PhotoPC 700
5/98
EPSON PhotoPC 700
- 5
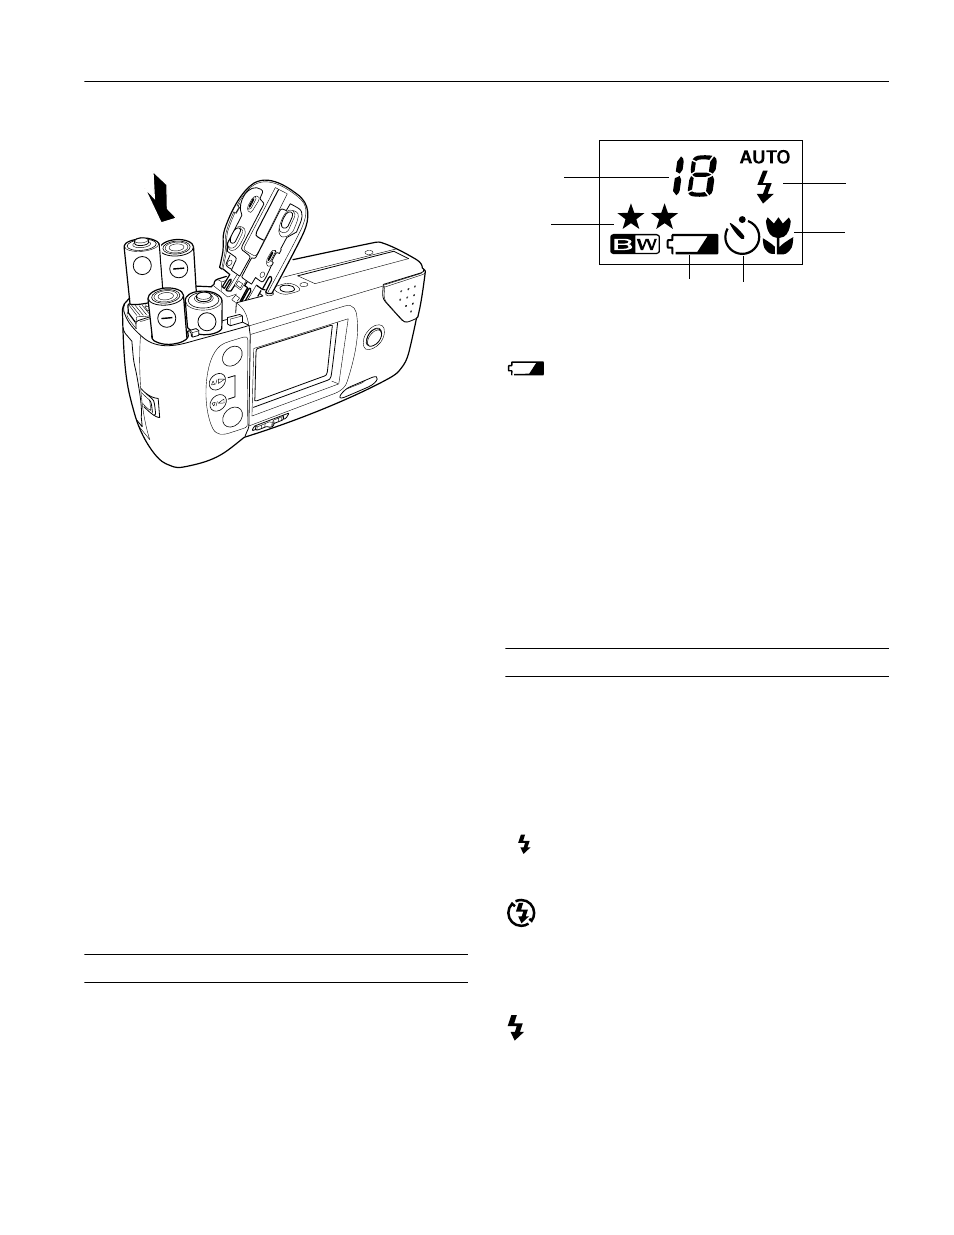
3. Insert all four batteries into the compartment, positioning
the + and – ends as shown:
4. Close the battery cover and slide it to the right while
pressing down, until it snaps into place.
Handling Batteries
If you forget to charge your NiMH rechargeable batteries or
they need to be replaced, the camera can also accept the
following:
❏ Rechargeable AA NiCad batteries
❏ Single-use AA alkaline batteries (Energizer
®
brand
recommended)
❏ Single-use AA lithium batteries (longer life)
WARNING
To avoid the danger of fire or explosion, do not mix different types of
batteries. Replace all four batteries at the same time. Do not allow
the battery contacts to touch metal objects such as coins or keys,
which could short out the battery’s circuits. Charge your NiMH
batteries only with the EPSON NiMH battery charger (Model EU-23).
Do not put in fire or water, drop or apply pressure, disassemble,
short-circuit, or apply heat. Keep away from small children. If battery
acid gets into your eyes or on your skin, immediately rinse the
affected area well with water and seek medical treatment. If a battery
is swallowed, seek medical treatment immediately.
Using the Display Panel
The display panel shows the camera’s current settings, the
status of your batteries (when power is low), and the number
of pictures remaining.
.
Checking the Battery
When your battery power is almost out, the low
battery icon appears on the display panel. The icon
flashes when your battery power is completely out.
To save battery power, the camera shuts off automatically after
60 seconds. It also shuts off when you take a picture with the
LCD screen. To turn the camera back on, press the shutter
button all the way down or close the lens cover and then open
it again.
You can change the battery saving mode to have the camera
remain on after you take a picture with the LCD screen.
However, you’ll use up your batteries faster. You can also
change the auto shut-off time period, or press the shutter
button to turn the camera back on.
Flash
The camera’s built-in flash is effective within a range of
8 inches to 8 feet (20 cm to 2.4 m). Press the flash button to
cycle through the three flash settings. An icon for each setting
appears on the display panel as shown below:
Auto
The flash goes off automatically whenever it’s needed
for adequate lighting (factory setting).
Flash Off
The flash is disabled, even when adequate lighting is
not available. Use this setting for special effects, where
flash photography is prohibited, or for macro mode
close-ups.
Forced Flash
The flash goes off with every picture you take. Use this
setting to compensate for backlighting; for example,
when you are facing a light source.
+
+
timer
approximate
pictures
remaining
image
quality and
mode
low battery icon
flash
mode
macro
mode
AUTO