Ascaso – Ascaso Dream User Manual
Page 14
Versatile (pod/ground)
(versatile mobile system)
Pod coffee:
Points 1 and 2 as in the above section.
Use the specific filter holder
19
or Pod
filter (option). (See picture 4)
Points 5, 6, 7 and notes as in the above
section.
Ground coffee:
For ground coffee, fill the coffee filter
basket up to the rim (see picture 2B),
and tamp it. Fill and tamp the coffee
again. Points 1,2,4,5,6 and 7 as in the
above section.
Pod
(fixed holder-pod only).
Points 1 and 2 as in the section on ground
coffee.
Place the pod in the filter holder and turn
it smoothly to the right as far as it will go.
Do not force it, closing is smooth (see
picture 5). Points 5,6,7 and notes as in
the section of ground coffee.
Attention! Do not remove or turn the
filter holder while the water is passing
through as the appliance is at high
pressure at this moment.
Notes:
1 .The filter holder should always be
placed in the machine, in closed
position, so that it remains warm.
2 .Place the cups on the cup warmer
9
. T h e r i g h t t e m p e r a t u r e
(optimum40ºC/105ºF) will improvethe
espresso. (see picture 6)
3 .If the coffee does not come out very
hot, press steam switch
3
for 10
seconds. This will raise the
temperature of the machine.
4 .Coffee will continue to drip from the
spouts for a moment after the coffee
swich is turned off.
5 .It is normal for the coffee grounds to
be very wet or a soup-like
consistency if the filter holder is
removed within one to minutes after
brewing.
THERMOMETER
The thermometer will show you the
temperature of the machine. It should
b e b e t w e e n 8 0 º C / 1 8 0 º F a n d
110ºC/230ºF for coffee, and higher than
125ºC/257ºF for steam.
Important: Tamped
The best espresso results are
obtained when ground coffee is
firmly tamped.
5-
. Preparation of cappuccino
1 - .Press general switch
1
. Pilot lights
13
,
6
(all models) and
12
(Dream).
2 . -When pilot lights
6
(all models) and
12
(Dream)go out, press switch
3
and pilot light
6
(all models) and
12
(Dream). Pilot lights
6
(Arc, Elipse,
Basic) and
12
(Dream) will light up,
at the same time the pump is
activated at short intervals.
3 . -Turn side knob
4
to open, releasing
the water inside until it drips
intermittently. Turn side knob
4
again
to close and wait approximately 40-
50 seconds before placing the steam
nozzle in the milk jug, then turn side
knob
4
again to open and release
the steam.
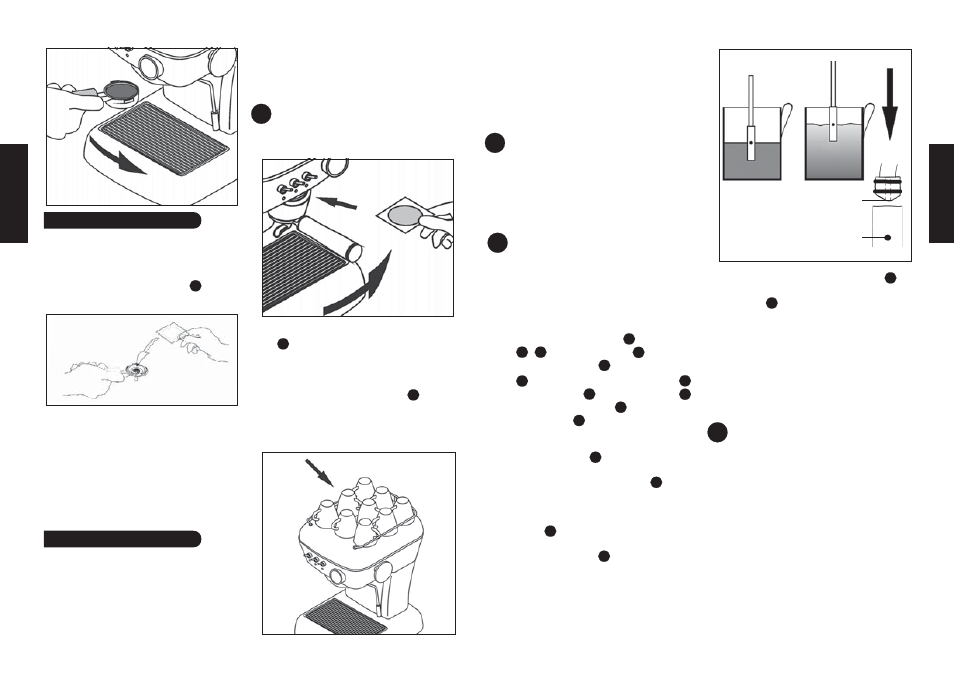
4-.Place the tube
5
into the milk to
heat it, so that the milk covers exactly
half the absorption hole (never coverit
completely ). Do this for the whole
process (see picture 7).
5.-Liquid is absorbed through the hole
and cream forms automatically.
The recipient should be lowered
gradually while the milk emulsifies.
6.-Turn the hot water/steam knob
4
to
closed position, and turn off thesteam
switch
3
.
If you want a creamy cappuccino, use
cold, fresh, full-fat whole milk.
If you want hot milk (without emulsifying)
the hole must be completely covered.
For obtaining micro-foam, you should
keep the absorption hole in the same
position.
Important
We recommend running steam
through the wand for a few seconds
(5'') after each use to clean and
prevent clogging.
To clean the absorption holes (A and
B), you can use a toothpick or a
paperclip. This will ensure the tube
is free of blockages. Hole B always
on the top (see picture 7)
After steaming milk, the steam has
to be purged before brewing (picture
2B)
ascaso
ascaso
ENGLISH
ENGLISH
22
23
Picture 4
!
!
!
!
CLEAN A AND B
AFTER USE.
Picture 7
A
B
Picture3
Picture 5
Picture 6