Lowel rifa, Exchange, Instructions – Tiffen Lowel Rifa eXchange User Manual
Page 2
TH-X300
For all Rifa eX models
Standard lamphead that is supplied with the
Rifa eX 44. It will also fit the other models of
Rifa eX as an accessory head, allowing use of
lower wattage, as well as some lower voltage
DC powered, lamps.
Wattage
/
Voltage
125 - 300W
at
120V
235 - 300W
at
240V
50 - 100W
at
12V
200W
at
30V
n
1 Unfold Egg Crate accessory. With the
diffuser already attached, place the Soft Egg
Crate over the front of the light, inserting the
corner pins of the reflector frame into the metal
tube sockets located in the egg crate corners.
n
2 Secure the egg crate to the body of the
Rifa with Velcro strips located around the edge
of the reflector housing.
Lowel Rifa
®
eXchange
®
Instructions
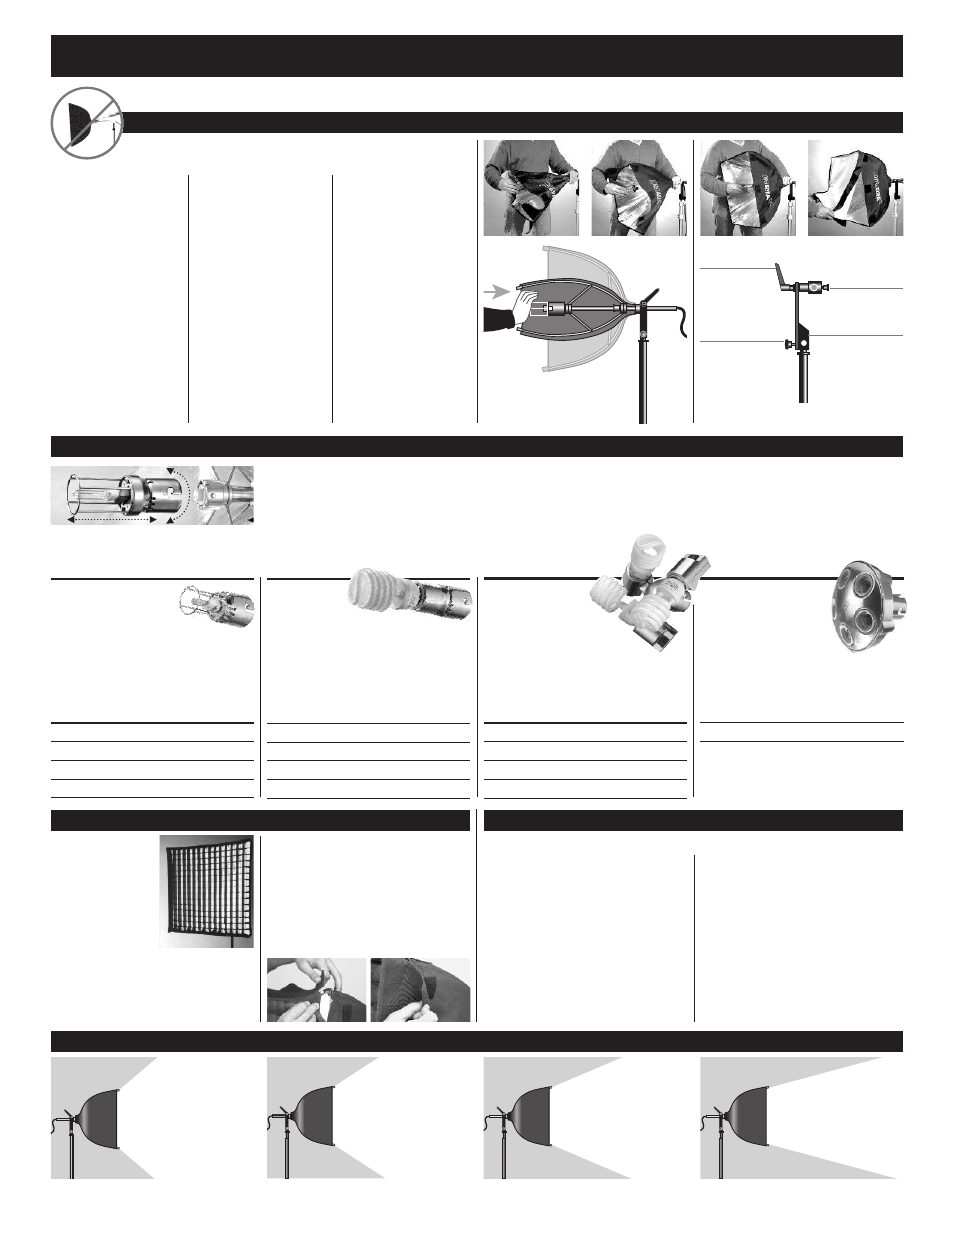
n
Remove the Rifa eX unit
from its sleeve and mount and
lock on suitable stand.
n
Release tilt lock handle,
tilt light to horizontal, relock
tilt handle, release the Velcro
strap around the folded
assembly.
n
Reaffix the strap to itself.
Unfurl Rifa-lite reflector mate-
rial until assembly loosens.
n
Loosen thumbscrew locat-
ed on back end of fixture.
n
While holding the assem-
bly base push the socket/lamp
cage assembly (avoid touch-
ing lamp) inward until the
assembly “click-locks”
into position.
n
Tighten thumbscrew clock-
wise to lock fixture open.
Warning: The fixture must
be locked open before using,
failure to do so may cause the
fixture to close during opera-
tion, damaging the fixture.
Note: Make sure tilt lock
handle is on left side when
viewed from rear, this will
cause lock to tighten if light
droops forward on stand.
n
Orient on stand with one
leg extending straight out
under Rifa for best balance.
n
For increased balance, use
Rifa Balance Bar accessory.
n
Attach diffuser panel by
placing it over the front of the
light inserting the corner pins
of the reflector frame through
the grommets of the diffuser,
securing it with Velcro strips
located around the reflector.
n
Never use more than one
diffuser at a time.
Always operate Rifa-lite
with diffuser panel in
place.
n
Attach 16' extending
(switched) power cord to
captive cable IEC connector.
Attaching Soft Egg Crates
Packing & Storing Rifa eX
eXchange
™
System Accessory Lampheads
(See eXchange System Lamphead Instructions Sheet for more information)
Setting up Rifa eX
2
1
2
3
4
Thumbscrew
Stand mounting
bracket
Tilt lock
handle
Stand lock
Soft Fabric Egg Crates
are a valuable accessory
for controlling the aprox-
imately 80˚beam angle
of Rifa, which can cause
unintended light spill in
other areas of your shot.
They can also help pre-
vent a moving subject from becoming overlit
as they approach the light. Egg Crates are
available in 3 different dispersion angles (30,
40 & 50 degree) for each model of Rifa. Egg
Crates will lower output of Rifa eX.
Rifa alone - 75°
Rifa with 30° Egg Crate
Rifa with 40° Egg Crate
Rifa with 50° Egg Crate
Unplug light and allow to cool for at least five minutes before disassembly.
n
Detach Soft Egg Crate (if used)
and front diffuser. To prevent damage to the
diffuser, wrap material around tube and place
in pocket of light storage sleeve.
n
Accessory flourescent lampheads & lamps
will prevent Rifa eX from collapsing fully.
Remove lamps and head before collapsing.
Place supplied protective caps on head & post.
n
Hold stand mounting bracket, loosen
thumbscrew on mounting arm assembly and
push shaft forward until frame has collapsed.
n
Smooth reflector material, and secure with
Velcro strap, tilt light down, remove unit from
light stand and place in sleeve.
Rifa eX Beam Angles with Soft Egg Crates
(Beam Angle = Point at which intensity drops to 50% of maximum)
Warning: Do not pull power cable to open light. Doing so may dam-
age the cable & fixture. Make sure fixture is unplugged before setup.
FLO-X1
For all Rifa eX models
This accessory lamphead is designed to take
screw-thread edison base (normal household
socket) daylight fluorescent lamps. It will also
allow use of low wattage incandescent lamps
(27W or less)
Wattage / Voltage
Model
27W or 80W @ 120/240V, 65W @ 120V Rifa eX 88
27W at 120/240V or 65W at 120V
Rifa eX 66
27W at 120/240V
Rifa eX 55
27W at 120/240V
Rifa eX 44
FLO-X3
For all Rifa eX models
This accessory lamphead is
designed to take screw-thread edison
base (normal household socket) daylight
fluorescent lamps, switched separately.
Wattage / Voltage
Model
27W or 80W @ 120/240V, 65W @ 120V
Rifa eX 88
27W or 80W @ 120/240V, 65W @ 120V
Rifa eX 66
27W or 80W @ 120/240V, 65W @ 120V
Rifa eX 55
27W at 120/240V
Rifa eX 44
TH-X1000 Standard lamphead supplied
with Rifa eX 55, 66, & 88. Can not be used
with Rifa eX 44.
Lowel Rifa eX uses quick-swapping accessory lampheads of the eXchange System, to increase versatility in lamps & output.
It is not necessary to remove supplied Standard Lamphead when storing or transporting Rifa eX.
Stand orientation viewed from behind
n
To remove standard (supplied) lamphead, make sure fixture is
unplugged & cool to touch. With diffuser removed, fixture open, on
stand, hold rear fixture stem, and push in & twist lamphead to release.
n
Use same method to install accessory head, taking note of proper
bayonet pin / cutout alignment.
1
2
FLO-X5
For Rifa eX 88 only
Uses screw-thread edison base
lamps. Designed for maximum
output from Rifa eX 88, especially when used
with the 80w lamp. Use with Rifa Balance Bar
for improved balance on stand.
Wattage / Voltage
Model
27W or 80W @ 120/240V, 65W @ 120V
Rifa eX 88