Tiffen Lowel i Light User Manual
Lowel i & id-light instructions
The Lowel i & id-lights are profession-
al DC powered lighting fixtures.
Read these instructions and lamp man-
ufacturer’s warnings before operating.
n
Not for house hold use, use only
for film, video or imaging purposes.
n
The units use lamps of several
different voltages. Make certain that power
source voltage matches lamp voltage.
Example: never connect a 12 volt lamp
to a 30 volt source.
n
Do not use near standing water,
or in rain.
n
Units such as this emit
considerable light and heat, and if not
properly used, could be dangerous.
n
Lights should not be positioned
extremely close to people. Ultraviolet light ray
emissions can cause damage to the eyes and
reddening of the skin. The likelihood of either
occurring is increased with length of expo-
sure, focus intensity and proximity. Therefore,
lights should be kept away from people.
n
Avoid aiming the light at, or placing
too close to, people, delicate objects or
flammable materials.
n
Do not interfere with ventilation
by covering the lights in any way.
n
For proper ventilation, do not tilt
down beyond 45 degrees or operate sideways.
n
Do not tilt light down if mounted on
top of a camera, while illuminated. Camera
damage could result.
n
Do not leave fixtures unattended.
n
Unplug fixtures when not in use.
n
Never touch hot parts only touch
handles & knobs for light adjustments.
n
Do not touch i or id-light upper front
end knob while operating the light,
high temperature is present.
n
Lights should be operated with lamp
filament horizontal.
n
Avoid mounting lights directly over
people unless secured with a safety cord
or cable.
n
Keep light power cable away
from front housing when hot, to avoid
damage.
n
Never store i or id-light without first
removing the power cable from the power
source.
Lowel i & id-light Instructions
Warnings
Lamp/Beam Data
Performance
i & id Power Cable
& Connectors
i & id Lamp Replacement
i-light
id-light
The i-light standard power cable terminates
in a standard cigarette lighter plug.
Special i-lights are avalible with 4-pin XLR,
or Anton Bauer (2 pin battery plate, camera)
cable connectors.
i & id-light Connector
i-86
Anton Bauer
Battery Tap
The Anton Bauer connector can be supplied
by a Lowel Dealer or directly from Lowel for
installation by a qualified electrician.
NOTE: If you connect a battery with
reversed polarity (plus is minus /
minus is plus) to the id-light, the fix-
ture will not light, and a red warning
LED will illuminate on the side of the
fixture.
Yes
No
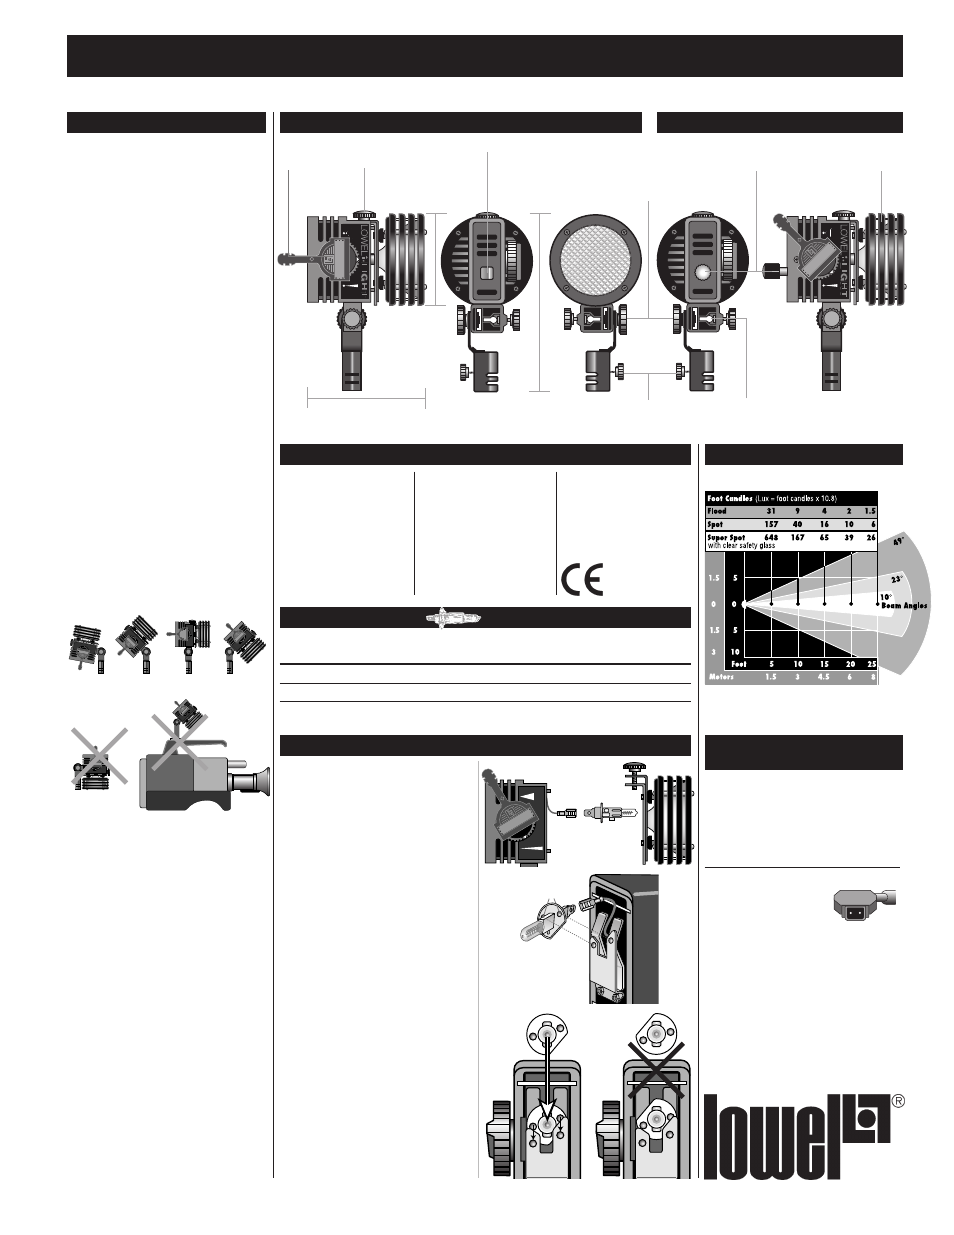
With 12v, 100w, 3200°K, i-100 lamp
Beam angles-points at which intensity drops
to 50% of maximum
Lamp Volts Watts
°K
Avg
F. C. (lux) at 10' (3 m)
Code
Life
Flood
Spot
Focus Range
Super Spot
i-100
12/14
100
3200
500 hr*
9 (99)
40 (430)
5:1
167 (1800)
i-55
12/14
55
3200
500 hr*
4 (40)
29 (315)
8:1
120 (1300)
*At 12v.
1
Turn focusing knob A to spot position.
2
Unscrew the small knob B located on top
of the front reflector assembly. Remove
front assembly by tilting “downward”.
3
Holding the focus knob in spot position
grasp the rear metal portion of the lamp C
and push in.
4
This will release the two “dimple” studs D
which seat the lamp in its socket.
5
While continuing to push the lamp
assembly E in, gently slide it upwards
and out of the socket. Slowly pull the
lamp forward slightly. This will expose
a single-wire connector F.
6
Separate the lamp from the single-wire
connector. Make sure single-wire
connector does not fall back into the
lamp housing.
7
Connect this wire to the replacement
lamp. Align connected lamp with the
flat side of the metal lamp base facing
down (the 4 o'clock position).
8
While pushing in, gently slide the lamp
downwards until the two “dimple” studs
are seated in the socket.
9
Replace the front reflector assembly
and tighten the top knob.
A
B
C
C
D
E
F
F
i-light Technical Data
160° constant tension
no-yoke tilting from
stand-fitting. Stand fitting can
swap for accessory handle
4.6” (11.7 cm)
3.
7”
(
9.
4
cm
)
6.
7”
(
17
c
m
)
Front-end comes
off for easy, no-tool
lamp change
Screw-in lock
for front-end
AC switch
20 KHz Rotary
dimmer control
Focus
knob
Stand fitting & locking knob
for 5/8” stand tops
Slot & lock for umbrella
and gel-frame
Weight:
i-light with 4' cable:
1.2 lbs (544 g)
id-light with 4' cable:
1.5 lbs (635 g)
Max wattage: 100
Max amperage: 8.3
Beam control:
continuously variable
Fits on: stands, studs,
camera tops, etc.
Materials: primarily
aluminum and Ryton
Cable: 4' (1.25 m) #16/2
with cigarette lighter
connector CE Model with
#18/2 cable
Switch: in-head
U.S. Patent: 4777566