Fp install ms_led_scent062810, Fp_motion_sensor_rev040210 (4), Fp series – Soundtube FP6020-II User Manual
Page 3: Fp-motion | motion sensor settings & controls
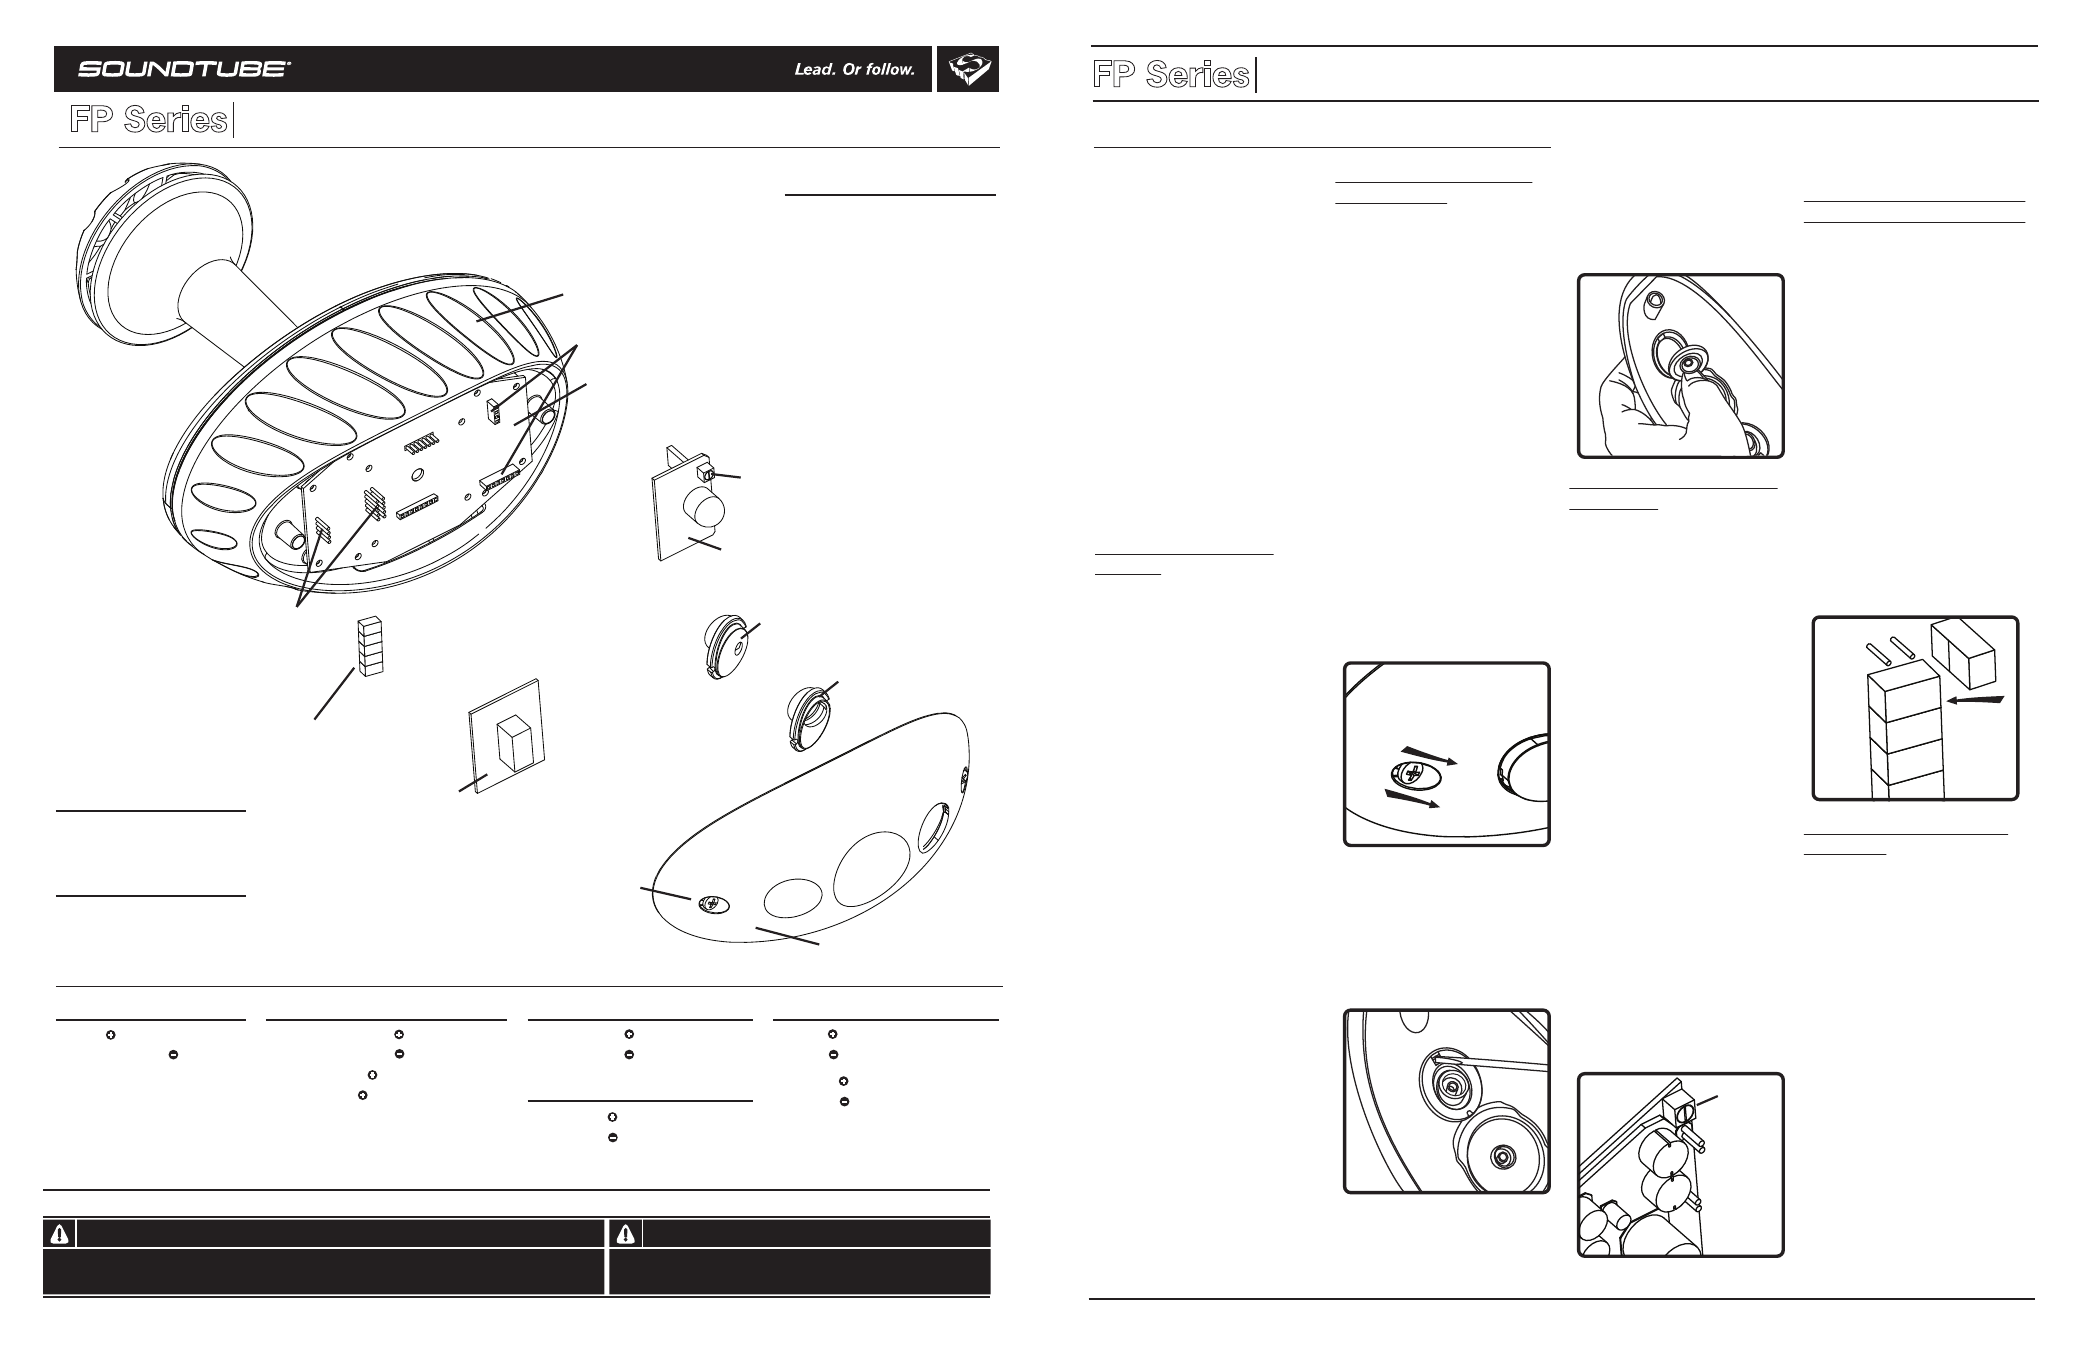
Trim pot
FP-Motion | Motion Sensor Settings & Controls
Module Description
The motion sensor is used to
trigger actions within the FP
product when motion is
detected underneath the dome.
Potential actions include
triggering the FP’s 12 V output
signal, activating the contact
closure, activating an audio
stream, turning on an LED lamp
(if installed), and triggering an
optional ScentAir module (if
installed).
To integrate the FP-Light,
FP-Amp or FP-ScentAir, refer to
those instructions.
Section 1 – Wiring The
Speaker
Connect External Power
Supply
The motion sensor requires an
external power supply rated
between 12 V and 18 V
(optional SoundTube
accessories: AC-PS-1530 and
AC-PS-1550). Connect the
power supply to the
brown/white (+) and brown (-)
wires in the Cat 5 cable.
Connect Contact Closure
To connect the contact closure
to an external device, connect
the green/white (+) and green
(-) wires in the Cat 5 cable to
the corresponding wires in the
external device.
Connect 12 V Trigger
To connect the 12 V output
signal trigger to an external
device (i.e., external audio
source), connect the blue/white
(+) and brown (-) wires in the
Cat 5 cable to the
corresponding wires in the
external device. Note: the
brown wire is shared with the
power ground.
Section 2 – Adjusting the
Aperture Lens
Define the Aperture Setting
The FP-Motion ships with the
narrow aperture lens installed
as the default. The narrow
aperture covers a 3-foot (0.9
m) radius when the dome is
hung at 7.5 feet (2.3 m). The
wide aperture covers a 6-foot
(1.8 m) radius when the dome
is hung at 7.5 feet (2.3 m).
Install the Wide Lens
Aperture
To install the wide aperture
lens, remove the pod cover [1]
from the FP pod [2] by
loosening the two captured
screws [3] on each side
(Figure 1). The screws will not
come out of the cover.
To remove the narrow aperture
lens [4], GENTLY press
outward on the tab on the
inside cover with a small
screwdriver while pushing
inward on the lens (Figure 2).
*CAUTION* Using excessive
force on the tab will break the
tab and ruin the pod cover.
To insert the wide aperture
lens [5], align the notch on the
lens and gently snap it into
place by hand (Figure 3).
Section 3 – Setting Motion
Time Delay
Time Delay Default
The FP-Motion has an
instant-on, time-delay-off
functionality and ships preset
to a 5-second delay off. The
delay off can be adjusted
manually from 2 – 12 seconds.
As long as motion is detected,
the module’s timer is
continuously reset. Once no
motion is detected, the
delay-off timer is activated.
Adjust the Time Delay
Manually
To adjust the time delay,
remove the pod cover [1] from
the FP pod [2] by loosening the
two captured screws [3] on
either side. Using a small
screwdriver, turn the motion
sensor trim pot [6] clockwise
to increase time delay and
counterclockwise to decrease
it.
Section 4 – Using The Audio
Relay and Continuous Audio
The FP-Motion module ships
with a relay board [7] installed
which engages the audio path
when motion is detected. When
there is no motion detected,
the audio stream is disabled.
Enable Continuous Audio
If you don't want the FP to
disable the audio stream when
no motion is detected, then
replace the included audio
relay board with 5 included
jumpers [8] (Figure 5). The
audio will play continuously
whether or not motion is
detected.
Section 5 - Replacing The
Pod Cover
Replace pod cover [1] and
tighten screws [3].
Cat 5 Wiring
All signal and control wires are located in the signal/hanging cable provided
with the FP unit speaker wires. A Cat 5 cable (blue shield) contains the control and power
wires; audio wires are individual 16-gauge wires in the bundle.
Wiring Instructions
1 FP-Motion module
5 Pairs audio relay jumpers
Contents
Power
External controller
LED Light
Amp Control
Speaker
Contact closure = Green/White
Contact closure = Green
12 V trigger = Blue/White
Amp control = Blue
LED control = Orange/White
LED control = Orange
Amp gain = Blue
Amp gain = Orange
Left in = White
Left in = Green
Right in = Red
Right in = Black
Power = Brown/White
Power ground = Brown
Figure 1
Figure 2
Figure 3
Figure 4
Figure 5
FP pod [2]
Motion sensor trim pot [6]
(delay off timer)
Pod cover [1]
Motion sensor module
Motion sensor
wide aperture [5]
Audio relay [7]
(ships with motion sensor only)
Motion sensor narrow aperture [4]
Main electrical board
Motion sensor connection
Amp, audio relay or continuous
audio jumper connection
Continuous audio jumpers [8]
FP modules ship pre-installed
from the factory.
Other FP Series optional
modules include:
1. LED Light
2. ScentAir
3. Amp
All modules require a power source.
An optional 15 volt source is
available from SoundTube
(Model numbers: AC-PS-1530
or AC-PS-1550).
FP Series
Do not spec or install speaker near support beam, ventilation duct or
other structure that may interfere with speaker function or dispersion.
Warning
© 2010 SoundTube Entertainment, Inc. All rights reserved. PN INS-FP-MOTION Rev04.02.10
Warning
SoundTube speakers must be installed by a professional audio installer/contractor. For safety and for
optimum audio performance, installer must follow all directions issued by SoundTube Entertainment.
435.647.9555
|
800.647.TUBE
|
www.soundtube.com
435.647.9555
|
800.647.TUBE
|
www.soundtube.com
Install Instructions For:
FP-Motion
FP Series
435.647.9555
|
800.647.TUBE
|
www.soundtube.com
Install Instructions For:
FP-Motion
FP Series
Pod cover screws [3]