D: perform audyssey auto setup, English, Press – Denon AVR-2310CI User Manual
Page 28: Select “measure” and then press, Measurement”, then press, Step2 speaker detection step3 measurement, Step4 calculation, Once measurements are finished, use, Calculation”, then press
2
ENGLISH
Get
ting Star
ted
Connections
Pla
ybac
k
Remot
e Contr
ol
Inf
or
mation
Tr
oubleshooting
Specifications
Multi-Zone
Making the Optimum Settings for the Connected Speakers Automatically (Audyssey Auto Setup)
1
Press
ui
to select
“Channel
Select”,
then press
.
2
Press
ui
to select a channel, press
o
p
to select
the item, and then press
.
A U T O
S E T U P
A U D Y S S E Y
A U T O
S E T U P
M u l t E Q
S T E P 1
P r e p a r a t i o n
[ 1 / 6 ]
C o n n e c t
t h e
s p e a k e r s
a n d
p l a c e
t h e m
a c c o r d -
i n g
t o
t h e
r e c o m m e n d a -
a t i o n s
i n
t h e
m a n u a l .
S e t
t h e
f o l l o w i n g
i t e
m
s
i f
n e s e s s a r y .
A m p
A s s i g n
C h a n n e l
S e l e c t
A u t o
S e t u p
S t a r t
E N T E R
E n t e r
R E T U R N
C a n c e l
S k i p u n u s e d c h ’ s m e a s u r e m e n t f o r t i m e s a v i n g .
n
Front
A
: The sound is output from front speakers A when measuring
the front speakers.
B
: The sound is output from front speakers B when measuring
the front speakers.
A + B
: The sound is output simultaneously from front speakers A
and B when measuring the front speakers.
See overleaf
Set the channel to be measured (Channel Select)
(Channel Select)
• Front
The front speaker to be measured can be selected ahead of time
here.
• Subwoofer, Surround Back
If you set the channels you will not use beforehand, those channels
will not be measured. Therefore, you can save an amount of time
commensurate with that which would have been taken to measure
those channels.
n
Subwoofer, Surround Back
Measure
: Default setting. Measure the selected channel.
Skip
: Skip the selected channel and do not measure.
b
To cancel, press
.
When “Amp Assign” is set to “Normal”, only then is “Surround Back”
displayed.
d
: Perform Audyssey Auto Setup
The Audyssey Auto Setup function detects the presence of each
speaker and automatically calculates the speaker size, channel level,
distance, and optimal crossover frequency setting. Audyssey MultEQ
corrects acoustical distortions within the listening area.
Once started, MultEQ will play a series of test tones through each
speaker.
Before starting, connect and position all of your speakers.
•
•
•
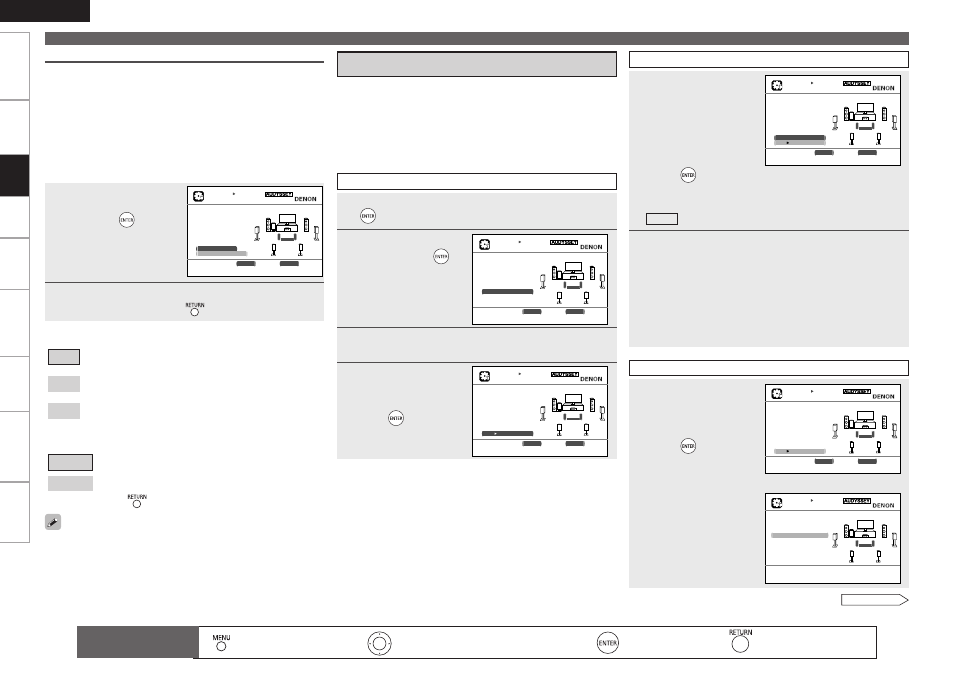
1
Press
ui
to select “Auto Setup Start”, then press
.
2
Select
“Measure”
and then press
.
3
Once all the speakers have been detected, check the
results of detection of the connected speakers.
4
Press
ui
to
select
“Next
1
Measurement”, then
press
.
A U T O
S E T U P
A U D Y S S E Y
A U T O
S E T U P
M u l t E Q
S T E P 2
S p e a k e r
D e t e c t i o n
P l e a s e
p l a c e
t h e
m i c -
r o p h o n e
a t
e a r
h e i g h t
a t
m a i n
l i s t e n i n g
p o s i t i o n .
M e a s u r e
E N T E R
E n t e r
R E T U R N
C a n c e l
Te s t T o n e w i l l s t a r t f o r m e a s u r e m e n t
[ 2 / 6 ]
STEP2 Speaker Detection
STEP3 Measurement
5
Once the screen on
the right appears,
move
the
setup
microphone to the
second
position,
use
ui
to select
“Measure”,
then
press
.
Measurements for the second position begin.
b
To skip this step, select “Next 1 Calculation” and proceed to
STEP4 .
6
Perform Step 5 repeatedly for the 3rd, 4th, 5th, and
6th measurements.
Once measurements for the sixth position are completed,
“Measurements finished.” is displayed.
b
Measure at a total of six positions, including the main listening
position and positions around it. It is possible to stop the settings
with five positions or fewer, but for better results we recommend
measuring at six positions.
A U T O
S E T U P
A U D Y S S E Y
A U T O
S E T U P
M u l t E Q
S T E P 3
M e a s u r e m e n t
P l e a s e
p l a c e
t h e
m i c -
r o p h o n e
a t
e a r
h e i g h t
a t
2 n d
l i s t e n i m g
p o s i t i o n .
M e a s u r e
N e x t
C a l c u l a t i o n
E N T E R
E n t e r
R E T U R N
C a n c e l
S t a r t n e x t m e a s u r e m e n t . T e s t T o n e w i l l s t a r t
[ 3 / 6 ]
STEP4 Calculation
7
Once measurements
are finished, use
ui
to select “Next
1
Calculation”, then
press
.
Analysis begins.
b
Analysis takes several
minutes
to
complete.
The time required for
this analysis depends on
the number of speakers
connected. The greater
the number of speakers
connected, the longer
analysis will take.
A U T O
S E T U P
A U D Y S S E Y
A U T O
S E T U P
M u l t E Q
S T E P 3
M e a s u r e m e n t
P l e a s e
p l a c e
t h e
m i c -
r o p h o n e
a t
e a r
h e i g h t
a t
2 n d
l i s t e n i m g
p o s i t i o n .
M e a s u r e
N e x t
C a l c u l a t i o n
E N T E R
E n t e r
R E T U R N
C a n c e l
P r o c e e d t o S t e p 4 ( A n a l y z e )
[ 3 / 6 ]
A U T O
S E T U P
A U D Y S S E Y
A U T O
S E T U P
M u l t E Q
S T E P 4
C a l c u l a t i o n
N o w
c a l c u l a t i n g . . .
P l e a s e
w a i t .
■ ■ ■ ■ ■
2 5 %
[ 4 / 6 ]
⇩
: Moves the cursor (Up/Down/Left/Right)
: Decision the setting
: Return to previous menu
Remote control
operation buttons
:
Displaying the menu
Cancel the menu
A U T O
S E T U P
A U D Y S S E Y
A U T O
S E T U P
M u l t E Q
S T E P 2
S p k r
D e t e c t
C h e c k
F r o n t
Y e s
C e n t e r
Y e s
S u b w o o f e r
Y e s
S u r r o u n d
Y e s
S . B a c k
Y e s
2 s p k r s
R e t r y
N e x t
M e a s u r e m e n t
E N T E R
E n t e r
R E T U R N
C a n c e l
G o t o S t e p 3 ( M e a s u r e m e n t ) a f t e r s p e a k e r c h e c k
[ 2 / 6 ]
Set
tings