Preset functions and operations, English – Denon DN-M991R User Manual
Page 13
13
ENGLISH
PLAYBACK
PRESET FUNCTIONS AND OPERATIONS
(1) List of Preset Functions
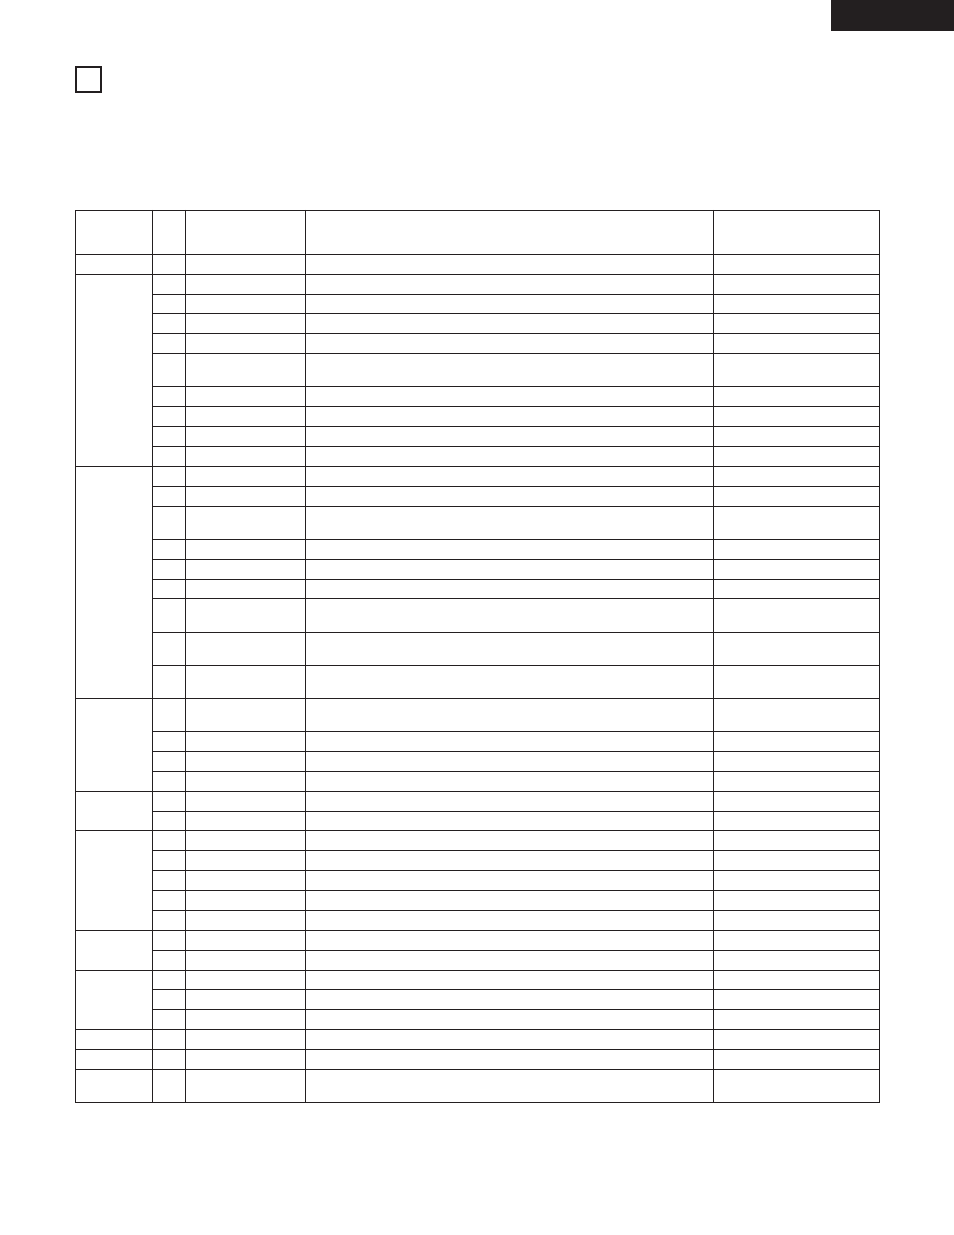
• Functions can be preset using the buttons on the front panel. These presettings are stored in a permanent memory, so they are not cleared
even when the power is turned off.
• The functions shown on the table below can be preset. Set the functions according to the usage purpose to efficiently achieve even higher
quality playback.
• One of the preset functions can be used to display information on this set (microprocessor version).
Preset function type
Description
Character display
(as set upon shipment from
factory)
No.
Preset area
Selection of preset area
Preset Area1
Setting of whether or not to use the end monitor function and monitor time
setting
Setting of whether or not to display the EOM and display time setting
PlayLock OFF
S.xxxxD.yyyy
(xxxx yyyy is a number.)
Set information
Microprocessor version display
Classification
grouping
1
7
8
9
10
11
12
13
14
15
16
17
18
19
20
21
22
23
24
25
26
27
28
29
30
31
32
33
34
35
37
38
2
3
4
5
6
AREA
Play Finish mode
Play finish mode selection
Finish Next
Play sound
Selection of stereo or monaural playback
Stereo
Auto cue
Auto cue on/off setting start up level setting
CueDet.OFF
Digital out
Selection of digital out format
D.Out Pro
End monitor
End Mon.10s
E. O. M.
E. O. M. 10s
Delay start
Setting of delay playback start time
Delay OFF
Playback speed
Selection of playback speed (–8.0 % ~ +8.0 % 0.1% step)
Pitch OFF
Play pitch auto
Selection of whether or not to use pitch set for disc
PitchAutoOFF
RECORD
Record input
Selection of recording input (analog or digital)
Analog IN
Stereo/Mono
Stereo recording or mono recording selection
Rec Stereo
Auto increment
level
Auto increment level setting
IncDet.–60dB
Auto increment
Auto increment selection
AutoInc OFF
Pre UTOC
Pre-UTOC on/off setting
Pre UTOC OFF
Recording start level
Recording start level setting
RecLv –60dB
Recording start
offset
Recording start offset time setting
RecOffsetOFF
Copy management
(SCMS)
Serial copy management on/off selection
SCMS INH
Relay recording
Set the relay recording mode (on or off) and the timing for output of the REC
E.O.M. tally when the relay recording mode is on
RelayRec OFF
PANEL KEY
Next track standby
Setting of whether or not to standby at the next track when the STANDBY/CUE
button is pressed during playback
Next Stb.OFF
Play lock
Selection of whether or not to inhibit the panel switches during playback
Eject lock
Selection of whether or not to lock ejecting during playback
EjectLockOFF
Switch protect
Selection of whether or not to enable the panel switches
Switch ENA
DISPLAY
Date display
Date display on/off selection
DateDisp OFF
Frame display
Selection of whether or not to display frame
FR Disp ON
PARALLEL
REMOTE
Standby tally
Selection of whether to enable or inhibit the STDBY/CUE tally
St.Tally ON
End cue
End cue time setting
EndCue –2s
Tally selection
Setting of tally output signal with dry contact
DryCnt E.CUE
Tally flash
Setting of tally output lit or flashing
T.Flash OFF
Fader start
Fader start mode selection
Fader Pause
SERIAL
REMOTE
Serial BPS
Baud rate setting
9600bps
Player ID
Player ID on/off selection and ID setting
PlayerID OFF
PROGRAM
Program 1
Setting of whether or not to play program 1
Program1 OFF
Program 2
Setting of whether or not to play program 2
Program2 OFF
Program 3
Setting of whether or not to play program 3
Program3 OFF
CLEAR
Preset clear
Setting for clearing presets and setting them to the initial values
Ini. Preset
36
HOT START
Hot start
Hot start mode on/off selection for parallel remote
HotStart OFF
VERSION
4