Assembly, Figures and tables – Groth 1400 User Manual
Page 7
6
Vacuum Disassembly
1. Remove the nuts from the cover.
2. Lift the cover.
3. Remove the gasket.
4. Lift the stem-pallet assembly. (Make note of
the weights. The valve must be
reassembled with the weights in the same
location to achieve the specified settings.)
5. Invert the assembly.
6. Remove the nut holding the assembly
together.
ASSEMBLY
Inspect all guides for corrosions, damage or
product build up. Also inspect the vacuum cover
guide bore. Check the metal seating surfaces
for pitting, corrosion or product build up. It is
recommended to replace ALL soft goods
including diaphragms, O-Rings and cover
gaskets. Note, the stem guide has internal
Fluoropolymer bushings.
If the seats are damaged they must be lapped
using a flat ground metal disc with fine grit
emery cloth attached and lapping compound.
Wipe the seating surface clean before assembly.
To assemble a valve, reverse the disassembly
procedure.
FIGURES AND TABLES
The following figures are to assist in identifying
components during disassembly and assembly
of the Groth 1400 Series valves. The actual
configurations might vary because of special
applications and customers’ request, but the
operation and function is similar.
Figure 5 through Figure 8 include a NOTE
column. For an explanation of the NOTES, see
Table 4 below.
For Lubricants suggested, see Table 6.
For Troubleshooting Guide, see Table 7.
For Abbreviations, see Table 8.
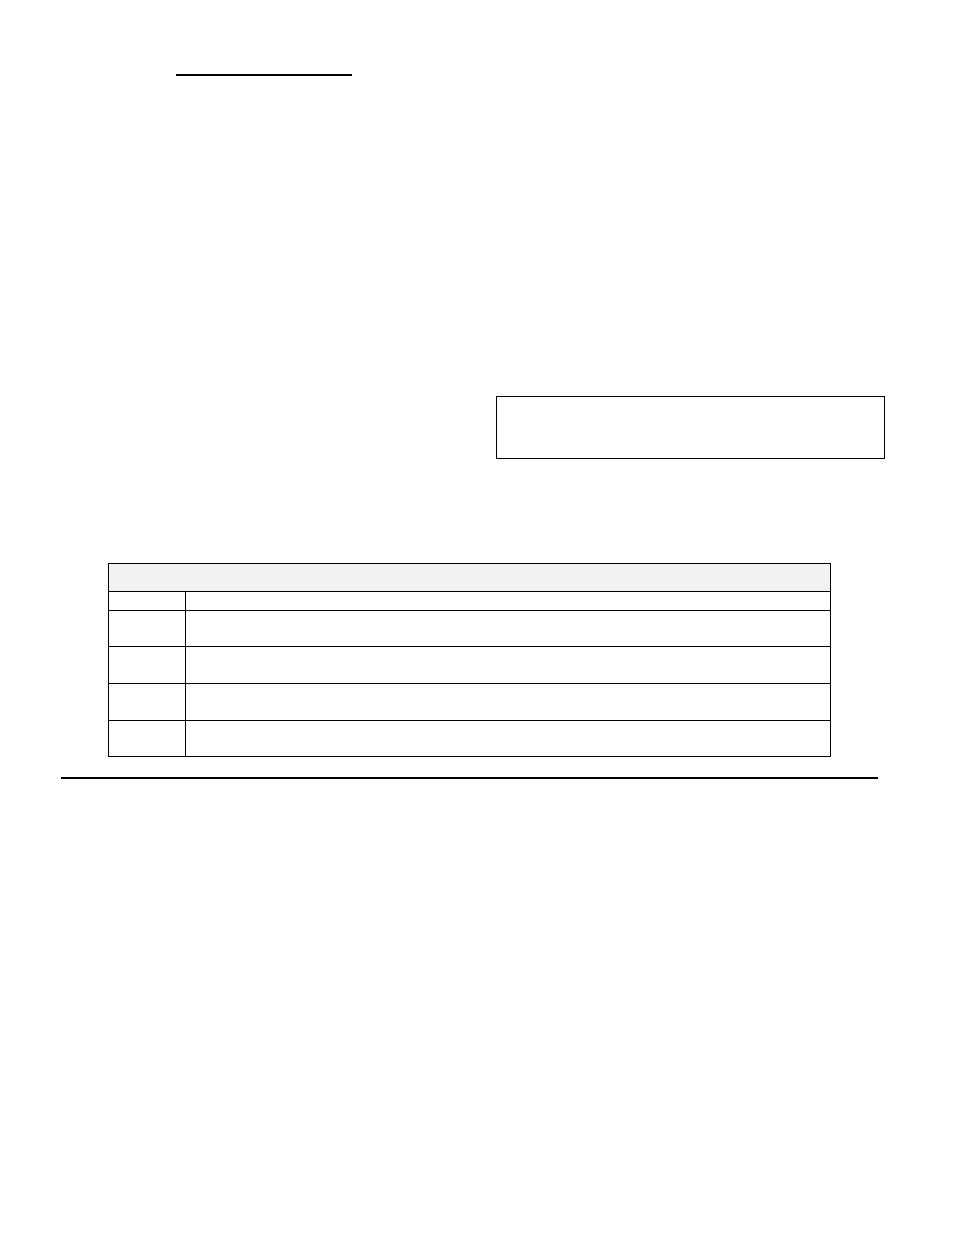
TABLE 4 : NOTES FOR FIGURE 5 THROUGH FIGURE 8
NOTE DESCRIPTION
1
Pallet Diaphragms & O-Rings. These soft goods should be replaced each time the valve is
disassembled. Standard material options include FEP, Buna, FKM, & FFKM.
2
Gaskets: Non-Asbestos Fiber. These should be replaced each time the valve is
disassembled.
3
Bushing Guides: Fluoropolymer. At assembly, inspect stem travel through guides. The
stem should slide smoothly with minimal drag. Replace as required.
4
Actuator Diaphragms & Gaskets. Replace each time valve is disassembled they are
available only in FEP.
FIGURE 3: VALVE PORT IDENTIFICATION