Controller schematic, Alarm connections – Greenheck Fire Ready Hood - GRRS User Manual
Page 21
21
Fire Ready Hood
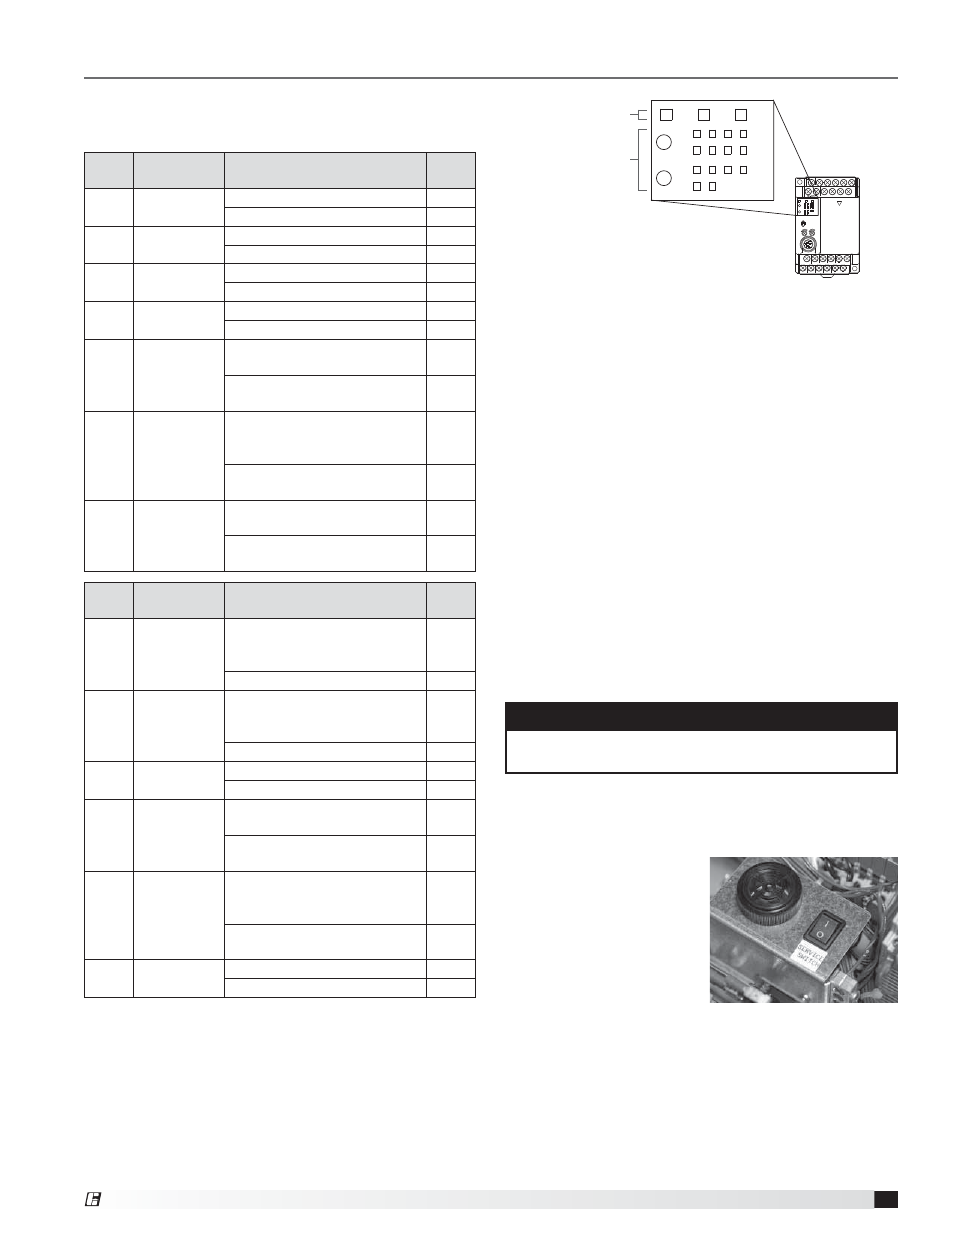
Controller Schematic
Panasonic
max.
min.
RUN
PROG. ERR.
FP-X C14
7
4
0
0
3
4
Y
X
3
V1
RUN
PROG.
V0
5
L
N
X1
X0
X2
X4
X6
COM
X3
X5
X7
Y1
Y0
0V
24V
Y5
C0
C1
C2
C3
Y4
Y3
Y2
Status display
Input/output
display
PROG.
RUN
ERR.
7
4
0
0
3
4
Y
X
3
5
The controller’s operating system is designed to
enhance the functionality of the unit and the safety of
the cooking environment.
On the controller, there are two rows of LED indicators
next to the X (inputs) and two rows of LED’s on the Y
area (outputs).
Alarm Connections
Alarm Outputs: The other function of the controller
is to report alarms from the system either for a system
fault or as a result of a system discharge. Refer to
Fire Alarm System Connections on page 14 in this
installation manual for information on how to connect
the alarm outputs.
Output Y1 and common C1 are configured to close with
the discharge of the extinguisher tank. This condition is
determined by the controller with the low pressure input
from the switch and a high temperature condition from
the 190°F rated thermostat. Both conditions must be
present in order for this output to trigger.
Note that the microswitch outputs are dry contact type,
rated for low voltage, and can be normally open (NO) or
normally closed (NC), with a common. Therefore do not
produce any current or voltage output.
Service Switch: The black switch next to the controller
and internal audible alarm is the service switch. It can
be switched on or off. When it is switched to on, the
remote alarm and local
alarm are deactivated. Its
purpose is to allow service
to be conducted and
components tested without
setting off the alarm. Once
testing or service is done,
turn the service switch to
off for normal operation.
NOTE: LED will flash orange
and green.
Service Switch
in the OFF position
LED
Label
Input
Function
Scenario
LED
State
X0
Hose
Switch
Hose in place
On
Hose disconnected
Off
X1
Reset
Switch
When switch is depressed
On
Switch not pressed
Off
X2
Pressure
Switch
Pressure okay
On
Pressure failure
Off
X3
Service
Switch
Servicing unit
On
Normal operation
Off
X4
Low
Temperature
Switch
Both low temp thermostats
below 150°F
On
Either thermostat at or above
150°F
Off
X5
Remote
and
Local Alarms
Alarms are configured for
normally closed (jumper
installed)
On
Alarms are configured for
normally open (no jumper)
Off
X6
High
Temperature
Switch
High temperature thermostat
below 190°F
On
High temperature thermostat
at or above 190°F
Off
LED
Label
Output
Function
Scenario
LED
State
Y0
Output for
Local Alarm
Low gas switch activates OR
hose switch activates OR high
temperature switch activates
On*
Normal operation
Off*
Y1
Output for
Remote
Alarm
Loss of pressure AND high
temperature (fire suppression
discharge)
On*
Normal Operation
Off*
Y2
Normal
Condition
Alarm condition
On
Normal condition
Off
Y3
Fan
When controller turns the fan
on
On
When controller is not running
the fan
Off
Y4
Power
Disconnect
When power is being set
to gas/electric disconnect
(normal operation)
On
When power is lost to gas/
electric disconnect
Off
Y5
Horn
Horn is on
On
Horn is off
Off
NOTE
Pressing the reset button will not turn off alarm. Unit
needs to be recharged to reset alarm.
* The LED’s state depends on whether the alarm contacts are
set up for normally open or normally closed. These contacts
are set up for normally open from the factory (LED’s illuminate
during alarm). To configure the fire contacts for normally
closed state (LED’s illuminate on no alarm), a jumper must
be placed between two terminals. Please see page 14 for
additional information.
®