Installation, Pre-installation guidelines – Greenheck AMD Series Dampers (474014) User Manual
Page 2
2
4) Damper must be installed into duct or opening square
and free of twist or other misalignment. Damper must
not be squeezed or stretched into duct or opening. Out
of square, racked, twisted or misaligned installations can
cause excessive leakage and/or torque requirements to
exceed damper/actuator design.
5) Damper and actuator must be kept clean, dry and
protected from dirt, dust and other foreign materials
prior to and after installation. Examples of such foreign
materials include but are not limited to:
a) Mortar dust
b) Drywall dust
c) Firesafing materials
d) Wall texture
Installation
-
Failure to follow instructions will void all warranties
1. Ensure the AMS or AMD series damper is mounted with
airflow straightener upstream of the damper.
2. Duct opening or opening square should measure 1/4
inch (6mm) larger than damper dimension and should be
straight and level.
3. Use shims between damper frame and duct opening or
opening space to prevent distortion of frame by fasteners
holding it in place. Brace at every horizontal mullion and
vertically brace at every 8 feet (2.4m) of damper width for
strength. Dampers in high velocity (2000 fpm [610m per
second]) may require more bracing.
Note: Greenheck dampers are specifically designed
and engineered for structural integrity based on model
and conditions. Attachment, framing, mating flanges,
and anchoring of damper assemblies into openings,
ductwork, or walls is the responsibility of the installer.
Design calculations for these retaining and supporting
members should be determined by field engineers for
that particular installation.
4. Individual damper sections, as well as entire multiple
section assemblies must be completely square and free
from racking, twisting, or bending. Measure diagonally
from upper corners to opposite lower corners of each
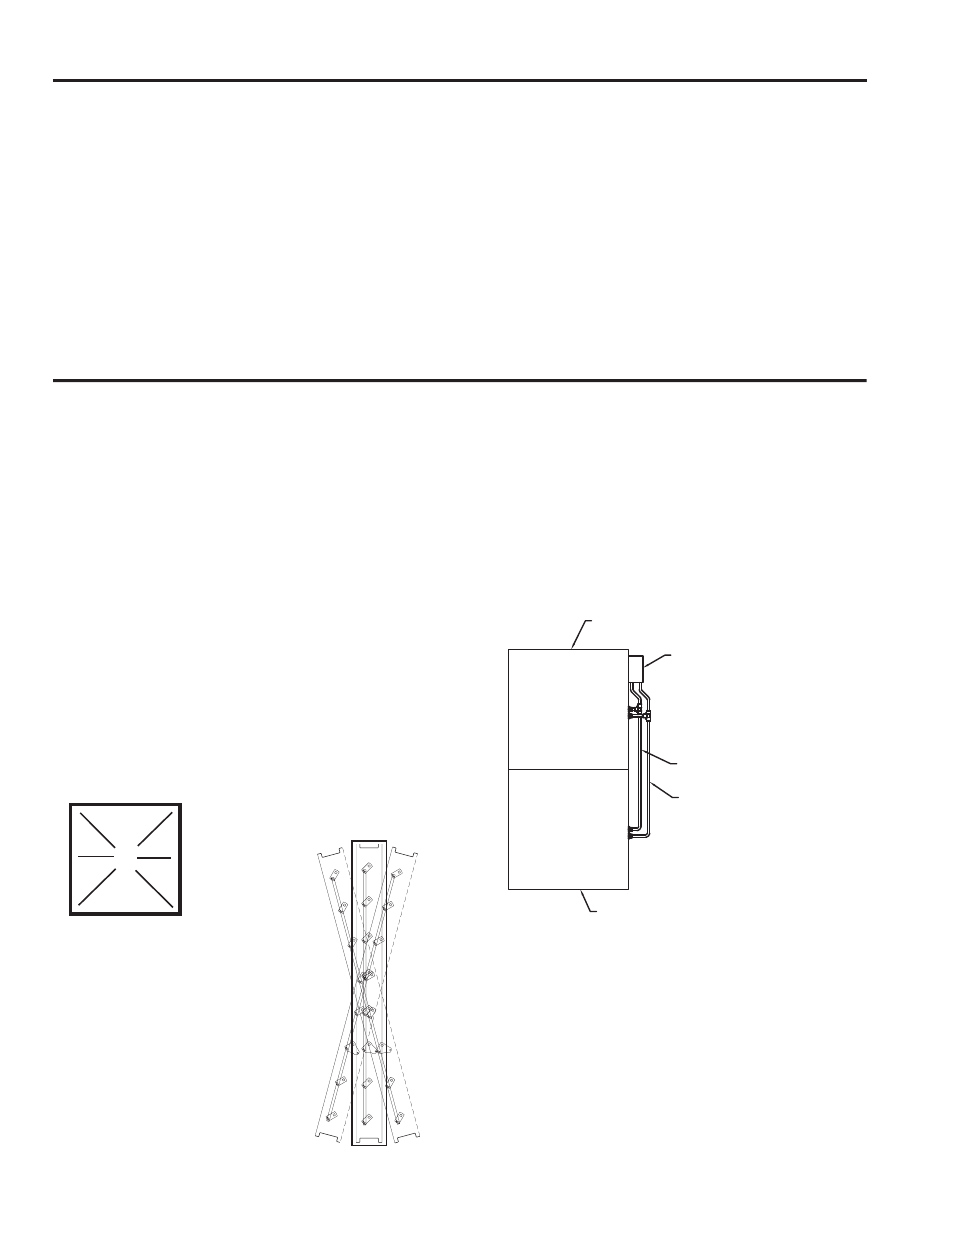
Damper Sleeve
Damper Sleeve
Pressure Transducer
Plumb the high pressure parts together
Plumb the low pressure parts together
e) Paint overspray
6) Damper should be sufficiently covered as to prevent
overspray if wall texturing or spray painting will be
performed within 5 feet (1.5m) of the damper. Excessive
dirt or foreign material deposits on damper can cause
excessive leakage and/or torque requirements and
inaccurate airflow measurement to exceed damper/
actuator design.
7) ACCESS: Suitable access (actuators maintenance, etc.)
must be provided for damper inspection and servicing.
Where it is not possible to achieve sufficient size access,
it will be necessary to install a removable section of duct.
Do not twist
or bow. Mount
damper plumb
in the opening.
A
B
AF = BE
AB = CD
C
D
E
F
Pre-Installation Guidelines
section.
5. Damper blades, axles, and linkage must operate without
binding. Before system operation, cycle dampers after
installation to assure proper operation. On multiple
section assemblies all sections should open and close
simultaneously.
6) Installing two section high AMD series together. AMD's
more than one section high will be shipped separately in
individual sleeves. The high and low pressure ports need
to be plumbed together and then plumbed back to the
pressure transducer.