3 vacuuming, 4 adjusting handlebar height, 3 vacuuming 4.4 adjusting handlebar height – Echo Bear Cat WV190S 2009 User Manual
Page 13: Warning, Important, English
WHEELED VACUUM
9
ENGLISH
OPERATION
4.3 VacuumING
WaRNING
Please read and follow all safety instructions in this
manual. failure to operate the vacuum in accordance
with the safety instructions May reSulT iN PerSoNal
iNjury!
operating tips:
when turning the vacuum, push down on the handlebar
1.
to pivot on the back wheels.
if you will be using the vacuum on hard surfaces, Bear
2.
Cat recommends adding the Castor wheel Kit (PN
73607-00). The wheel kit also works when vacuuming
on grass.
avoid overfilling the vacuum nozzle. This may lead to
3.
clogging, especially if the material is wet and soggy.
work from the outer edge of leaf piles and gradually
4.
move inward with the vacuum.
Before leaves fall, mow the lawn to a shorter length to
5.
aid in vacuuming.
Check and empty the collection bag frequently.
6.
avoid vacuuming twigs and sticks that are likely to clog
7.
the vacuum nozzle.
use slower ground speeds if the materials vacuumed
8.
are wet or heavy.
Typically, the vacuum works best when operated at
9.
full throttle.
Multiple washings of a new debris bag will improve its
10.
breathability, which can improve performance (See
Section 5.2).
avoid operating the vacuum with the fan intake housing
11.
too close to the ground. This could cut off air flow and
decrease the performance of the machine.
Engaging self-propelled Vacuums:
The vacuum self-propelling feature is engaged with the
clutch engagement bail located under the handlebar.
when the bail is brought up to the handlebar, the machine
will move forward. when the bail is released, the speed
of the machine can be adjusted between three settings
using the gear shift control on the handlebar.
ImpoRTaNT
exclude pieces of metal, rocks, bottles and other foreign
objects when vacuuming.
WaRNING
To prevent personal injury or property damage: Shut
off engine, disconnect spark plug and make sure that
all moving parts have come to a complete stop before
servicing, adjusting or repairing.
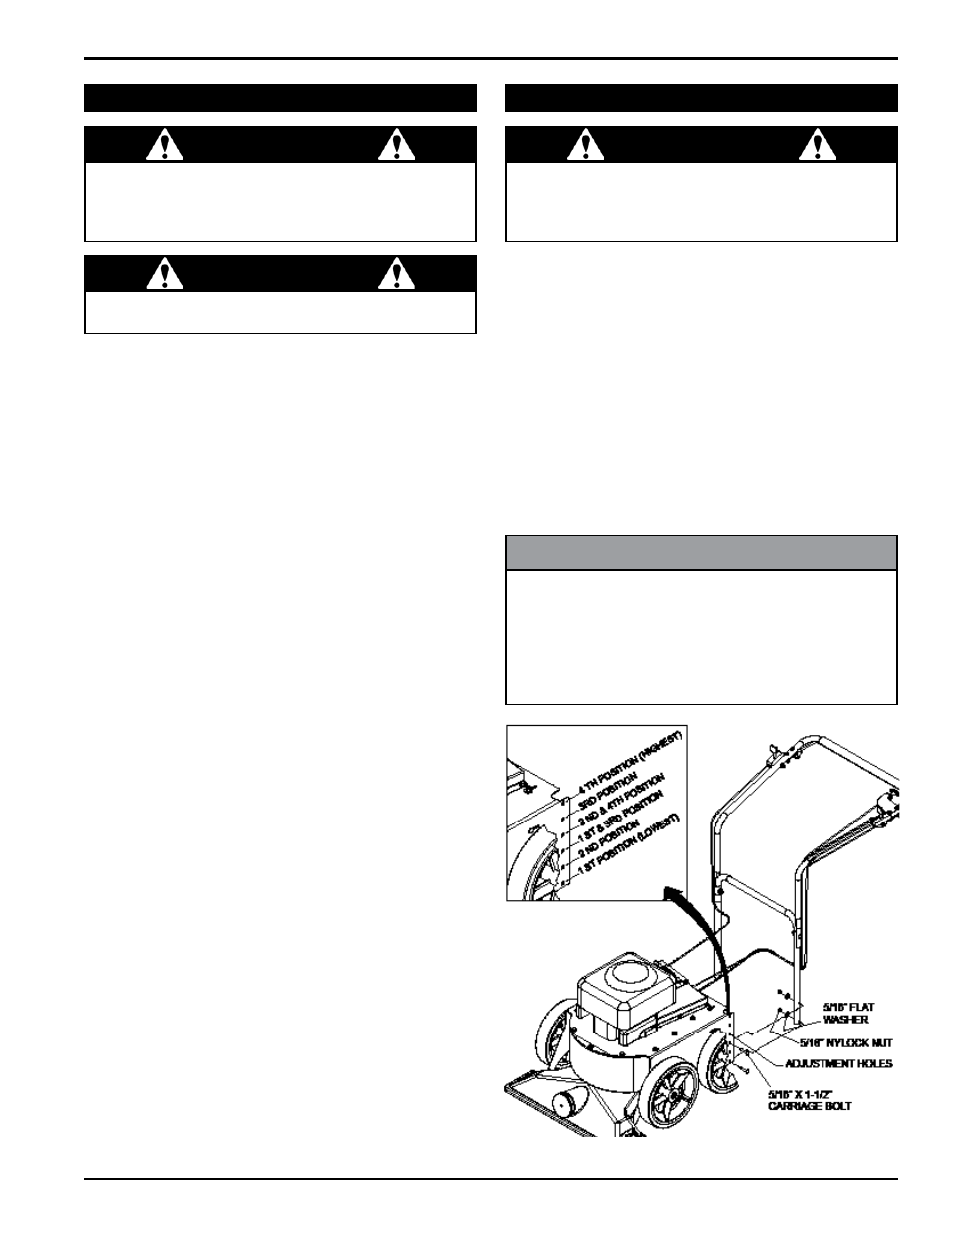
4.4 adjuSTING HaNdLEbaR HEIGHT
The handlebars of the vacuum can be mounted in four
different positions (figure 4.3). The handlebar is shipped
in its lowest position. if the handlebar needs to be raised,
follow the instructions below:
remove the 5/16" x 1-1/2" carriage bolts, flat washers
1.
and nylock nuts attaching the lower handlebar to the
vacuum.
remove the handlebar assembly from the vacuum
2.
frame.
Move the handlebar to the desired position on the
3.
frame.
reconnect the handlebar to the frame using the 5/16"
4.
hardware. Torque nuts to 17 ft-lbs.
Figure 4.3, Adjusting the handlebar height
NoTE
Check the shift cable to ensure the transmission will shift
into all three gears. If the cable needs adjustment:
loosen the two nuts at the end of the shift cable.
1.
Adjust the cable either in or out until detent position
2.
is reached.
Tighten the two nuts that were loosened in Step 1.
3.
- WV190 2009 WV179S 2009 WV179 2009 WV160S 2009 WV160 2009 WV190S 2008 WV190 2008 WV179S 2008 WV179 2008 WV160S 2008 WV160 2008 77360 77060 75360 2008 75060 2008 WV190S 2010 WV160S 2010 WV160 2010 WV190S 2014 WV190 2014 WV160S 2014 WV160 2014 WV190S 2011 WV190 2011 WV160S 2011 WV160 2011 WV190S 2013 WV190 2013 WV160S 2013 WV160 2013 WV190 2010