Replacing the smartlink, Replacing the z-filter, Replacing the heater – Daktronics 4200 Series Digital Billboard User Manual
Page 28
24
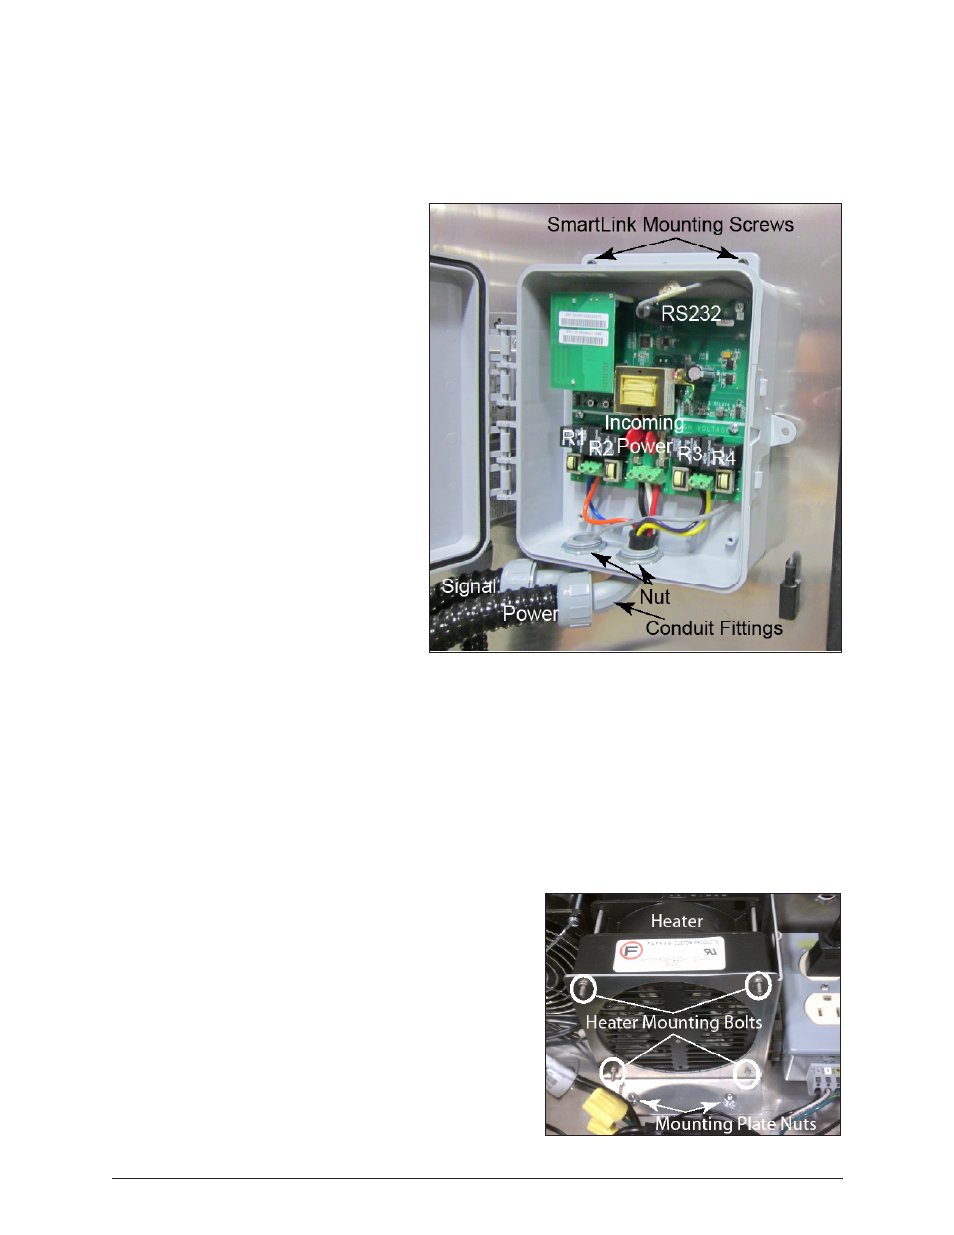
Replacing the SmartLink
TM
1. Turn off SmartLink
TM
breaker in the power entrance box.
2. Wait for all LEDs in the SmartLink
TM
to turn off. This may take up to eight minutes.
3. Disconnect the incoming power wires in the SmartLink
TM
.
4. Disconnect the outgoing power
wires from the relays (R1, R2,
R3, R4).
5. Disconnect the RS232 cable and
remove any cable ties securing it
within the SmartLink
TM
.
6. Unscrew the nuts off of the
power and signal conduit
fittings.
7. Slide the nuts over the ends of
the power wires and RS232.
8. Slide the threaded end of
conduit fittings out of the
SmartLink
TM
.
9. Remove the four screws that
secure the SmartLink
TM
to the
display backsheet.
10. Reverse Steps 1 - 9 to install the
new SmartLink
TM
.
11. Call Daktronics help desk and
provide them with the new
ICCID number from the bottom
of the SmartLink
TM
enclosure.
Replacing the Z-Filter
Required Tools: Phillips screwdriver
1. Unplug the 3-pin Mate-N-Lok power jack from the outside of the enclosure.
2. Disconnect the power cables from both sides of the Z-filter
3. Remove the screws that secure the Z-filter bracket to the back of the ISP enclosure.
4. Remove the two screws that secure the Z-filter to the Z-filter bracket.
5. Reverse Steps 1 - 4 to install the new Z-filter.
Replacing the Heater
Required Tools: Phillips screwdriver,
5
/
16
" nut driver
1. Disconnect the power wire to the heater.
2. Using the nut driver, loosen and remove the
mounting plate nuts. Refer to Figure 23.
3. Remove the heater assembly from the ISP
enclosure.
4. Using a Phillips screwdriver, remove the
four heater mounting bolts that secure the
heater to the mounting plate.
5. Reverse Steps 1 - 4 to install the new heater.
Figure 22: SmartLink
TM
Figure 23: ISP Enclosure Heater Assembly
Control Equipment Overview, Service, and Replacement