English, Main features, Before using – Denon DRA-F100 User Manual
Page 5: Connecting the included antennas, 5english
5
ENGLISH
CONTENTS
z
Main Features ………………………………………5
x
Before Using ………………………………………5
c
Connecting the Included Antennas ………………5
v
Connections …………………………………………6
b
Part Names, Functions and Displays …………7, 8
• Receiver …………………………………………7
• CD Player
………………………………………8
n
Remote Control Unit …………………………9, 10
m
Listening to Radio Programs ……………………11
,
Using the Timer ……………………………12 ~ 14
.
Playing CDs ………………………………………15
• About Compact Discs …………………………15
• Normal Playback …………………………15, 16
• Various Playback Functions ……………16 ~ 18
⁄0
Other Information …………………………………19
⁄1
Specifications
……………………………………19
⁄2
Troubleshooting
…………………………………20
DENON Service Network …………………………53, 54
1
MAIN FEATURES
• Quality power for high quality sound
30 W + 30 W (4
Ω
/ohms, DIN) high quality
amplifier and terminals for large speakers.
• High sound quality, multi-function CD player
• Two types of timers
Two timer settings can be made – everyday and
sleep.
• Easy-to-use remote control unit
2
BEFORE USING
Read the following before using the system.
• Before turning on the power
Check again that all connections are correct and
that there are no problems with the connection
cords. Be sure to unplug the power cord before
connecting or disconnecting the connection cords.
• Humming may be produced if this system is set
near a TV or other audio equipment.
If this happens, try changing the position of the
equipment or the connection cords.
• Moving the system
Be sure to remove CDs before moving the system.
If a CD is left in the CD player, it may be scratched.
To prevent short-circuits or damage to the
connection cords, always unplug the power cord
and disconnect all connection cords to other audio
equipment.
• Condensation (dew)
Condensation (water droplets) may be produced on
internal optical lenses or discs in the following
cases:
• Directly after a heater is turned on.
• When the system is in a steamy or humid room.
• When the system is moved abruptly from a cold
place (room) to a warm room.
• Should condensation occur:
The signals on the disc cannot be read and the
system will not function properly. Remove the
disc then let the system set with the power on.
The condensation will evaporate in one hour or
less, at which time the system will function
normally.
• Note that some of the illustrations used for
explanations in this manual may differ from the
actual system.
3
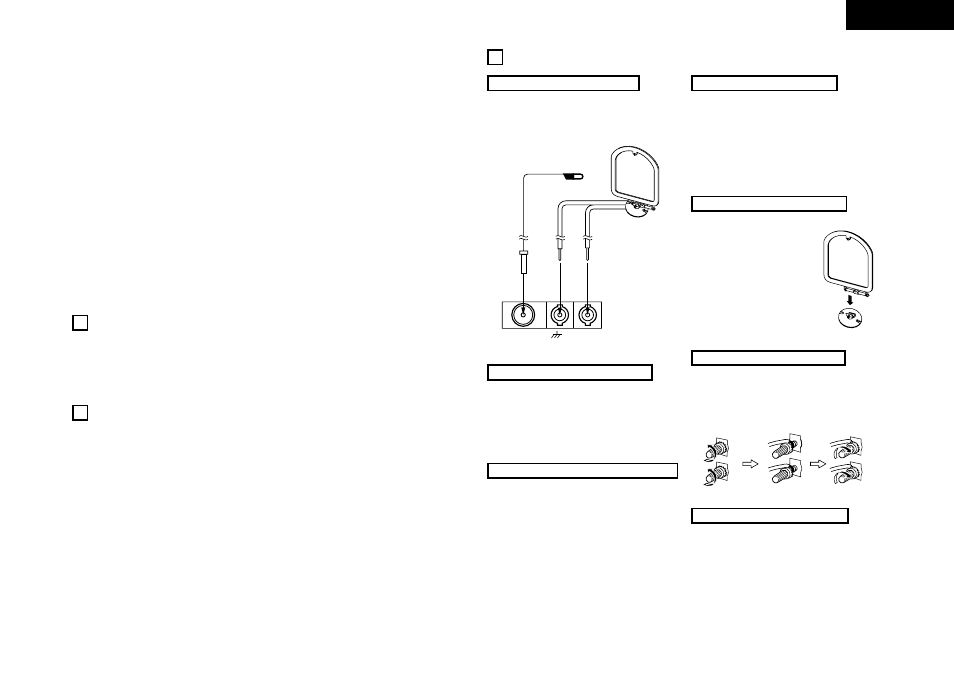
CONNECTING THE INCLUDED ANTENNAS
Installing the FM indoor antenna
Tune in an FM station (Refer to page 11.), set the
antenna in a position in which distortion and noise is
minimum, then fasten the tip of the antenna in this
position using tape or a pin.
Installing the AM loop antenna
Tune in an AM station (Refer to page 11.) and set the
antenna in a position as far from the system as
possible in which distortion and noise is minimum. In
some cases it is best to invert the polarities.
AM broadcasts cannot be received well if the loop
antenna is not connected or if it is set close to metal
objects.
Assembling the AM loop antenna
Assemble the included AM loop antenna as shown in
the diagram.
q Remove the clamp.
w Insert the AM loop antenna
into the antenna stand.
Connecting the AM loop antenna
Connect the included AM loop antenna to the antenna
terminals as shown in the diagram.
q Loosen the
terminal
knobs.
w Insert the
antenna
wire.
e Tighten the
terminal
knobs.
Installing an AM outdoor antenna
Connect the signal wire from the AM outdoor antenna
to the antenna terminal. Be sure to ground the
antenna and connect the ground wire to the GND
terminal. Also be sure to connect the included AM
loop antenna.
Connecting an FM outdoor antenna
If good reception cannot be achieved with the
included FM antenna, use an FM outdoor antenna.
Connect an F-shaped connector to the coaxial cable
and connect the antenna to the FM COAX (75
Ω
/ohms) terminal.
Selecting a place for the FM outdoor antenna
• Set the antenna so that it is pointing towards the
broadcast station’s transmitting antenna. Behind
buildings or mountains, set the antenna in the
position at which reception is best, and also try
changing the direction of the antenna.
• Do not install the antenna under power lines.
Doing so is extremely dangerous, as the power line
could touch the antenna.
• Install the antenna away from roads or train tracks
to avoid noise from cars or trains.
• Do not install the antenna too high, as it may be hit
by lightning.
Check that the following parts are included in the package aside from the main unit:
• DRA-F100 (AM-FM stereo receiver)
• Remote control unit (RC-829) ……………………1
• R6P/AA batteries …………………………………2
• Operating instructions ……………………………1
• FM antenna ………………………………………1
• AM loop antenna …………………………………1
• DCD-F100 (Compact disc player)
• System connector cable …………………………1
• RCA pin-plug cord …………………………………1
FM COAX 75º
LOOP
ANT.
AM
Antenna stand
FM antenna
AM loop antenna