WaveWare Adaptive Alpha Series Sign User Manual
Page 2
2
215C
(6.25 lb, 2.83 kg)
215R
(6.25 lb, 2.83 kg)
220C
(4.7 lbs, 2.13 kg)
Big Dot
(12.25 lbs, 5.6 kg)
320C
(12.5 lbs, 5.7 kg)
330C
(17 lbs,7.7 kg)
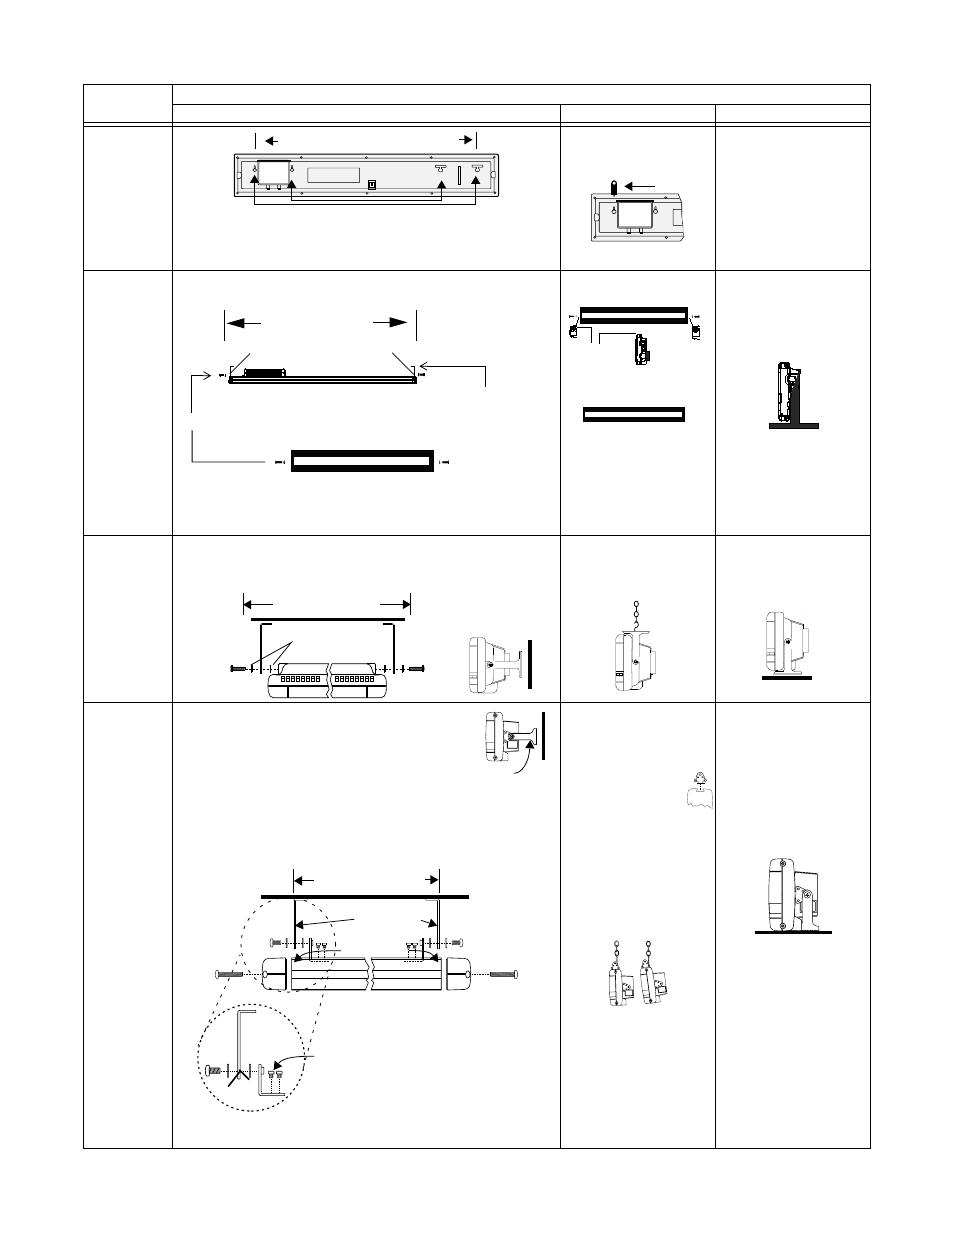
Model
(weight)
Mounting instructions
Wall
Ceiling
Counter
Wall mounting holes 24" (61 cm) or 16" (40.6 cm) apart
or
A mounting kit (pn 1040-9005) can be used to mount the sign on a wall, ceiling, or
counter. (The kit contains brackets that attach to the end of the sign and can swivel.)
Flip-up ceiling mounts 24" (61 cm) apart
The flip-up ceiling mounts will
come out if the sign if turned
over.
The sign will stand up if placed
on a counter. However, for
greater stability use a mounting
kit (pn 1040-9005).
36.5 inches (92.7 cm)
Flat washers (between bracket and sign
Top View
Mounting bracket
Screws and lock washers
Front View
The sign will stand up if placed on
a counter. However, for greater
stability user the mounting kit
(pn 1036-9003).
1. Attach two wall brackets in the mounting kit (pn 1038-9003) to a wall 46 3/4”
(118.7 cm) apart (measured from the center of each bracket).
2. Attach the mounting brackets to the sign as shown.
Wall mounting distance
Lock washers
Using the mounting kit (pn
1038-9003) and a chain (not
supplied in the kit), mount the
sign from the ceiling as shown:
The sign will stand up if placed
on a counter. However, for
greater stability use the
mounting kit (pn 1038-9003):
NOTE: Do NOT install the sign directly
to drywall or plasterboard. The
sign must be fastened to a wall
capable of supporting at least
250 pounds (113.3 kg).
NOTE: Keep a minimum 1.0-inch
(2.54 cm) clearance on all
sides of the sign for adequate
ventilation.
1. Attach two wall brackets in the mounting kit (pn 1043-9005)
to a wall the following approximate distance apart
(measured from the center of each bracket):
320C: 51 1/4” (130.2 cm)
330C: 78 3/4” (200 cm)
Wall mounting distance
Wall brackets
Hex
screws
Lock
washers
Wall bracket
2. Unscrew the two screws that secure each end cap to the sign. Then remove the end
caps.
3. Fasten the two signs brackets to the sign using the supplied hex screws.
4. Connect the sign brackets to the wall brackets using the supplied two, large bolts
and lock washers.
Sign brackets
3. Slide the mounting brackets
to the desired locations.
Then use the suppled screws
to fasten each mounting
bracket to the sign.
Use a chain (not supplied) to
hang the sign from a ceiling.
NOTE: Choose a chain and
mounting system
capable of supporting
a minimum of 250
pounds (113.3 kg).
NOTE: Keep a minimum 1.0-
inch (2.54 cm)
clearance on all sides
of the sign for
adequate ventilation.
1. Remove the end cap from each
side of the sign by unscrewing
the two screws that hold each
end cap to the sign.
2. Insert a mounting
bracket into the
“rail” on each side
of the sign.
1. Attach the two mounting
brackets to the sign as
described in the wall
mounting instructions.
2. Either rest the sign on the
mounting brackets or fasten
the brackets to the counter.
NOTE: Keep a minimum 1.0-
inch (2.54 cm)
clearance on all sides
of the sign for
adequate ventilation.
1. Attach the mounting brackets to the wall or surface.
2. Attach the sign to the mounting brackets using screws and washers as shown
Attach the ceiling bracket to the
sign (screws provided)
Ceiling
mount
Note: Mounting chain
and ceiling hook
(not supplied) must
be able to support
at least four times
the weight of the
sign