Coupling mount clutch – Nexen F-450 802700 User Manual
Page 6
6
FORM NO. L-20003-AA-1112
COUPLING MOUNT CLUTCH
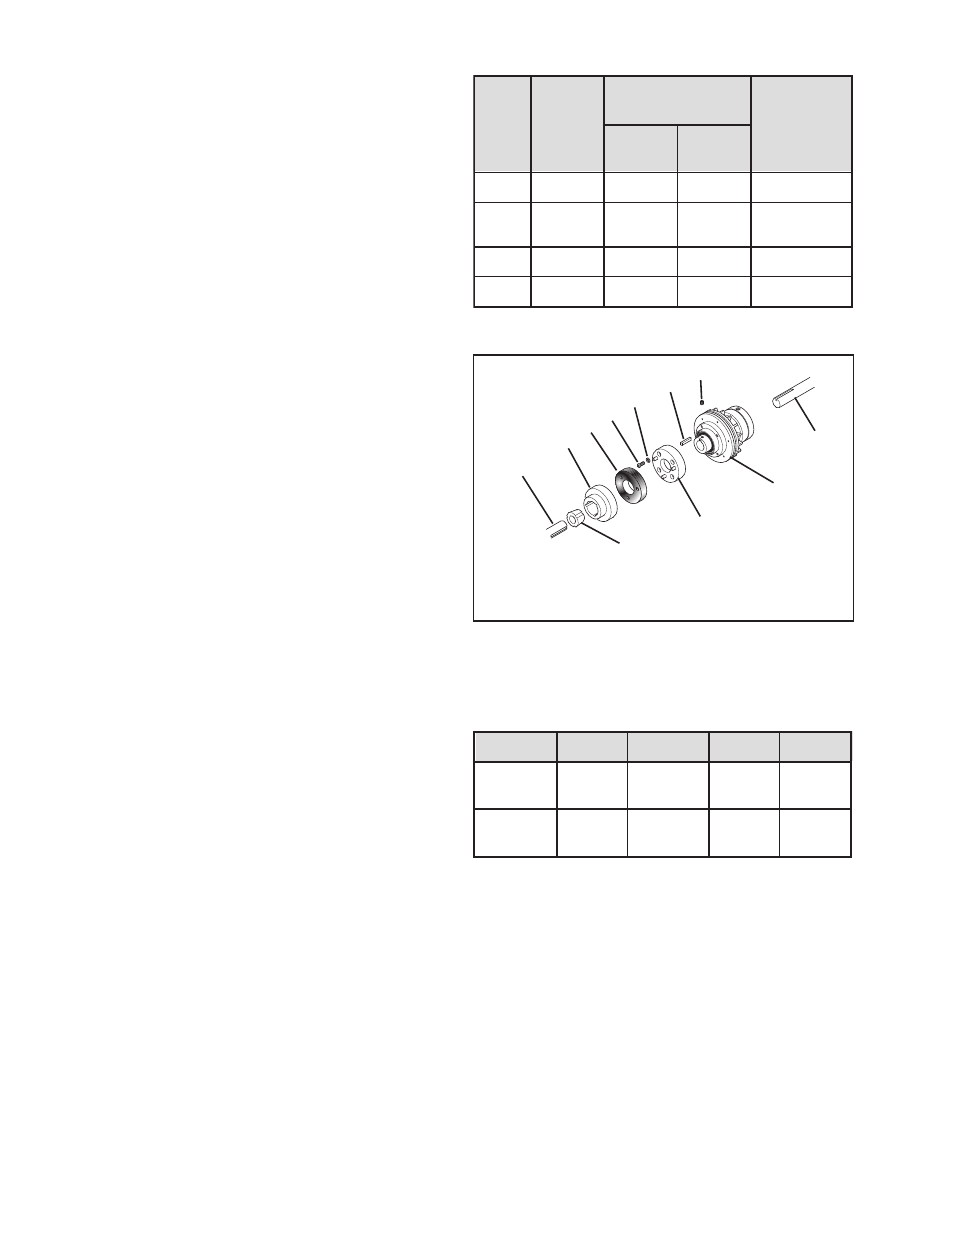
Refer to Figure 1.
1. Determine the parallel misalignment of the shafts to
be coupled by placing a straight edge across the
shafts and measuring the maximum offset at various
points around the periphery of the shafts. Make the
necessary corrections to keep the shafts within the
parallel misalignment limits of the clutch coupling (See
Table 5).
NOTE: Before installation, the driving shaft can be fixed,
but the driven shaft must be allowed to float.
Align the air inlet port to the six o’clock down position
to allow condensation to drain out of the port.
2. Slide the Clutch onto the driving shaft until the end of
the Clutch is flush with the end of the shaft.
3. Insert the Key (Item 18) into the driving shaft and
Clutch.
4. Install and tighten the Set Screws (Item 17) to the
recommended torque (See Table 6).
5. Attach the Coupling Adapter Plate (Item 24) to the
Clutch pilot using Cap Screws (Item 33) and Lock
Washers (Item 34); then, tighten the Cap Screws to
the recommended torque (See Table 6).
6. Place the Coupling’s Flexible Disc (Item 25) over the
pins in the Coupling Adapter Plate (Item 24).
7. Insert the customer supplied Dodge
TM
Taper-Lock
Bushing into the Coupling Hub (Item 26).
8. Align the holes (not the threads) and slide the Dodge
TM
Taper-Lock Bushing/Coupling Hub Assembly onto the
driving shaft until it is flush with the shaft.
9. Thread the screws supplied with the Dodge
TM
Taper
Lock Bushing into the threaded holes of the Coupling
Hub (Item 26); then, alternately and evenly tighten the
screws to the bushing manufacturer’s specifications.
10. Align the pins in the Coupling Hub (Item 26) with the
holes in the Flexible Disc (Item 25).
11. Push the entire assembly together. Automatic spacing
is accomplished by spacers molded into the Flexible
Disc.
FIGURE 3
Driving
Shaft
Driven
Shaft
Dodge
TM
Taper-Lock
Bushing
26
25
33
34
24
18
17
Clutch
TABLE 5
L
E
D
O
M
E
G
D
O
D
M
T
K
C
O
L
-
R
E
P
A
T
C
S
I
D
-
Y
L
O
P
G
N
I
L
P
U
O
C
E
Z
I
S
N
O
I
T
A
I
R
A
V
D
E
R
U
S
A
E
M
T
R
A
P
A
°
0
8
1
S
T
N
I
O
P
T
A
T
A
O
L
F
L
A
I
X
A
M
U
M
I
N
I
M
(
M
O
R
F
E
U
L
A
V
D
E
D
N
E
M
M
O
C
E
R
L
A
I
T
I
N
I
)
G
N
I
C
A
P
S
L
E
L
L
A
R
A
P
M
U
M
I
X
A
M
R
A
L
U
G
N
A
M
U
M
I
X
A
M
W
F
.
n
i
8
/
5
-
2
}
m
m
5
7
.
6
6
[
.
n
i
5
1
0
.
0
]
m
m
1
8
3
.
0
[
.
n
i
0
4
0
.
0
]
m
m
6
1
0
.
1
[
n
i
8
/
1
+
]
m
m
5
7
3
.
1
+
[
W
L
.
n
i
4
m
m
6
.
1
0
1
[
.
n
i
5
1
0
.
0
]
m
m
1
8
3
.
0
[
.
n
i
4
6
0
.
0
]
m
m
5
2
6
.
1
[
n
i
8
/
1
+
]
m
m
5
7
3
.
1
+
[
W
M
.
n
i
7
m
m
8
.
7
7
1
[
.
n
i
5
1
0
.
0
]
m
m
1
8
3
.
0
[
.
n
i
2
1
1
.
0
]
m
m
5
4
8
.
2
[
n
i
8
/
1
+
]
m
m
5
7
3
.
1
+
[
W
H
.
n
i
8
]
m
m
2
.
3
0
2
[
.
n
i
5
1
0
.
0
]
m
m
1
8
3
.
0
[
.
n
i
8
2
1
.
0
]
m
m
1
5
2
.
3
[
n
i
8
/
1
+
]
m
m
5
7
3
.
1
+
[
TABLE 6
RECOMMENDED TIGHTENING TORQUES
L
E
D
O
M
W
F
W
L
W
M
W
H
W
E
R
C
S
T
E
S
)
7
1
M
E
T
I(
.
S
B
L
.
N
I
0
8
]
m
N
9
[
.
S
B
L
.
N
I
2
4
1
]
m
N
9
.
5
1
[
.
N
I
6
3
2
.
S
B
L
]
m
N
4
.
6
2
[
.
N
I
6
3
2
.
S
B
L
]
m
N
4
.
6
2
[
W
E
R
C
S
P
A
C
)
3
3
M
E
T
I(
.
S
B
L
.
T
F
1
2
]
m
N
5
.
8
2
[
.
S
B
L
.
T
F
1
2
m
N
5
.
8
2
[
.
S
B
L
.
T
F
3
2
]
m
N
2
.
1
3
[
.
S
B
L
.
T
F
8
7
]
m
N
8
.
5
0
1
[
- FW-450 802700 FWCB-450 802700 FCB-450 802700 LSCC-32 802700 F-450 With Metric Pilot 802799 L-600 804900 LW-600 804900 LWCB-600 804900 LCB-600 804900 LSCC-44 804900 LSCB-44 804900 L-600 With Metric Pilot 804999 H-1000 809700 HW 809700 HWCB 809700 H-1000 With Metric Pilot 809799 M-800 807400 MW-800 807400 MWCB-800 807400 MCB-800 807400 M-800 807666 M-800 807401 MW-800 807666 MW-800 807401 MWCB-800 807666 MWCB-800 807401 MCB-800 807666 MCB-800 807401 M-800 With Metric Pilot 807499 FW 846900 FW 846901 LW 847000 L-600847002 LW 847002 MW 847100 HW 847200