Eg 1•2•3 hidden fastener, Important eg 1•2•3 product information, Installation instructions – TAMKO Evergrain User Manual
Page 3: 45º installation instructions
EG 1•2•3 Hidden Fastener
Installation Instructions
IMPORTANT EG 1•2•3 PRODUCT INFORMATION
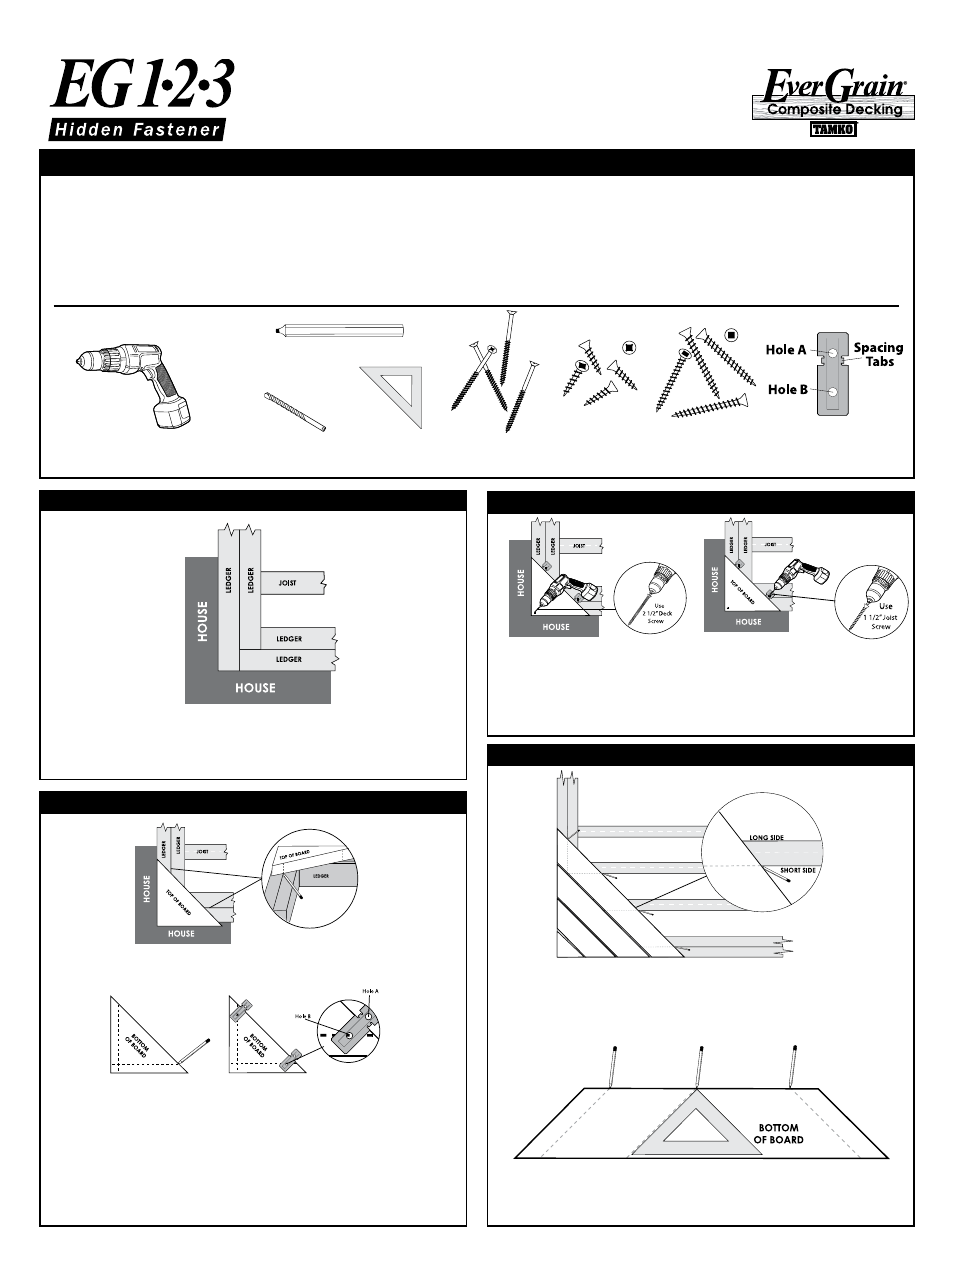
TOOLS & MATERIALS NEEDED
• The EG 1-2-3 Hidden Fastener has been designed to work specifically and exclusively with the EverGrain 1" x 6" and 2" x 6" decking profiles.
Usage of the fastener with any other product has not been tested and is not recommended.
• Make safety of the workplace the prime consideration. Always wear the proper protective clothing and safety equipment.
• Framing supports should be straight and level with each other to ensure proper installation and an even surface.
• EG 1-2-3 Hidden Fastener must be installed in accordance with the installation instructions. Deviation from these instructions may result in
unsatisfactory performance and may exclude coverage of your EG 1-2-3 Hidden Fastener under the limited warranty.
Place first corner board in position where it will be installed. Vertically
mark the decking board at framing seams as shown.
Flip board over, and extend the vertical mark along the bottom of the
board. Hook fasteners on the edge of the board with spacing tabs tight
against board edge and pointing downward.
Slide fasteners along edge until the pencil mark runs through the
center of hole B while allowing hole A to extend over the board. Secure
fasteners on both ends of board using a board screw.
CAUTION: Use low torque setting to avoid spinout.
Any framing up against a structure should be doubled for proper
installation. Always start installation in the structure corner and work
toward the outer edge of deck.
Framing blocks can be added for existing frames.
Power screw gun with
ratcheting torque setting
3/4"
BOARD Screws
(included in packaging)
EG 1-2-3 Fasteners
(included in packaging)
1/8" Drill Bit
Square
(Optional)
STEP 2.
POSITION FIRST FASTENERS
STEP 4.
INSTALLING THE NEXT BOARD
Place next board in desired position. Mark entire board from
underneath with a pencil on the *short side of each joist.
* Short Side of Joist: As a deck board crosses a joist or ledger at a
45º, one edge of the joist appears shorter than the other.
Flip deck board over. If needed use a 45º square to continue the angle
completely across the board.
STEP 1.
PREPARING TO INSTALL
STEP 3.
COMPLETING INSTALLATION OF FIRST BOARD
45º Installation Instructions
Flip first board back over; pre-drill a 1/8" hole in the corner of the board
that will be against the wall. Attach board to the frame using a color
coordinating decking screw (not supplied).
To finish securing the board, install a joist screw through each fastener
and into the deck frame.
2 1/2" Deck
Screws
(not included)
1 1/2"
JOIST Screws
(included in packaging)
TAMKO
®
tamko.com
Pencil