Eg 1•2•3 hidden fastener, Installation instructions, Installation instructions - continued – TAMKO Evergrain User Manual
Page 2
EG 1•2•3 Hidden Fastener
Installation Instructions
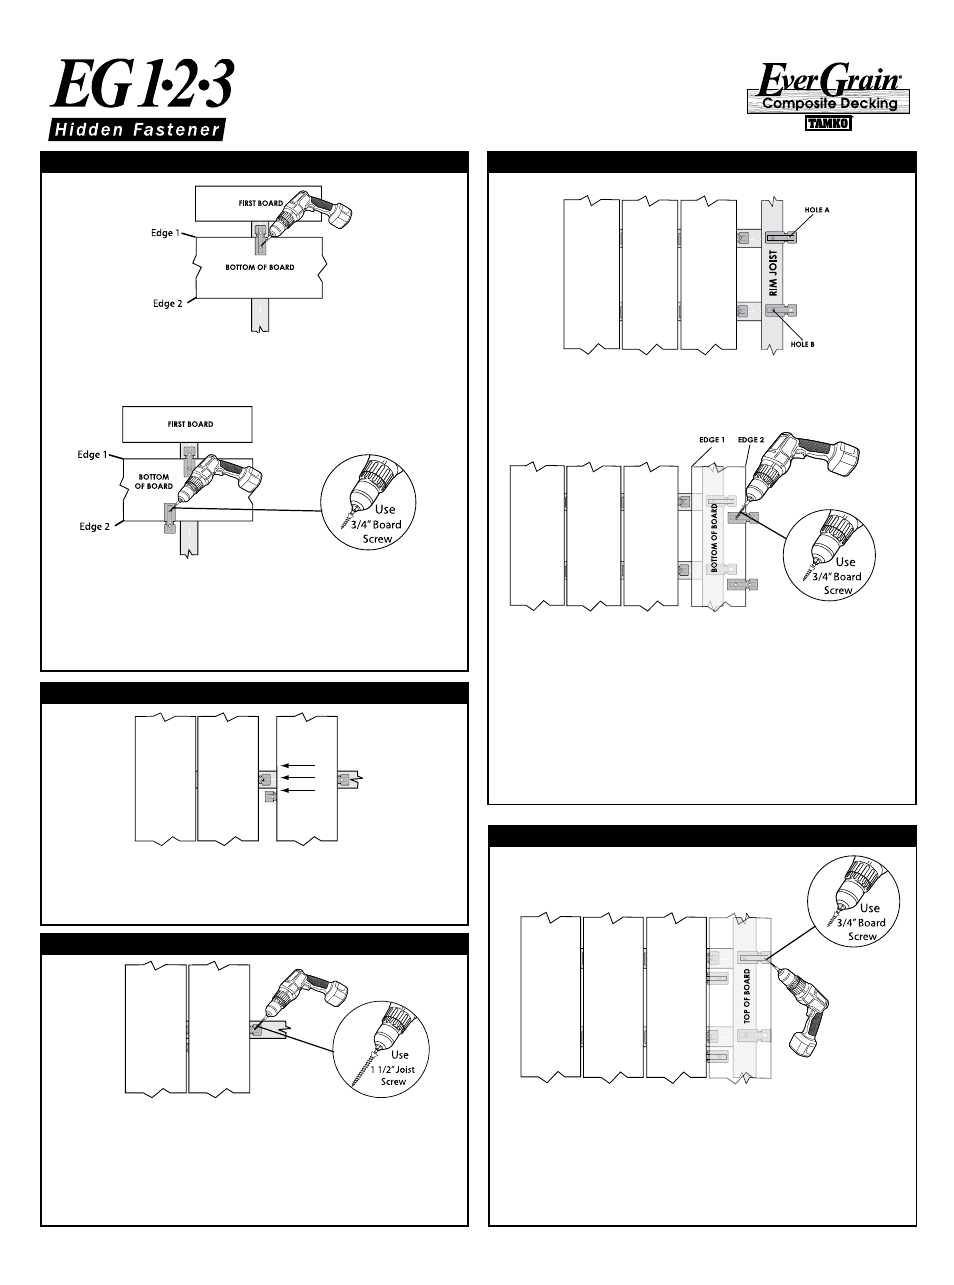
Place deck board in desired location to be installed. Flip deck board
over being careful not to move the board side to side from position.
Place fastener along Edge 1 (closer to the 1st board) of deck board
directly over joist with spacing tabs pointing downward.
Place another fastener along Edge 2 (direction of install) of board
approximately 1" off to the side of joist with spacing tabs pointing
downward.
Secure fasteners to board using board screws through hole B.
Repeat this process at every joist along remainder of board.
CAUTION: Use low torque setting to avoid spinout.
Once fasteners are attached to full board length, flip deck board back
over. Position board so fasteners can slide beneath the lead edge of
the previous board and exposed fasteners are aligned over the deck
joists. Carefully move board into position.
Attach a fastener to the rim joist aligned with each deck joist, with
spacing tabs pointing downward. Use a joist screw through hole B
while allowing hole A to extend over the outer edge of the rim joist as
shown.
Place last deck board in desired location to be installed. Flip deck
board over being careful not to move the board side to side from
position. Place fasteners along Edge 2 (direction of install) of board
approximately 1" off to the side of the joist with spacing tabs pointing
downward.
DO NOT PLACE FASTENERS ON EDGE 1 OF THE BOARD.
Secure fasteners to board using board screws through hole B.
CAUTION: Use low torque setting to avoid spinout.
Flip last board back over and position board so fasteners can slide
beneath the lead edge of the previous board. Reach under the final
board and install board screws up into the bottom of the board through
hole A of the fastener attached to rim joist. (Fastener installed in
Step 8.)
STEP 5.
INSTALLING THE NEXT BOARD
STEP 8.
PREPARING LAST BOARD
STEP 6.
POSITION DECKING BOARD
STEP 7.
SECURE DECKING BOARD
STEP 9.
POSITION AND INSTALL LAST BOARD
Once proper spacing is confirmed (1/8” spacing is integrated into the
fastener), attach deck board to frame using a joist screw through
hole A of each fastener.
Repeat steps (5-7) until reaching final deck board.
NOTE: DO NOT install a board screw into the fastener from
underneath the board. This is only required for the FIRST and
LAST board.
Installation Instructions - continued