Operation, Maintenance – Ryobi RP4000 User Manual
Page 2
2
OPERATION
OPERATION
OPERATION
WARNING:
Do not allow familiarity with products to make you careless.
Remember that a careless fraction of a second is sufficient
to inflict serious injury.
WARNING:
Always remove battery pack from the product when you are
assembling parts, making adjustments, cleaning, or when
not in use
.
INSTALLING/REMOVING BATTERY PACK
See Figure 2.
Pull and hold the height adjustment lever open to release the
inner console. Carefully remove the console from its jacket.
NOTE: Always hold the unit upright to remove the inner
console. Opening the height adjustment lever while turning
the plumb/cross laser upside down could cause the inner
console to fall out.
Pull the tab on the battery cover to open the battery compart-
ment.
Insert the battery pack into the unit. Make sure the raised rib
on the battery pack aligns with the groove in the compart-
ment. Press down on the battery pack to be sure contacts
on the battery pack engage properly with contacts in the
compartment.
Close the battery cover and press the tab until it snaps into
place. Make sure it is securely fastened before operating the
plumb/cross laser.
NOTE: Do not attempt to operate the plumb/cross laser if
the battery compartment is not closed or is missing.
Holding the adjustment lever open, replace the inner console
into the jacket. Release the lever.
When transporting the plumb/cross laser, keep the inner
console fully seated in the outer jacket (locked position).
TURNING THE LASER ON/OFF AND
SELECTING MODES
See Figure 3.
The ON/OFF/LASER MODE selector button is located on top
of the unit.
To turn the laser on, press the ON/OFF/MODE selector button
on top of the unit. The laser will be in crosshair mode with
plumb dots above and below the unit.
Press the button to change from crosshair to horizontal, and
again to change to vertical laser beam mode.
To turn the laser off, press the button again.
MAINTENANCE
WARNING:
To avoid serious personal injury, always remove the battery
pack from the product when cleaning or performing any
maintenance.
WARNING:
Do not at any time let brake fluids, gasoline, petroleum-based
products, penetrating oils, etc., come in contact with plastic
parts. Chemicals can damage, weaken or destroy plastic
which may result in serious personal injury.
GENERAL MAINTENANCE
Avoid using solvents when cleaning plastic parts. Most plastics
are susceptible to damage from various types of commercial
solvents and may be damaged by their use. Use clean cloths
to remove dirt, dust, oil, grease, etc.
CAUTION:
Use of controls or adjustments or perfor mance of pro-
cedures other than those specified herein may result in
hazardous radiation exposure.
BATTERIES
This product will accept Ryobi 4 V lithium-ion batteries. Length
of service from each charging will depend on the type of work
you are doing.
Lithium-ion batteries have been designed to provide maximum
trouble-free life. However, like all batteries, they will eventually
wear out. Do not disassemble battery pack and attempt to replace
the batteries. Handling of these batteries, especially when wearing
rings and jewelry, could result in a serious burn.
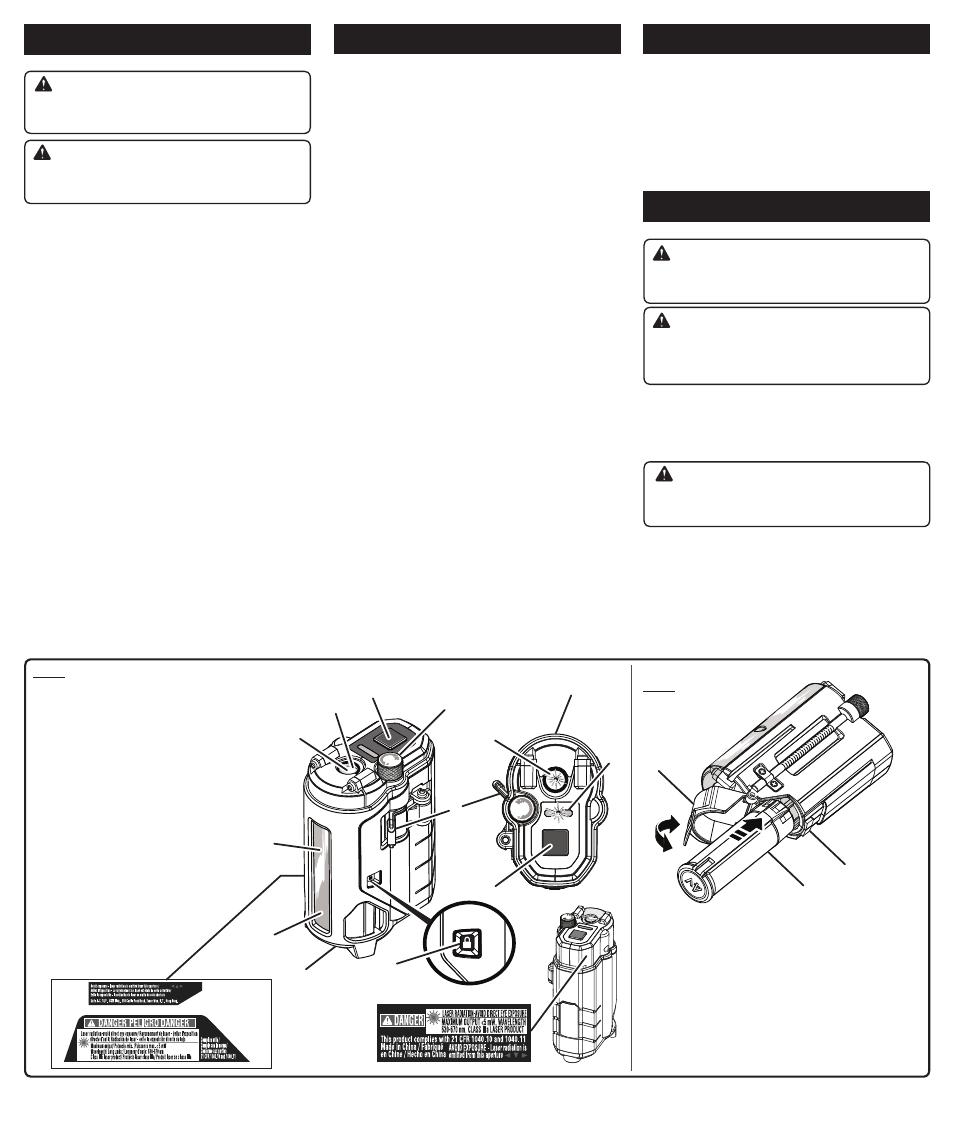
A - Battery pack (bloc-pile, paquete de baterías)
B - Battery cover (compartiment des piles, tapa de las baterías)
C - Tab (ergots, orejetas)
D - Inner console (console interne, consola interior)
Fig. 1
A
A
C
B
I
D
G
F
H
F
E
D
A
C
B
J
REMOVE INNER CONSOLE FROM OUTER JACKET TO INSTALL
BATTERY PACK
(RETIRER LA CONSOLE INTERNE DE L’ENVELOPPE EXTÉRIEURE
AFIN D’INSTALLER LE BLOC-PILES,
RETIRE LA CONSOLA INTERIOR DE LA CUBIERTA EXTERIOR PARA
INSTALAR EL PAQUETE DE BATERÍAS)
Fig. 2
CORRECT OPERATING POSITION
See Figure 3.
Set the plumb/cross laser on a stable surface or attach it to a
tripod (not included). There is a threaded tripod mount on the
bottom of the unit.
For greatest accuracy, place the plumb/cross laser at a height
that allows the laser beam to be projected straight onto the
target surface.
A lock icon in the side window indicates that the unit is locked
into place. When any part of the black lock icon is visible, the
unit is in locked position.
NOTE: Using the unit when the plumb/cross laser is locked
into the housing will not result in an accurate reading.
Pull the inner console out of the jacket until the black lock icon
completely disappears from the window.
Turn on the laser and select the laser beam mode you wish to
use.
Allow the pendulum to self-level before marking level lines on
a target surface.
PLUMB/CROSS LASER MODES
See Figure 4.
Crosshair beam mode
The crosshair laser beam projects both a vertical and horizontal
line with plumb dots above and below the unit.
Horizontal beam mode
In horizontal beam mode, the beam is oriented for leveling items
horizontally, with a plumb dot directly above.
Vertical beam mode
In vertical beam mode, the laser beam is oriented for leveling
items vertically, with a plumb dot below the unit.
Plumb bob mode
In crosshair beam mode, the plumb/cross laser generates a
vertical upper and lower plumb dot. It can be used as a laser
plumb bob.
OUT-OF-LEVEL INDICATOR
The plumb/cross laser is designed for accuracy when the unit
itself is not tilted more than 5°. If the unit is tilted more than
5°, the laser will automatically shut off, to prevent inaccurate
readings.
A white backlight appears in the top laser aperture area to indicate
that the auto-leveling feature is enabled. If the unit is out of level,
the white light will blink continuously until this is corrected.
FINE HEIGHT ADJUSTMENT
To select the height of the beam, pull the adjustment lever and
slide the unit up or down in its jacket.
For fine-tuning the height of the beam, turn the height adjust-
ment screw in the direction indicated.
LOW BATTERY INDICATOR
The low battery indicator on top of the unit will flash when the
battery needs to be recharged.
A - On/off/laser mode selector button (Bouton sélecteur
de mode « On/off/laser » (Marche/Arrêt/Laser),
botón selector de encendido/apagado/modo de
láser)
B - Laser height adjustment screw (Vis de réglage de
la hauteur du laser, tornillo de ajuste de altura de
láser)
C - Height adjustment lever(Levier de réglage de la
hauteur , palanca de ajuste de altura)
D - Laser aperture (upper) (Ouverture (supérieure) du
laser), abertura del láser [superior])
E - Laser aperture (lower) (Ouverture (inférieure) du
laser), abertura del láser [inferior])
F - Laser aperture (front) (Ouverture (avant) du laser),
abertura del láser [delantera])
G - Lock icon (Icône de verrouillage, ícono de candad)
H - Leveling pendulum (Pendule de nivellement,
péndulo de nivelación)
I - Out-of-level indicator light (Lumière de
l’indicateur d’erreur de nivellement,
luz indicadora de fuera de nivelación)
J - Low battery indicator (Indicateur de
faible niveau des piles, indicador
de batería baja)