Dacor OBSB162 User Manual
Page 7
5
3. Rotisserie Motor and Rotisserie Rod
Prepare the grill for rotisserie cooking
by following these steps:
•
Install the motor mounting bracket
and motor by slipping the edge of
the bracket down into the slot at the
right side edge of the grill frame (as
shown below).
Grill Cooking
NOTES:
1. Advanced preparation:
•
Bring all food items to be grilled to
thawed temperature.
•
Check to make sure the drip
retrieval tray is in position.
•
Preheat the grill with the canopy
closed to a minimum of 225
degrees or the applicable cooking
temperature for the food you are
preparing.
2. Begin the cooking process:
•
Once you have achieved the
appropriate temperature for your
chosen recipe, place the food
product on the grill and begin the
timing process.
3. After completion of cooking:
•
Remove the food to serve and close
the canopy for a safer environment.
Smoker Cooking
WARNINGS:
1. Smoker cooking is done with the
canopy in the down position. Smoke will
be exhausting through the grill vents.
Do not block vents. Blocking vents will
damage the unit and may cause fire or
injury.
2. Smoker wood chips are soaked with
liquids which create steam and smoke
while barbecuing. Proceed with caution
during cooking. This steam can be very
hot and dangerous.
3. Frequently, the smoker box will need
to be refilled during cooking. It will be
extremely hot. Exercise caution during
this process. Steam and hot metal
surfaces can cause personal injuries
and possible fire.
NOTES:
1. Smoker cooking enhances the flavors
of food during grilling or rotisserie
cooking.
2. Your Dacor smoker box is a removable
accessory that is shipped with your
originally purchased grill product.
3. The smoker should be filled with your
choice of wood chips.
4. Once you have prepared the wood and
smoker box for use, while the grill is
still cool, select a direct or indirect
cooking location, then place the smoker
box appropriately.
5. To place the smoker box correctly
•
Determine desired smoker location.
•
Remove one small grill and the
even heat channel. (The grills
and even heat channels may be
moved to create a smoker opening
anywhere across the full width
of the unit, except over the sear
burner.)
•
Place smoker in the opening.
Rotisserie Cooking
WARNING:
This unit is equipped with a 3-prong
grounding plug for your protection against
shock hazard and should be plugged directly
into a properly grounded receptacle. Do not
cut or remove the grounding prong from this
plug. Do not allow the rotisserie electrical
cord to touch any heated surface of your
grill.
CAUTION:
1. Cooking with the rotisserie burner is not
recommended during high wind.
2. If any flame is blown out during windy
conditions and does not automatically
re-ignite within 5 to 7 seconds, turn off
the control and attempt a new ignition
until you hear the constant clicking stop
and you see flame ignition.
NOTES:
1. Rotisserie cooking utilizes the intense
searing heat of the infrared burner and
constant rotisserie rod rotation to cook
many different types of meat.
2. Rotisserie burner operation:
•
Rotisserie burner requires no pre-
heating.
•
Rotisserie burner can be used in
conjunction with grill burners and
smoker box.
•
Push control knob and rotate 1/4
turn to the left (igniters will spark).
If ignition does not immediately
take place, within 4-10 seconds,
turn burner knob off, wait 5 minutes
and repeat lighting procedure.
Rotisserie Installation
Side Burners (Select Models Only)
ImpORTANT:
Do not place the burner cover over the
burners while hot. Excessive heat contact
with the cover may cause permanent
discoloration.
NOTES:
1. Largest recommended pot for these
burners is 14 inches in diameter. Larger
pots may contact the grill canopy during
opening and closing.
2. Automatic re-ignition systems will ignite
an extinguished flame.
3. Do not operate the side burner in windy
conditions.
4. The porcelain burner grate is durable,
however continuous sliding of pots can
remove surface material.
5. A stainless steel side burner cover is
made to cover the burner grate and
burners when not in use.
6. Turn on the burner to maximum (HI)
temperature. Leave the burner on high
until the chips begin smoking. Then turn
the heat down where the chips don’t dry
out or flame up.
7. Recipes with long time duration will
require the addition of wood and liquid
to the smoker box. Remember, every
additional time you open the grill
canopy and smoker box, you will extend
your recipe cooking times.
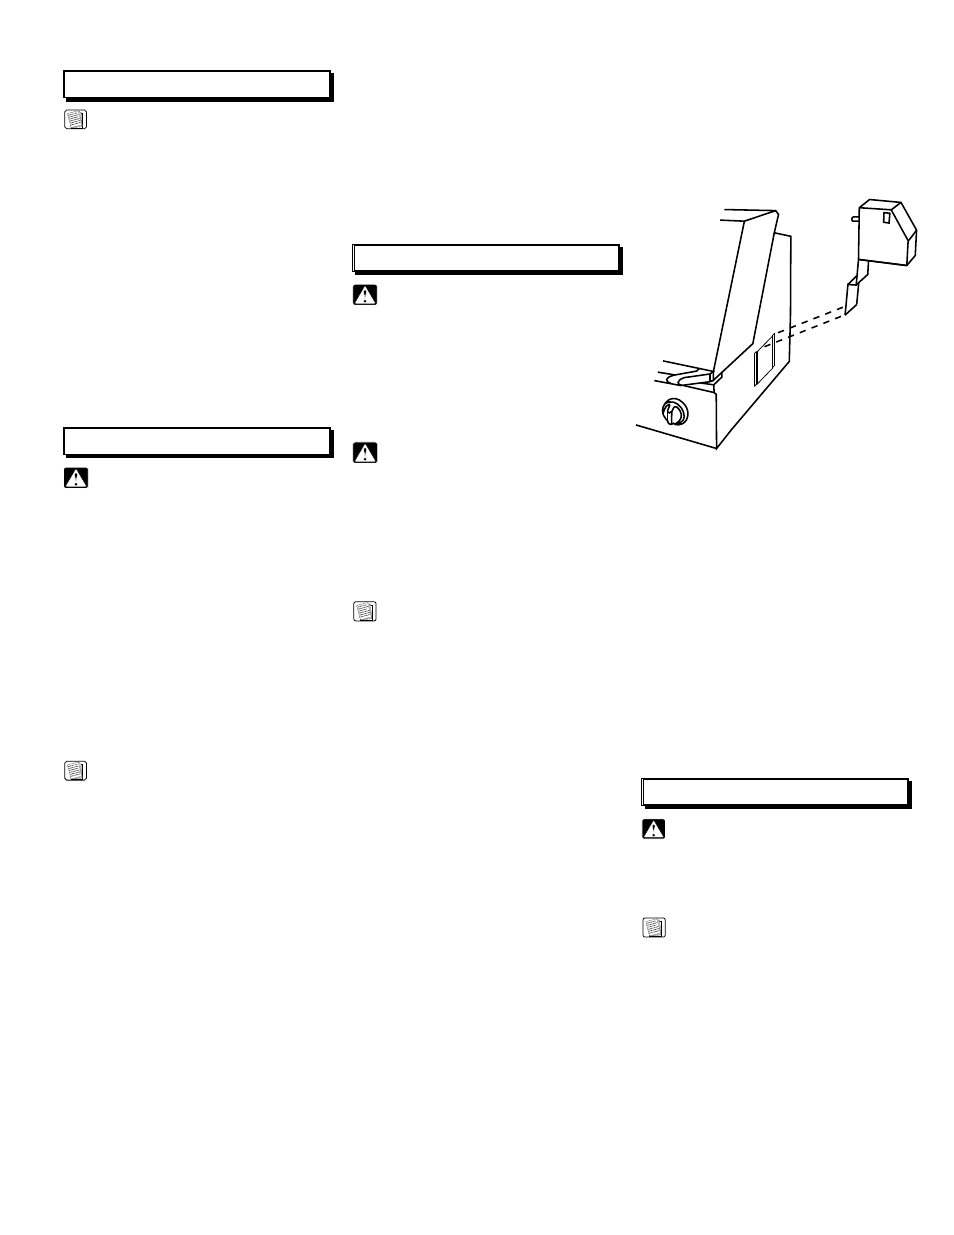
•
Plug the motor power cord into 120
VAC grounded receptacle. Keep the
cord away from all heated surfaces.
•
Load your menu items on the
rotisserie rod.
•
Insert one side of the loaded
rotisserie rod into the rod drive hole
on the side rotisserie motor. Put the
other side of the rod on the roller
bearings on the left wall .
•
Double check all rotisserie forks
and locking screws for tightness to
assure items will not move during
rotation.
•
Turn on the motor and observe
several rotations to confirm the
food is stable, then close the
canopy completely and you are
cooking.