Dacor OBSB162 User Manual
Page 6
4
Manual Lighting
WARNINGS:
FOR YOUR SAFETY FOLLOW THESE STEPS
BEFORE ATTEMPTING A MANUAL LIGHTING
PROCESS:
1. Turn all control knobs to OFF position.
2. Raise the canopy to its full open
position.
NOTES:
1. Remove all of the grills to access the
heat control channels.
2. Find the hole in the front of the heat
control channel located directly behind
the front control panel.
3. Use the match holder provided or a long
stem match to light the grill burners
manually.
4. Push in on the control knob and turn
counter-clockwise while inserting the
burning match into the access hole in
the heat control channel. This should
immediately result in ignition. If you do
not experience immediate ignition, turn
the control back to the off position.
5. After waiting for 2 to 3 minutes, begin
the process with step 4.
6. If you cannot achieve ignition after two
attempts, turn off all gas to the product
and immediately call your authorized
Dacor
Customer Service Team for a
service call.
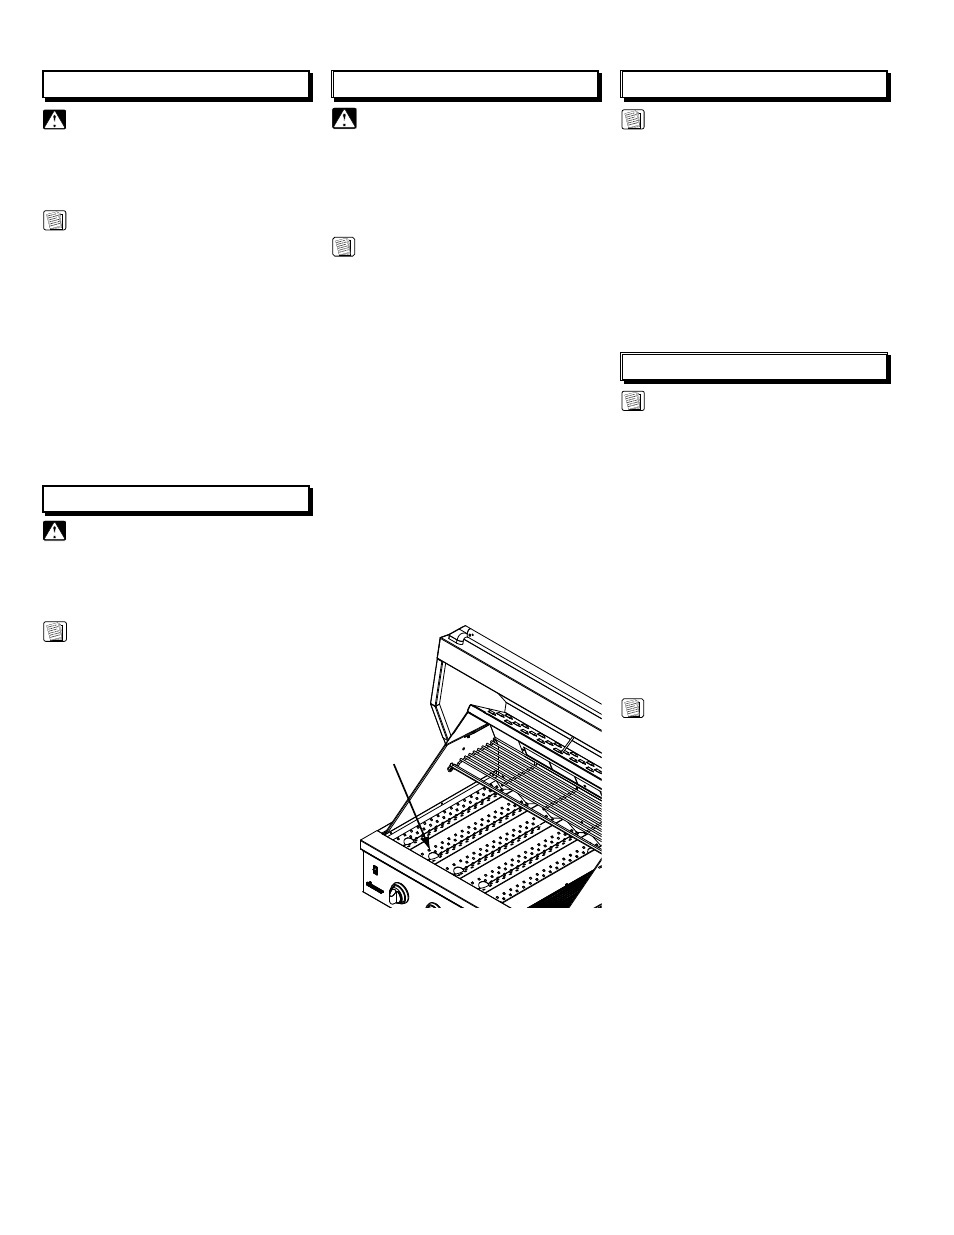
Access Hole for
Manual Lighting
Access Hole for Manual Lighting
Preheating Instructions
NOTE:
When preheating, set burners on high.
Following preheat, adjust burners to desired
temperature setting.
In order for the U- burners and burner box to
remain clean, the gas burners and the flame
spreaders have to be hot enough to vaporize
fats/oils/marinades as they drip upon them.
Without a proper preheat, these materials will
collect on both the flame spreader and the
burner tubes resulting in partial or total loss of
ignition or a decrease in burner performance.
Always light every burner to generate maximum
heat output and to assure even heat distribution.
Using only one or two burners can eventually
result in a buildup of unwanted material and
could affect performance.
NOTE:
In colder climates the infrared burner may
have to be used in order to achieve the
preheat temperature.
Regardless of what you are barbecuing, use
every burner. This assures even heat distribution
and also improves grease/fat management.
Using only one or two burners will eventually
result in an unwanted buildup of material that
might inhibit reliable performance.
After using the barbecue, allow it to continue
heating an additional five minutes. This allows
materials to move to the grease tray and away
from the burner area. This assures clean
burners and a healthy ignition system.
Canopy Mounted Temp. Gauge
NOTES:
1. Your Dacor
®
grill is equipped with a
canopy mounted thermometer to assist
you in various grill functions.
•
Preheating is an important part
of proper grilling – preheat to
approximately 225 degrees.
•
Smoking foods – heat to a
temperature range from 225 to 300
degrees.
•
Grilling all types of foods – vary
temperatures as needed from 225 to
500 degrees.
2. We recommend these temperatures as
approximations.
Lighting Liquid Propane Grills
WARNING:
Open canopy before attempting to light the
appliance. Failure to open the canopy could
allow gas to accumulate which could cause
an explosion.
NOTES:
1. Reference your installation instructions
for proper LP gas line connections to
the Dacor
®
regulator and the “Main tank
valve”.
2. Once the tank is properly installed:
•
Open the canopy to full open
position.
•
Turn on the main tank valve.
•
Light one grill burner at a time by
pressing in on the control knob
and turning it counter clockwise
until you hear the clicking ignition
sound. Your burner should ignite
within 4 to 10 seconds.
•
Repeat the last step with all control
locations.
Lighting Natural Gas Grills
WARNING:
Open canopy before attempting to light the
appliance. Failure to open the canopy could
allow gas to accumulate which could cause
an explosion.
NOTES:
1. Reference your installation instructions
for proper natural gas line connections
to the Dacor regulator.
2. Once you have confirmed that the
electrical and gas are properly installed,
begin the following processes:
•
Open the canopy to full open
position.
•
Light one grill burner at a time by
pressing in on the control knob
and turning it counter clockwise
until you hear the clicking ignition
sound. Your burner should ignite
within 4 to 10 seconds.
•
Repeat the last step with all control
locations.
•
If ignition does not immediately
take place, turn the burner valve
handle off, wait 5 minutes, and
repeat the lighting procedure.