Top fr o n t, Assembly step 1 burner chamber installation, Cooking instructions – Weston Outdoor Propane Vertical Smokers User Manual
Page 5: Warning
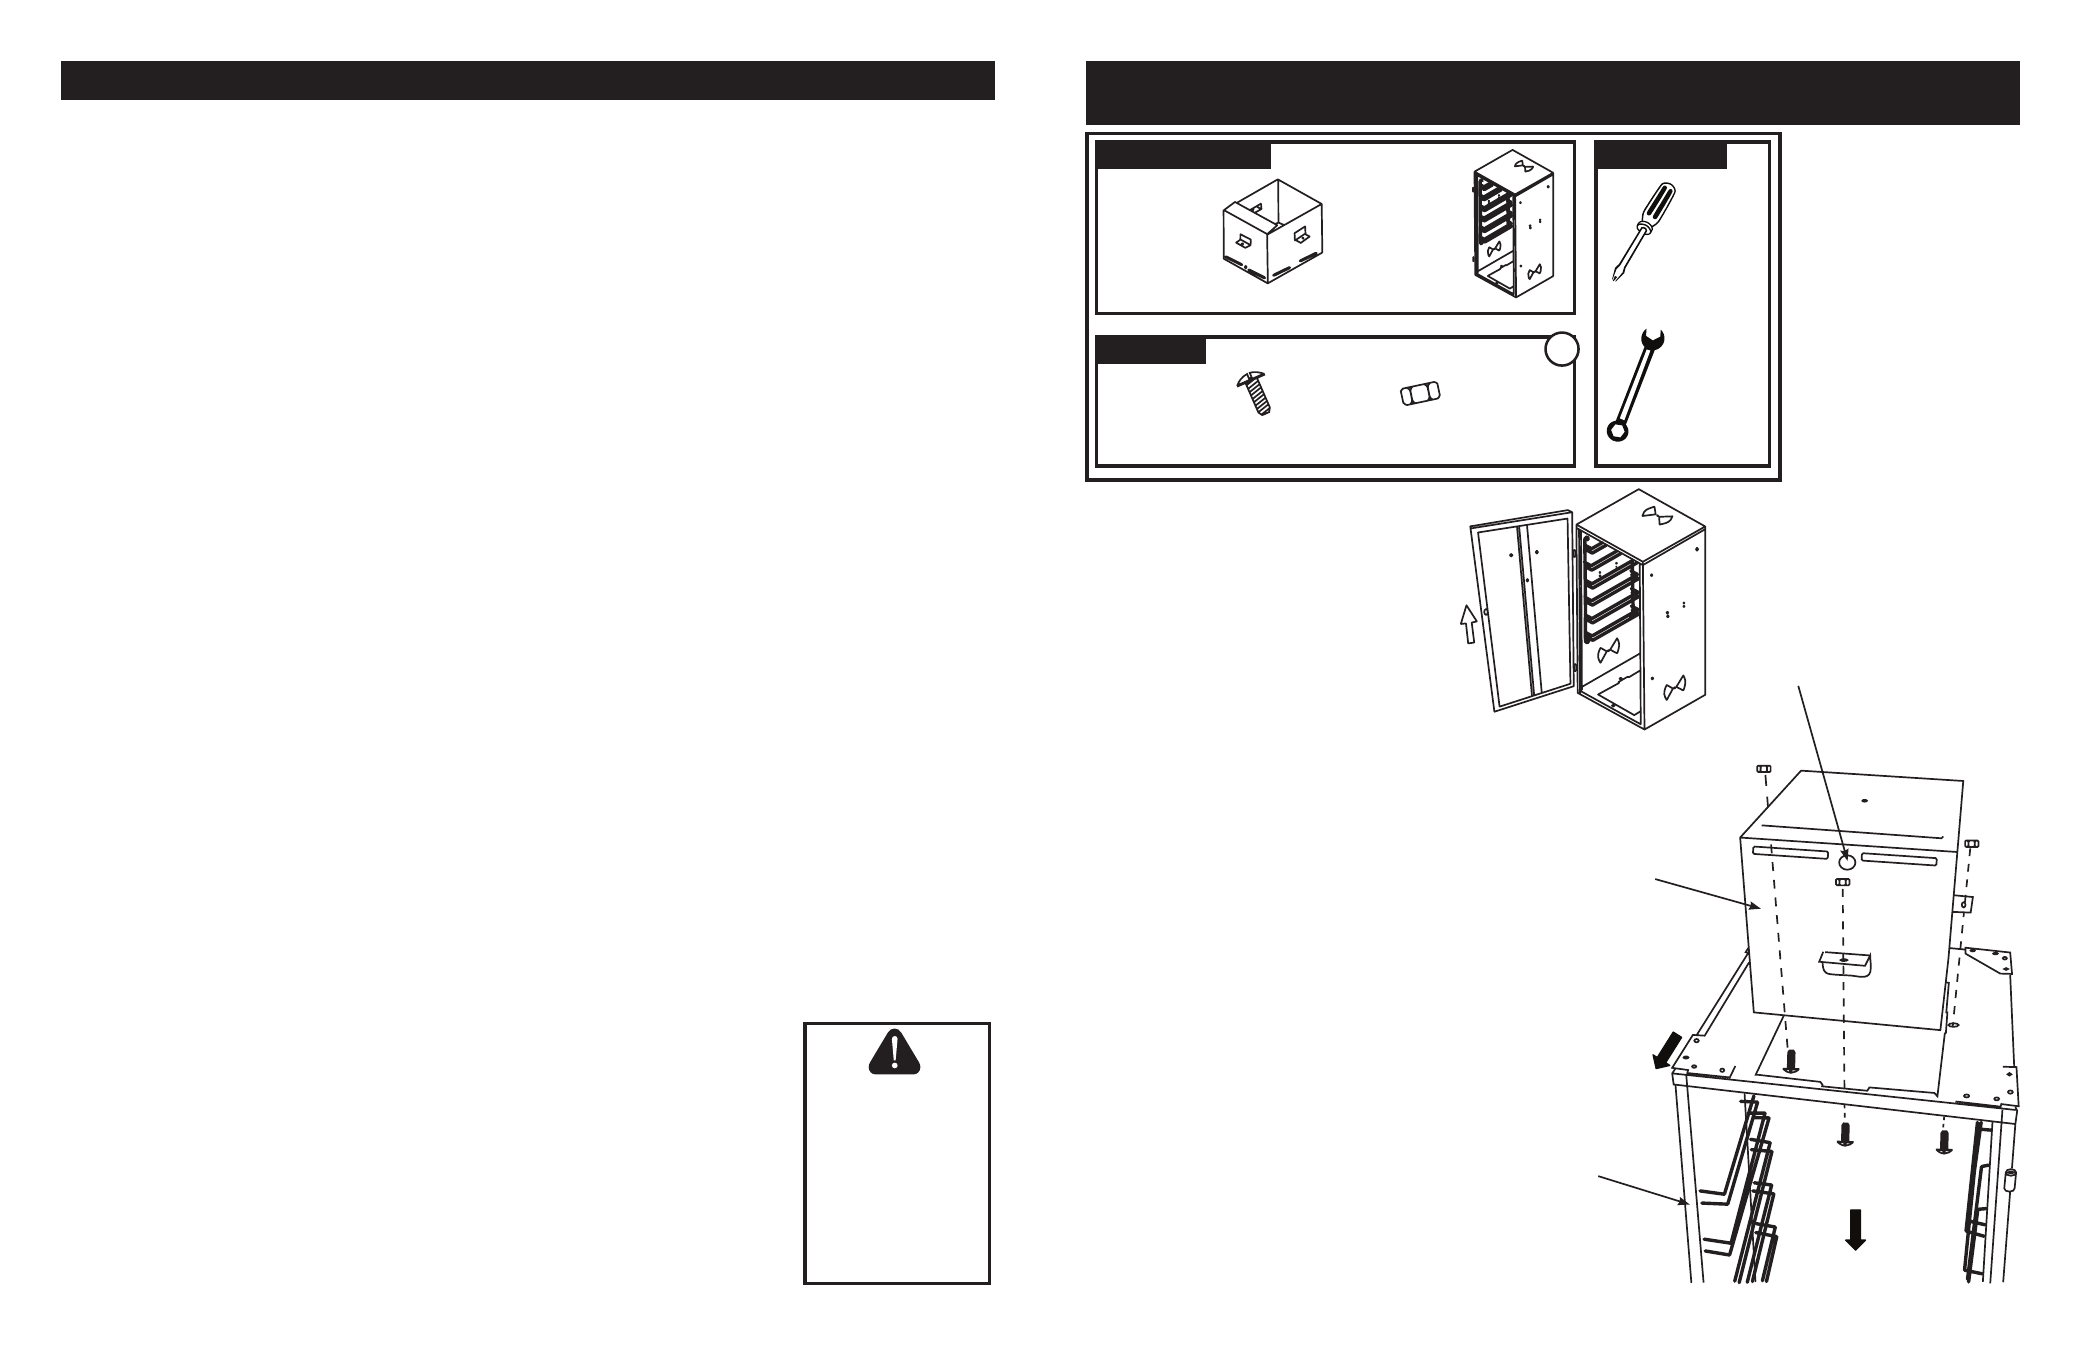
ASSEMBLY STEP 1
BURNER CHAMBER INSTALLATION
A1
LOCATE THESE PARTS
HARDWARE
TOOLS NEEDED
READ ALL OF THE INSTRUCTIONS
THOROUGHLY, PRIOR TO ASSEMBLY!
1. With the
Cabinet in the upright position, begin
by removing the
Door Panel from the Cabinet
Assembly by lifting it from the hinges. Set the
Door Panel aside.
FIGURE 1
2. Set the
Cabinet Assembly top side down. To
prevent scratching or damaging your smoker,
set the
Cabinet on a padded surface such as
cardboard or carpet. The top of the Cabinet
has the vent holes; the bottom has mounting
holes for the
Legs.
3. Insert the
Burner Chamber Assembly upside
down through the bottom of the
Cabinet as
shown.
FIGURE 2
Be sure the front mounting
tab and
Venturi Tube opening is facing the
front of the
Cabinet.
4. Line up the bolt holes and insert the
Bolts from
the inside of the
Cabinet as shown. Loosely
thread on the
Nuts to hold the assembly in
place. At this time, DO NOT tighten the
Bolts
completely.
FIGURE 2
FIGURE 1
FIGURE 2
HARDWARE BAG
BURNER
CHAMBER
ASSEMBLY
CABINET
ASSEMBLY
PHILLIPS
HEAD
SCREWDRIVER
7/16”
WRENCH
BURNER
CHAMBER
ASSEMBLY
CABINET
ASSEMBLY
VENTURI
TUBE
OPENING
COOKING INSTRUCTIONS
IMPORTANT: Before each use, clean and inspect the hose and the connection to the LP cylinder. If there is evidence of abrasion, wear,
cuts or leaks, the hose must be replaced before the
Smoker is used. Refer to the “CHECK FOR GAS LEAK” instructions in the LP tank
connection portion of this manual.
1. Fill the
Smoking Box / Wood Chip Box with flavored wood chips and place the Wood Chip Box inside the Smoker as instructed in the
assembly section of this manual.
2. Place the
Water Bowl inside the Smoker in the lowest rack position as explained in the “ASSEMBLY STEP 8” section of this
manual. Carefully fill the
Water Bowl with water or marinade up to 1 inch below the rim. A full bowl will last for approximately 2-3
hours. Do not overfill or allow water to overflow from the
Water Bowl.
3. Insert or adjust the
Cooking Racks into the desired rack positions. For better access to the food with tongs or spatulas, make sure
the
Racks run from front to back as explained in the “ASSEMBLY STEP 8” section of this manual.
4. You are now ready to light the
Burner. Refer to “LIGHTING PROCEDURES” In this manual. The heat from the Burner will allow the
wood chips to burn, causing the flavoring smoke to accumulate. Adjust the
Dampers to control the heat.
5. Place the food on the
Cooking Racks in a single layer with space between each piece. This will allow smoke and hot moisture to
circulate evenly around all the food pieces.
6. Smoking for 2 to 3 hours at the ideal constant cooking temperature of 225°F to 250°F will get the best results. This temperature is
according to the
Heat Indicator mounted on the front of the Smoker. For more tender and heavily smoked meat, a lower
temperature may be preferred. If time is critical, a higher temperature range is recommended.
7. Check water level periodically and add water if low. Never allow the water to completely evaporate. Check the water level at least
every 2 hours or as necessary. For best results and to retain heat, avoid opening the
Door of the Smoker while in use. When the
Door must be opened, only open it briefly. The Smoker will quickly resume cooking temperature after the Door is closed.
8. Always use a meat probe thermometer (not included) to ensure food is fully cooked before removing it from the
Smoker.
-5-
-16-
3 BOLTS
3 NUTS
TOP
FR
O
N
T
Be sure to follow ALL SAFETY
WARNINGS and precautions
that are contained in this
instruction manual before
using this Smoker!
NEVER leave this appliance
unattended!
The Smoker becomes
EXTREMELY HOT!
When the Smoker is not in use,
the gas MUST BE TURNED
OFF at the supply cylinder.
WARNING!