Phase 1 phase 2 phase 3 grindstone – Sioux Tools ST2L1410 User Manual
Page 3
3
7. During tool operation, it is normal for the tool to become warm. This does not indicate a defect.
8. Apply proper pressure on the surface, if necessary.
9. Always wear recommended protection and keep the work area clean when operating the tool.
Brush Belts and Applications
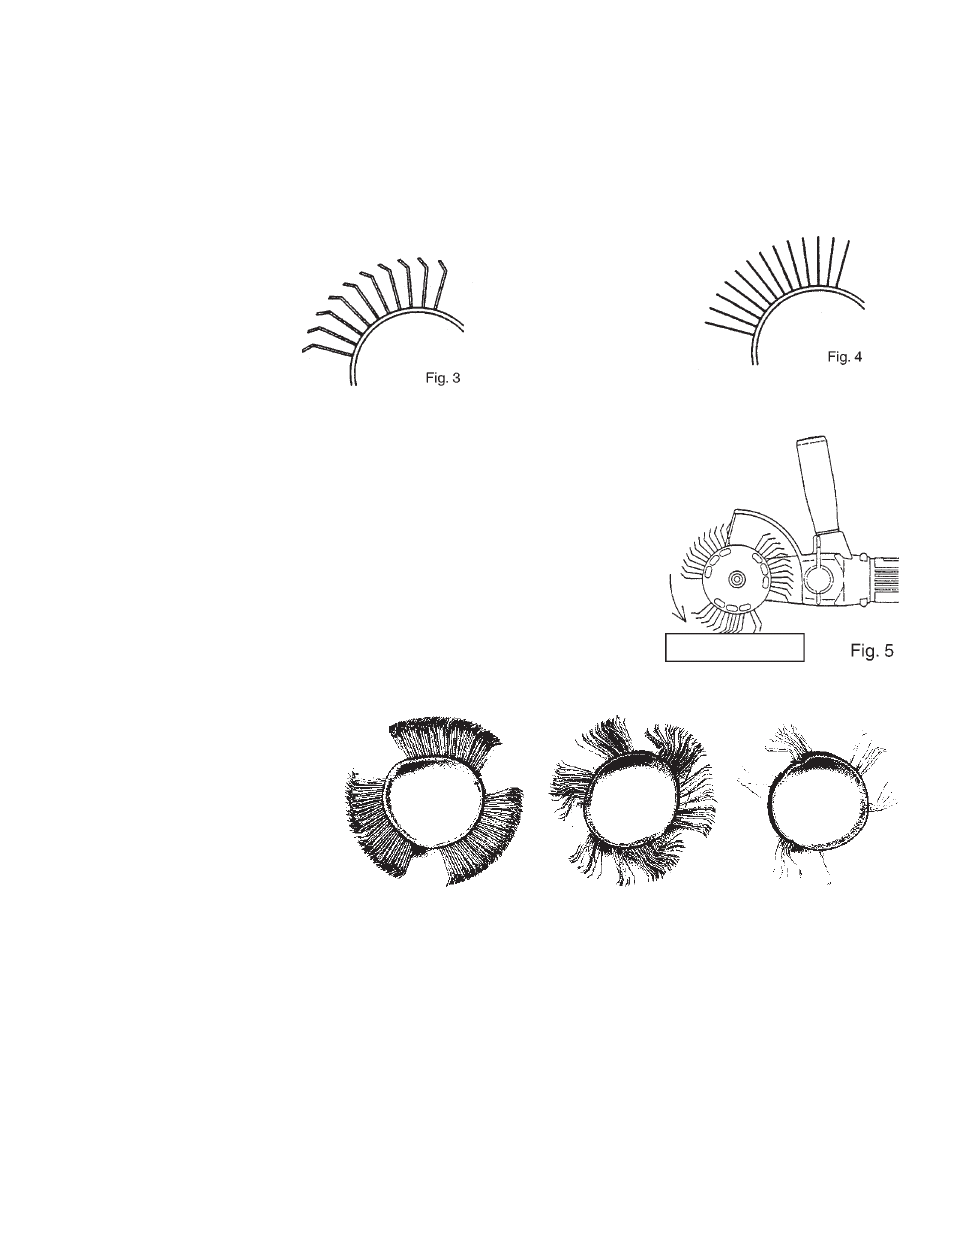
Black Belt
0.7 mm thickness knee style brush which has sharpened and
hardened tips.
Use this brush in scratching direction. The surface receives a
coarse sandblast effect.
Application
- Thick sealer removal
- Undercoat removal
- Asphaltic sheet removal
Resharpening of the Bristles
After using the abrasive belt for a certain period, the tips of the bristles get round and brushing
effect is reduced. By resharpening the bristles, the belt recovers it’s performance.
For Black belts:
Assemble the belt upside down to provide reverse spinning to the belt. Spin the belt on the
grinding stone for 15 to 30 seconds applying slight pressure. See Fig. 5. Then assemble the
belt in the right direction again.
For Green belt:
Just re-assemble the belt in same manner as removed.
Green Belt
0.5 mm thickness straight brush which has hardened tips.
Use this brush bi-directionally. No sandblast effect.
Application
- Thin sealer removal
- Rust removal
- Paint removal
Correct use of the Tool
Phase 1:
The belt works at full efficiency: Even little
pressure on the belt will remove a lot of
material. The needles are sharp and
straight. They don’t break off.
Phase 2:
The sharp needle ends have become dull.
The pressure on the belt was increased to
try to compensate for the decrease of
efficiency of the slowly dulling needles.
This caused the needles to be bent
backwards and some of the needles fell
out. The belt is used up and the needles
must be resharpened which sill straighten
them out. For resharpening, turn the belt
around and run the needles against concrete or sand paper with 60 grit. After 3-4 times resharpening, the belt is used up and needs to
be replaced.
Phase 3:
If the belt is not resharpened or replaced as mentioned in phase 2 and the pressure on the belt is increased, the condition as shown
will appear. Most needles have fallen out and the remaining ones are sharply bent to the back.
Explanation:
A traditional sanding disc is used up in a constant curve and you see how much is has been used and how much life is left in it.
Opposite to this is phase 1 in which the belt works with no usage visible for a long time. The change to phase 2 and quickly to phase 3
comes sudden and is considered normal.
Our Tip:
If efficiency of the belt drops, look at the belt and if phase 2 starts change the belt. Increasing the pressure as well as incorrect use are
reducing the life of the belt in phase 1. Again we want to point out that the life of phase 1 can be extended with resharpening as
mentioned in phase 2.
Phase 1
Phase 2
Phase 3
GRINDSTONE