ParkZone PKZ5880 User Manual
Page 12
EN
Range Check your Radio System
After fi nal assembly, range check the radio system with the ICON A5. Refer to
your specifi c transmitter instruction manual for range test information.
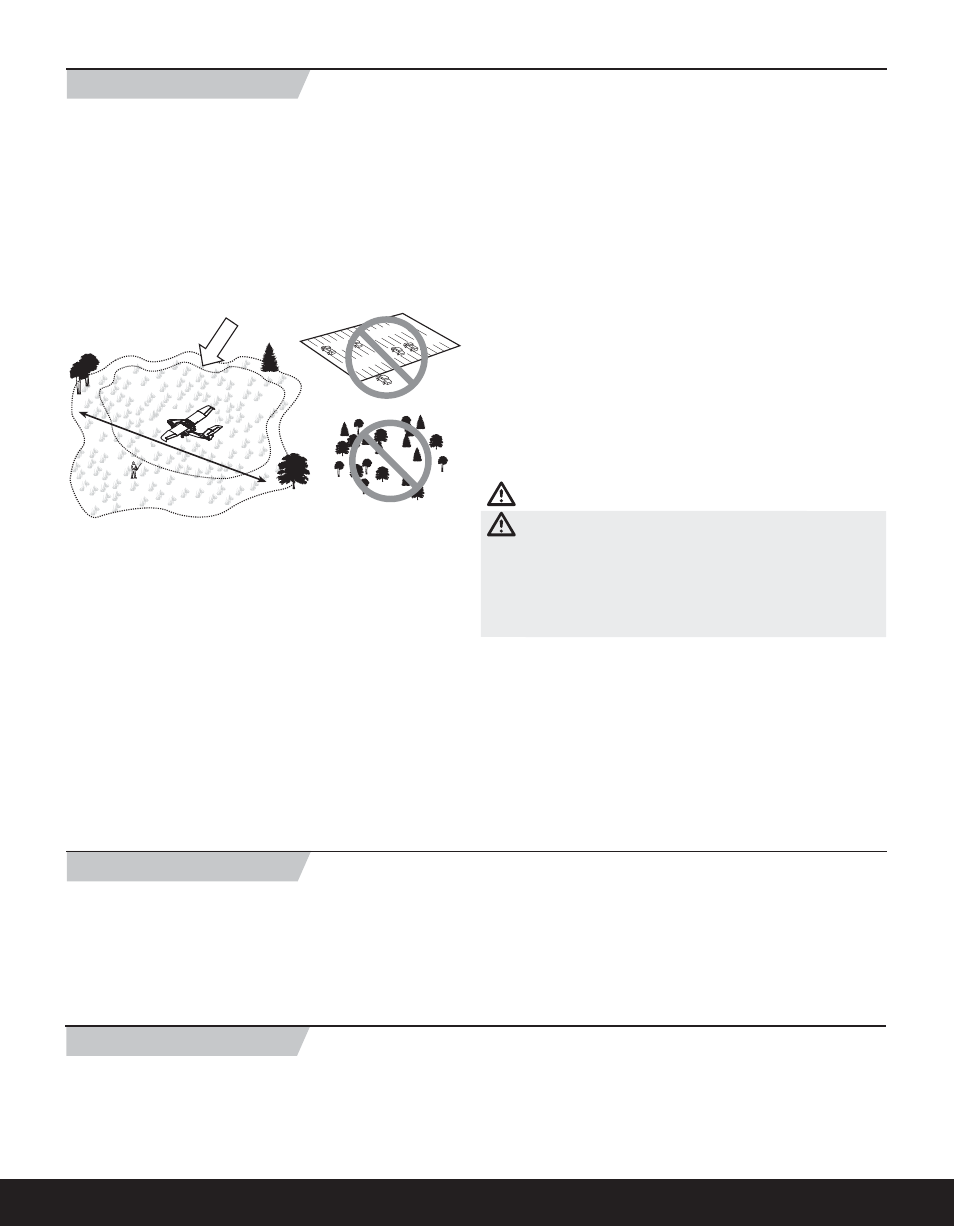
Flying
Always choose a wide-open space for fl ying your ParkZone ICON A5. It is ideal
that you fl y at a sanctioned fl ying fi eld. If you are not fl ying at an approved site,
always avoid fl ying near houses, trees, wires and buildings. You should also
be careful to avoid fl ying in areas where there are many people, such as busy
parks, schoolyards or soccer fi elds. Consult local laws and ordinances before
choosing a location to fl y your aircraft.
Takeoff
Add power slowly, and steer with the rudder stick. Hold a small amount
(1/4–1/3) of up elevator stick and when the airplane is ready to fl y it will lift
off the ground. Avoid forcing the airplane into the air.
Landing
For your fi rst fl ights, set your transmitter timer or a stopwatch to 7 minutes.
Adjust your timer for longer or shorter fl ights once you have fl own the model.
When the motor pulses, land the aircraft immediately and recharge the
fl ight battery. It is not recommended to fl y the battery to LVC.
To land the ICON A5, fl y the airplane to a couple of feet off the ground at about
1/4 throttle. Reduce power to idle and increase the up elevator to fl are the
model. Try to avoid touching the nose wheel fi rst as this will cause a bounce.
Once the airplane touches down, reduce back pressure on the elevator stick to
prevent the plane from becoming airborne again.
Note: It is recommended to land and takeoff on high rates.
Takeoff and Landing on Water
To take off on water, steer with the rudder and slowly increase throttle. Keep
the wings level on the takeoff. Hold a small amount (1/4–1/3) of up elevator
and the airplane will lift off once fl ying speed is reached. Avoid rapidly increas-
ing the throttle as the torque from the motor may cause the ICON A5 to roll to
the left when on water.
TIP: If the ICON A5 starts skipping during takeoff, move the battery so it sits in
the rear part of the battery cavity, or use more up elevator during the
takeoff run.
To land the ICON A5 on water, fl y the airplane to a couple of feet off the surface
of the water. Reduce throttle and add up elevator to fl are the model.
When taxiing, you must use some throttle to give propeller blast over the
rudder to steer, as there is no water rudder.
Avoid taxiing cross wind if there is a breeze, as this can cause the ICON A5 to
fl ip over if the wind gets under the upwind wing. Taxi at 45 degrees into the
direction of the wind (not directly into the wind) and use aileron to hold the
upwind wing down.
The ICON A5 will try to face into the wind when taxiing. The wind will naturally
turn the airplane to face into the wind.
CAUTION: Never go alone to get a downed model in the water.
CAUTION: If at any time water splashes into the fuselage and/or after
fl ying from water, bring the airplane to shore, remove the canopy and
immediately remove any water that may have gotten into the fuselage. Leave
the canopy off overnight to let the inside dry out and to prevent moisture
damage to the electronic components. Failure to do so could cause the
electronic components to fail, which could result in a crash, causing property
damage and injury.
NOTICE: When fi nished fl ying, never keep the airplane in the sun. Do not store
the aircraft in a hot, enclosed area such as a car. Doing so can damage
the foam.
Repairs
Thanks to the Z-Foam
™
construction of the ICON A5, repairs to the foam can
be made using virtually any adhesive (hot glue, regular CA (cyanocrylate ad-
hesive), epoxy, etc). When parts are not repairable, see the Replacement Parts
List for ordering by item number.
NOTICE: Use of CA accelerant on your model can damage paint. DO NOT
handle model until accelerant fully dries.
1. Remove and inspect contents.
2. Charge fl ight battery.
3. Read this instruction manual thoroughly.
4. Fully assemble model.
5. Install the fl ight battery in the aircraft (once it has been fully charged).
6. Bind aircraft to your transmitter.
7. Make sure linkages move freely.
8. Perform the Control Direction Test with the transmitter.
9. Adjust fl ight controls and transmitter.
10. Perform a radio system Range Check.
11. Find a safe and open area.
12. Plan fl ight for fl ying fi eld conditions.
1. Disconnect fl ight battery from ESC (Required for safety and battery life).
2. Power off transmitter.
3. Remove fl ight battery from aircraft.
4. Recharge fl ight battery.
5. Repair or replace all damaged parts.
6. Store fl ight battery apart from aircraft and monitor the battery charge.
7. Make note of fl ight conditions and fl ight plan results,
planning for future fl ights.
8. If fl ying off water, remove the canopy after fl ying and make sure inside the
fuselage is dry.
Fly in this area
(upwind of pilot)
Stand here
600
feet (182.8 m)
Flying Tips and Repairs
First Flight Preparation
Maintenance After Flying
12