7 color series transmission temperature gauge – GlowShift Diesel Set- 60 PSI Boost, Pyrometer EGT, Transmission Temp User Manual
Page 3
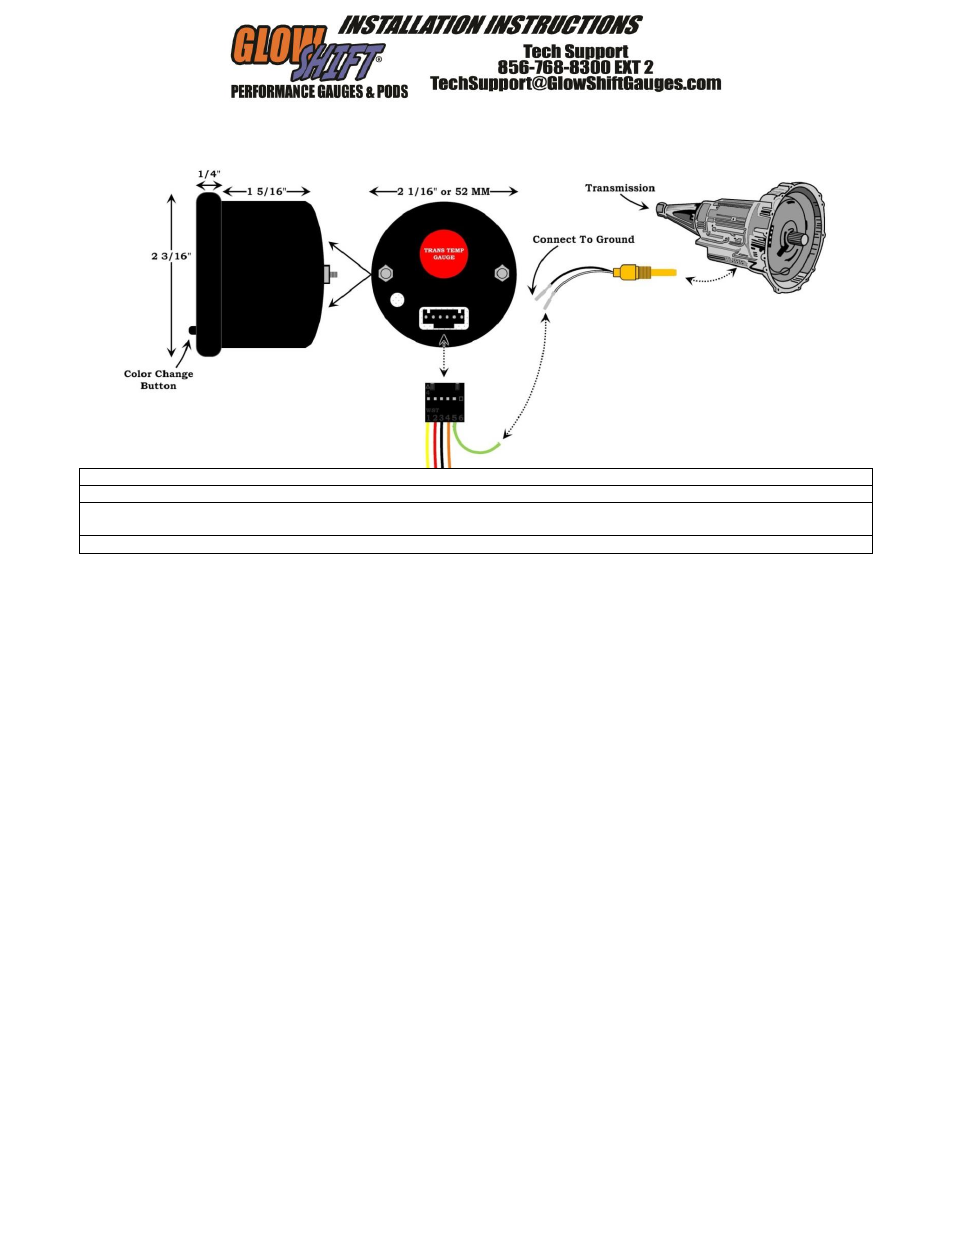
7 Color Series Transmission Temperature Gauge
For Product Numbers: GS-C712, GS-T712 and GS-W712
Wire Color Code
Yellow: 12v Constant Source (+) (un-switched)
Orange: 12v Switched Headlamp Source (+) (optional)
Red: 12v Ignition Source (+) (switched)
Green:
Connects to the White Wire on the
Temperature Sensor
Black: Vehicle Ground ( - )
1. Disconnect the vehicle's negative battery cable.
Temperature Sensor Installation
2. There are two common types of transmission temperature sensor
installations:
Transmission Test Port: Most vehicle transmissions come
equipped with a test port location. This may be located on
either the driver or passenger sides of the transmission near the
transmission oil pan. The bolt in this port should be removed
and the sensor fitted in its place. Confirm port and thread size
with your vehicle dealer or owner’s manual. A test port
extender will be required when installing this sensor into
Dodge Ram model years 94-07.5
Stock Sensor Location: Use a T-fitting (optional) to T off
your stock sensor location. This will allow you to keep your
stock sensor installed, while also allowing you to install an
aftermarket temperature sensor.
Note: Some vehicles may require additional adapters to complete the
installation of this sensor.
Connecting the Power Wire Harness
3. To make the wiring of your gauges easier you can purchase an
expandable circuit. This component easily fits into your fuse panel and
provides an additional fused power wire for accessories such as gauges.
The expandable circuit is available for purchase at www.GlowShift.com.
4. Connect the green wire from the gauge to the white wire of the
transmission temperature sensor. Then, connect the black wire of the
transmission temperature sensor to any good (unpainted) ground
connection.
Note: For an easier installation GlowShift offers an extended wire
harness that offers 9 feet of sensor wire and 3 feet of power wire so there
is no need to extend the wires yourself.
5. Using automotive grade wiring (18 gauge), connect the
yellow wire to a positive 12 volt constant (un-switched)
source either on the vehicle or in the fuse box.
Note: If you are connecting the yellow wire
directly to the battery, you MUST install a 3 amp
fuse within 6-8 inches of the battery connection.
6. Using automotive grade wiring (18 gauge); connect the red
wire to a positive 12 volt ignition (switched) source. It may
be connected to the fuse panel, an accessory wire, or any
positive 12 volt source that turns on and off with the ignition.
7. Using automotive grade wiring (18 gauge); connect the
black wire to any good (unpainted) ground connection. You
may also route a wire directly to the negative side of the
vehicle’s battery.
8. The Night Time Dimming feature decreases the brightness
of the gauge face by 30%. Connect the orange wire to the 12
volt positive headlamp source. This allows the mode to be
activated when the headlights come on. This step is optional
and will not affect operation of the gauge if it is omitted.
Note: Do not connect the orange wire to a dimmer
wheel. This will cause the gauge lighting to flicker.
9. Reconnect the vehicle's negative battery cable.
If your gauge(s) do not illuminate or do not recall
your last saved color, your switched and un-
switched sources are reversed.
If your gauge(s) only illuminate red then the yellow
wire for constant source is not connected properly.
Be sure all of your wiring is correct to ensure
proper gauge operation.