ENMET AM-5175 User Manual
Page 15
AM-5175
ENMET Corporation
13
5.2.3 Gas Span
It is recommended that the Zero Function be performed first.
Do not perform a calibration unless span gas is applied to sensor. Calibration can be aborted by pressing and holding the
M
ENU
button for 3 – 4 seconds.
Enter the maintenance menu. See Figure 6,
AM-5175
Maintenance Menu flow chart.
1.
Press the
M
ENU
button until Span display.
2.
Press the
S
ELECT
button to perform a Span procedure.
The display will alternate between the calibration gas concentration (Example:
Cal 20
) and a signal level (
PV
).
• To Abort calibration press and Hold
M
ENU
button for 3 – 4 seconds, “Abort?” will appear, press
S
ELECT
button to return
to Span.
• To change calibration gas level to be used, press and Hold
S
ELECT
button for 3 – 4 seconds, use menu button to change
digit and select button to move to next digit.
3.
Attach the associated calibration gas cylinder to the calibration adapter. See Figure 7 calibration adapter.
4.
Open the valve to apply the calibration gas to the sensor.
An auto detect sequence is initiated after 30 seconds, the
AM-5175
will monitor the cal reading for stability.
5.
Watch for the signal level to stabilize. This should take about 1 – 4 minutes.
6.
Once the signal level has stabilized,
If the Span is successful, Cal OK appears momentarily, then will advance to Alarm1 menu.
To exit cal, press
M
ENU
button until Exit appears and press
S
ELECT
button
If the sensor is outside of acceptable parameters, Bad Span is displayed.
If the sensor did not respond, an incompatible span gas was applied and the sensor did not respond at all,
Same mV is displayed then will return to Span.
If calibration is not successful, it is suggested that calibration be attempted again in 30-60 minutes.
If the sensor will not calibrate See Section 5.3 for sensor replacement.
7.
Remove the calibration gas.
8.
Press the
M
ENU
button to advance to Exit menu or desired menu.
N
OTE
:
Software revision may cause variations of display output.
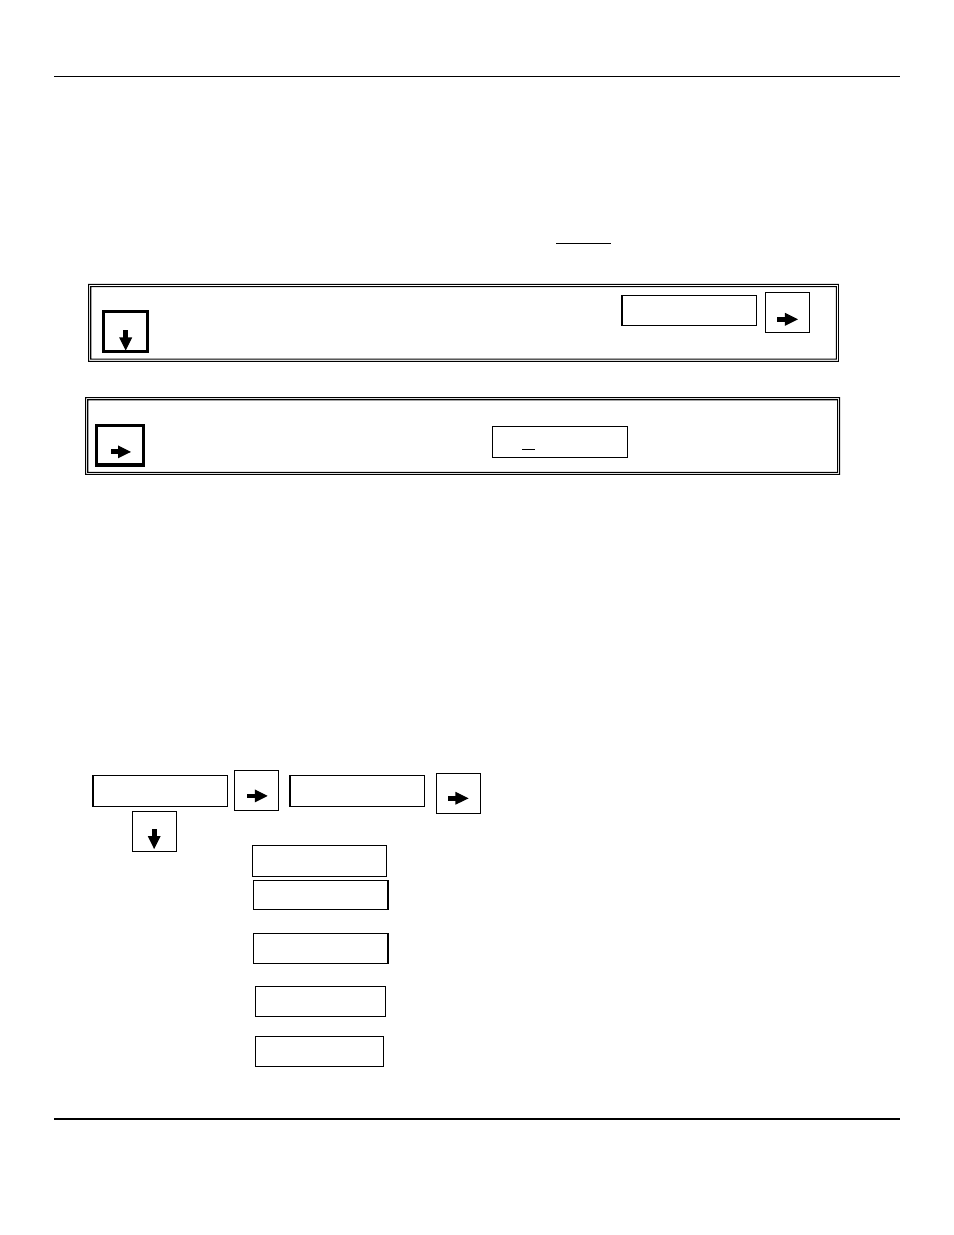
Example of Calibration Display:
Menu
PV:
0
20
Apply Cal Gas until signal value becomes stable (about 1 to 4
minutes) See Figure 7 Calibration Adapter
When cal signal is stable AM-5175 will automatically update:
If cal is good display will indicate OK or Same and advance to
Alarm1
If cal is not within preset “range” display will indicate Bad Sens
or Same mV The AM-5175 will return to the Span Menu
To exit press Menu button until Exit appears and press Select
Cal OK
Span
PV:
0
Same mV
Bad Sens
OR
Select
Select
Note:
To change calibration gas level. Press and Hold the Select button to change the Calibration Gas Level
-Use the Menu button to change digits
-Use the Select button to move to next digit
Select
20
Note:
To abort calibration. Press and Hold the Menu button to abort Calibration
When “Abort?” appears press Select button to advance to desired menu
Abort?
Select
Menu