Broiler hearth setup – EmberGlo Models 41 User Manual
Page 3
EmberGlo
A Division of Midco International Inc
8448 24
3
Grill Setup
Barbriq and
Briquette Setup
Grate Support
Bricks Setup
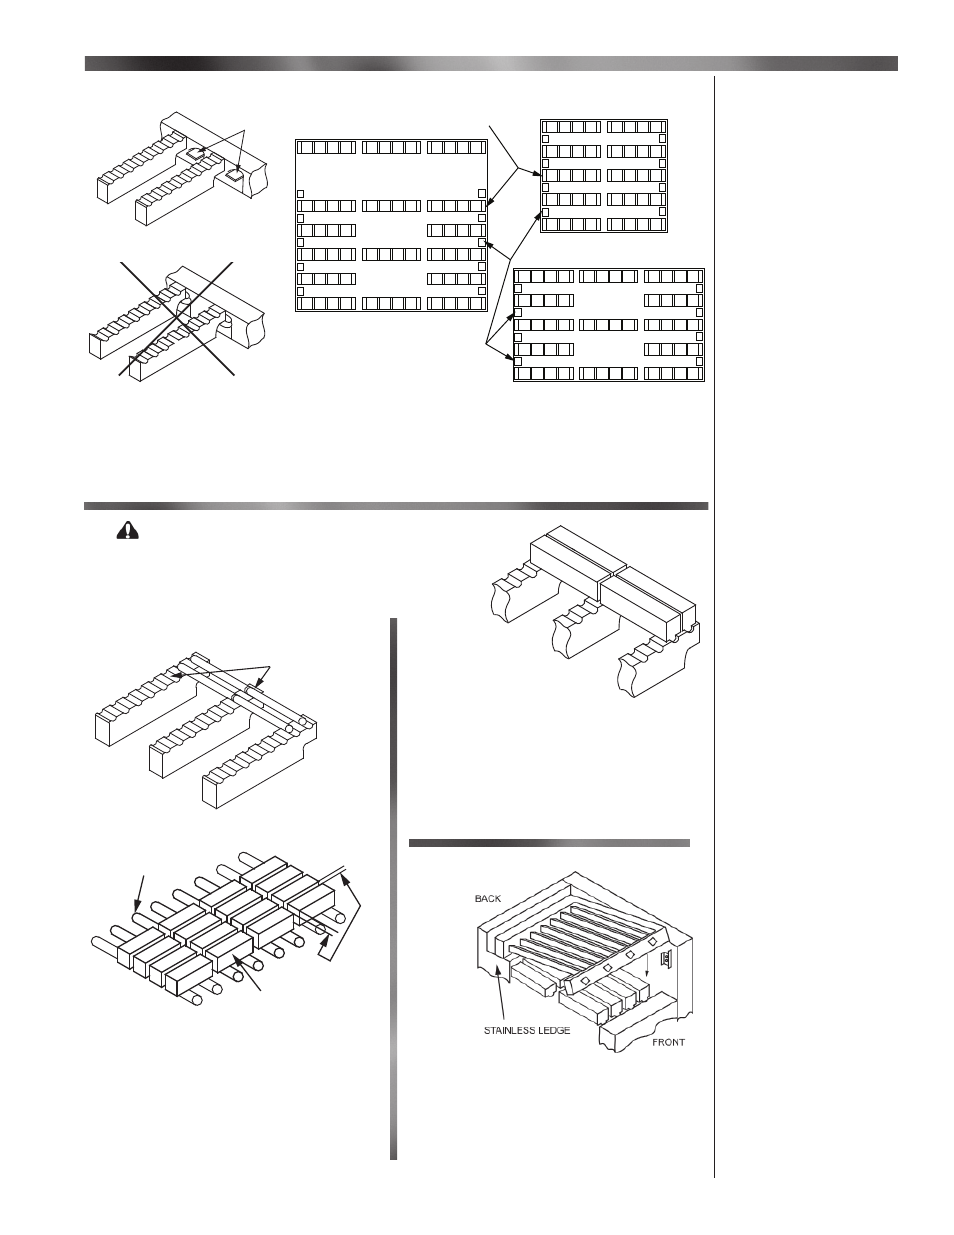
Models 25, 31 and 41 - Broiler Hearth Setup
CORRECT
(OPEN END TOWARD BURNER TIP)
Burner Tips
INCORRECT
MODEL 25C, 25F
MODEL 31C, 31F
MODEL 41C, 41F
Burner Tips
Grate Support Bricks
GRATE RODS
BRIQUETTES
1/8" to 1/4"
SPACE
PLACE CERAMIC GRATE
RODS IN GROOVES
IMPORTANT:
Placement of the Grate Support Bricks is identical for either Briquette or Barbriq set-up.
Figure 2
Grate Support Brick Arrangements
Figure 1
Grate Support Brick Placement
Set grate support bricks in fi rebox. Be sure cut-out end of brick is placed midway between each
burner tip - NEVER directly in front of the tips.
CAUTION: When the Char Broiler
is HOT!! never attempt to change location
or remove grates during cooking. Flare-
Up can occur at anytime. Turn off the char
broiler and wait until it cools.
Figure 3
Ceramic Grate Rod
Placement
Figure 5
Ceramic Barbriq
Placement
Figure 4
Briquette Placement
Figure 6
Cooking Grill ( All Models)
Place ceramic Barbriqs in grooves. The
featured design aligns automatically between
each Barbriq. Barbriqs should only cover
grate support brick area of hearth. Barbriqs
are arranged in columns (as shown) end to
end.
Install cooking grill by resting it on stain-
less ledge at rear and then lowering it onto
metal bracket at front.
Set ceramic briquette on grate rods. Be
sure to allow 1/8″ to 1/4″ space between
each briquette. Briquette should only cover
grate rod area of hearth. Briquette arranged
in columns (as shown) or staggered briquette
arrangements are acceptable.
Broiler Hearth Setup